Set Up Replication
Setting up Replication with Hammerspace involves configuring multiple sites, unifying them into a Global File System, and then establishing the Data Orchestration Objectives that govern how files move between them.
Step 1: Prepare the Infrastructure
Before configuring Replication, both sites must be ready and have access to the shared data plane.
-
Deploy and Configure Sites: Deploy the Hammerspace software (Anvils and DSX) at all required geographic locations (SITE A, SITE B, etc.). Ensure each site is fully operational. Reference the Hammerspace Installation and Licensing guide for guidance.
-
Configure Local Storage: Each site requires local file storage, such as a DSX with local block storage or a local NAS export to store data being used on that site. See the Hammerspace Configuration Guide for additional details.
Step 2: Configure a Shared Bucket
A shared object storage system will need to be added to each Hammerspace cluster to act as the shared repository for replicating file data content. Any supported object storage vendor/cloud (AWS S3, GCP GCS, or an on-premises S3-compatible system like MinIO) can be used as the shared bucket. If object storage is not available, then Hammerspace S3 functionality can also be used as the shared bucket.
The shared bucket is used for cross-site data transfers, but not for metadata traffic. A bucket must be added as a shared bucket from all participating sites. When a site is adding the shared bucket, a registration key is added to the bucket to simplify the setup of the Global File System for additional sites. The bucket can also be used for tiering and archiving as well as a general "overflow" bucket in case the local NAS runs out of space.
Only a single bucket is required (although using many is supported) and access to this bucket must be allowed for all Anvil and DSX nodes from all participating sites - access to the bucket can be limited to only the Anvil and DSX nodes as a security best practice.
Hammerspace also supports having multiple shared object stores on each site, which can be beneficial in reducing cross-site data traffic with some workflows. For resilience, having more than one shared object storage volume is recommended.
Note: If you need to configure advanced OSV features such as encryption, compression, and chunking (native mode), only compression is available in the GUI. Encryption and chunking must be configured through CLI or API. Remember to configure these features the same on all sites for the same bucket.
Add a Shared Bucket Using the GUI
1. Navigate to Infrastructure → Storage Systems and click on + Volume for the desired object/cloud storage system. This will bring up the Add Volume wizard.
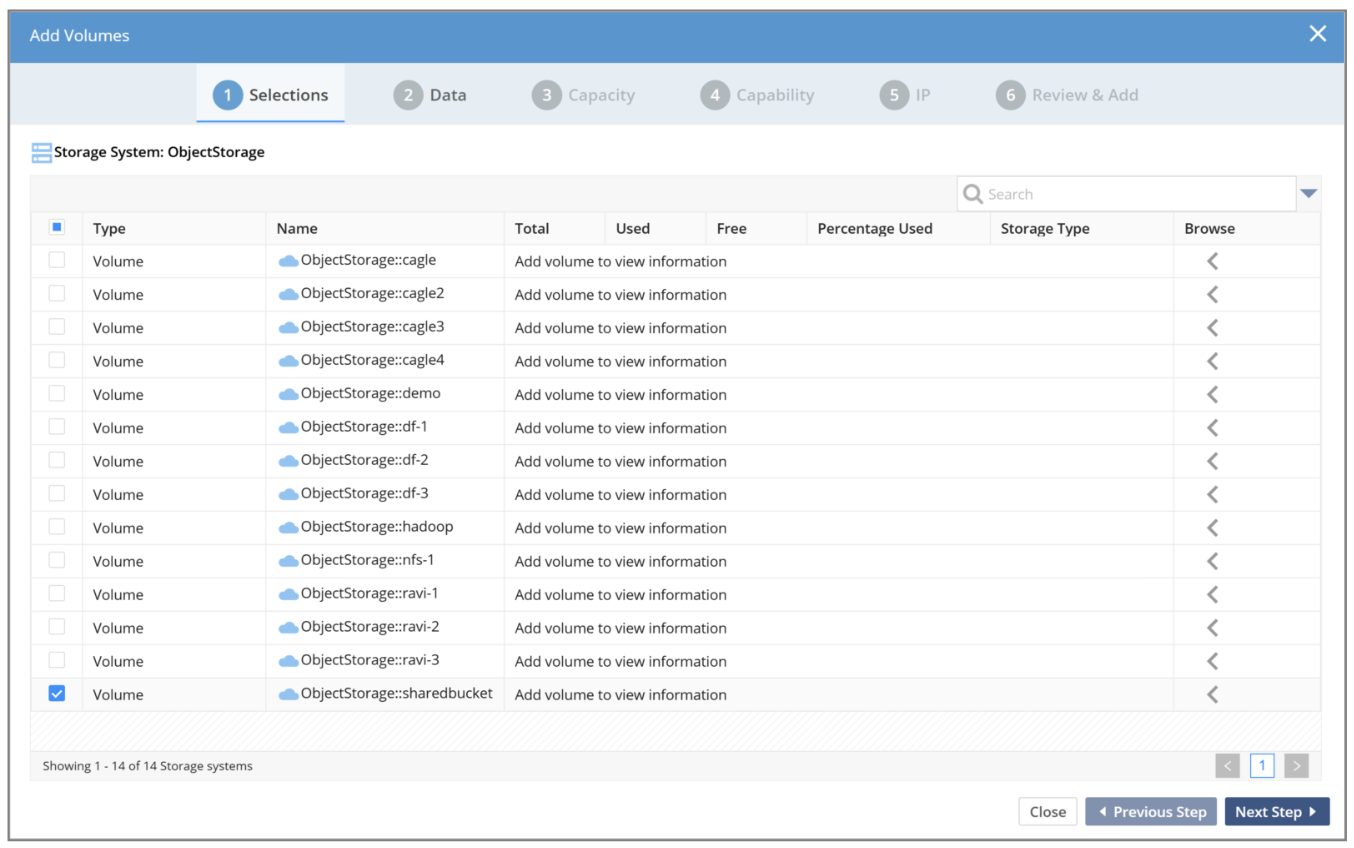
2. For the second, and any additional sites, the GUI will display a red warning icon, indicating that the site is in use by another Anvil. This is expected in a multi-site configuration. To proceed, make sure the Shared Volume checkbox is checked and click Next Step.
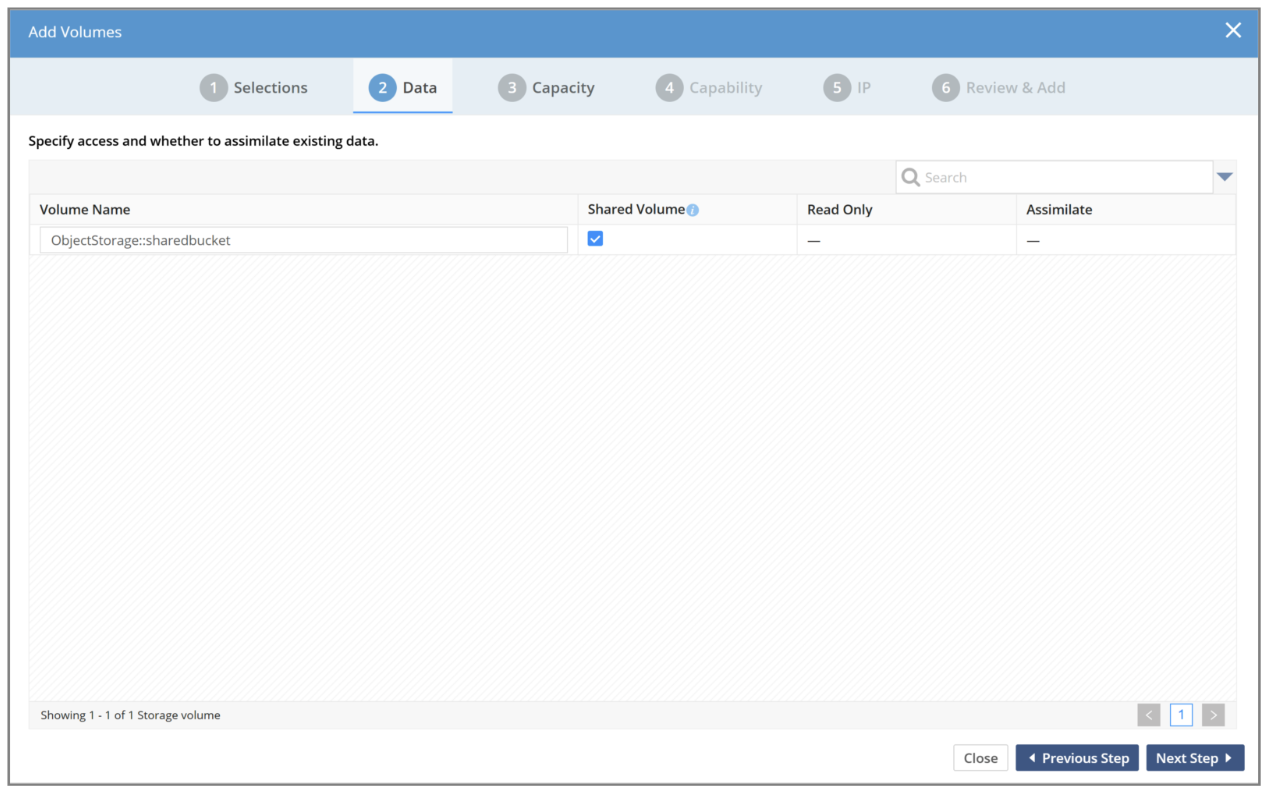
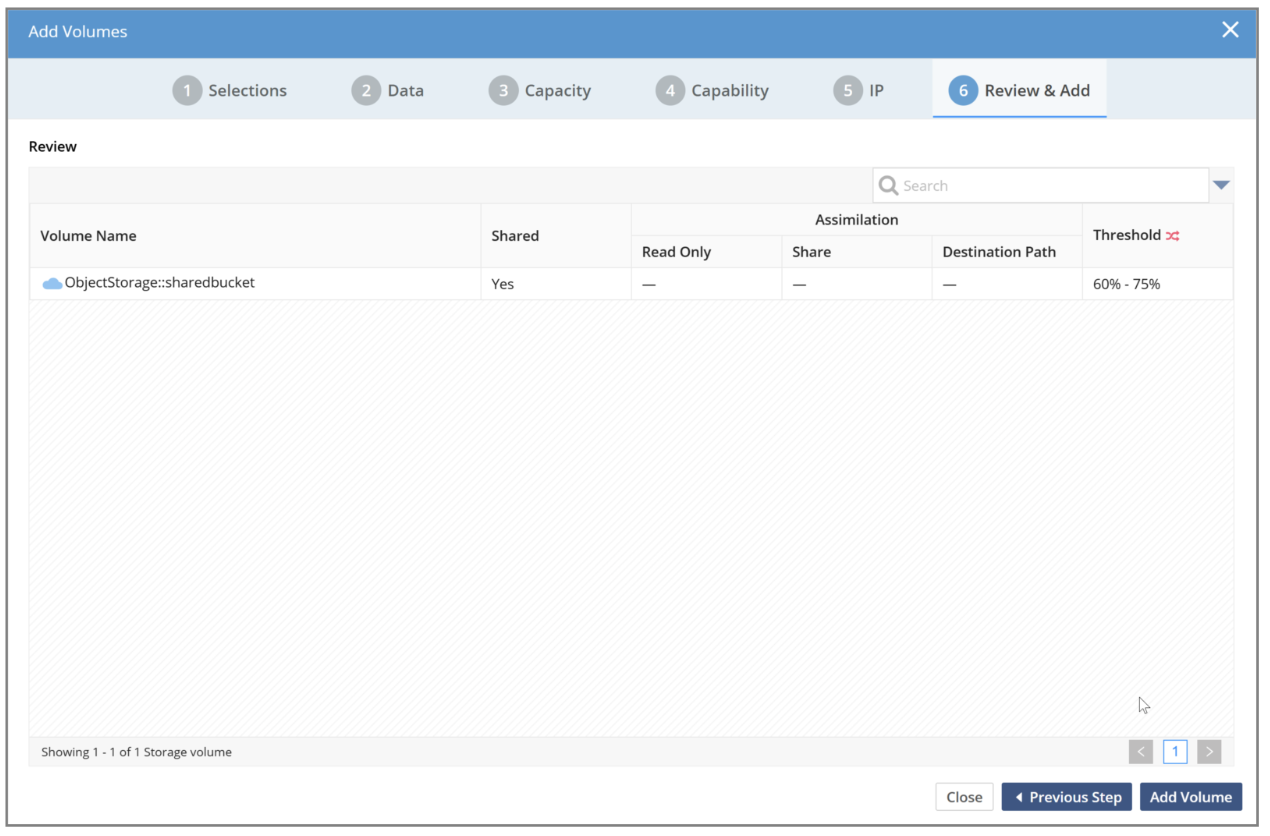
3. Complete the remaining steps and click Add Volume.
Add a Shared Bucket Using the CLI
You can add the --shared option to object-volume-add to indicate that this bucket is a shared resource. If this option is not used when first adding the bucket, then the second and third site will not be able to add the bucket as an object-volume. The option can only be configured when adding an object volume.
To keep the configuration simple, the same Storage System name has been used (ObjectStorage) on all three sites, and the bucket name is sharedbucket. This is not a requirement; each site can have its own names for Storage Systems and Volumes.
Configure the Shared Object Volume using the Admin CLI
*> object-volume-add --shared --node-name ObjectStorage --logical-volume-name sharedbucket*

[NOTE]

ID: 34f9b63a-1e07-47df-a245-1e5d7c152385
Name: ObjectStorage::sharedbucket
Internal ID: 268435473
Logical volume name: sharedbucket
State: OK
<...additional output truncated...>
*> object-volume-add --shared --node-name ObjectStorage --logical-volume-name sharedbucket*
[NOTE]
<Similar output as Site A>Step 3: Create a Global Share and Enable Replication
Create a new share or use an existing share and turn on share-replication, which will bi-directionally replicate all metadata changes from the share to all participating sites.
The initial GFS (metadata replication) setup is done on the site with the source share. Note that the same share name and path being configured for replication cannot exist on the target site. As part of the GFS create flow, the share will be created on the remote SITE and then be immediately populated with a near continuous stream of metadata.
The next step takes an existing share, named "Home," and creates a Global File System between SITE A, SITE B, and SITE C.
Create a Global Share Using the GUI
In the following example scenario, we will create a global share from the Home share using the Management GUI.
1. Navigate to Data and click on the Shares tab.

2. In the row for the Home share, click the Edit (pen) icon under the Actions column to bring up the share-configuration dialog.
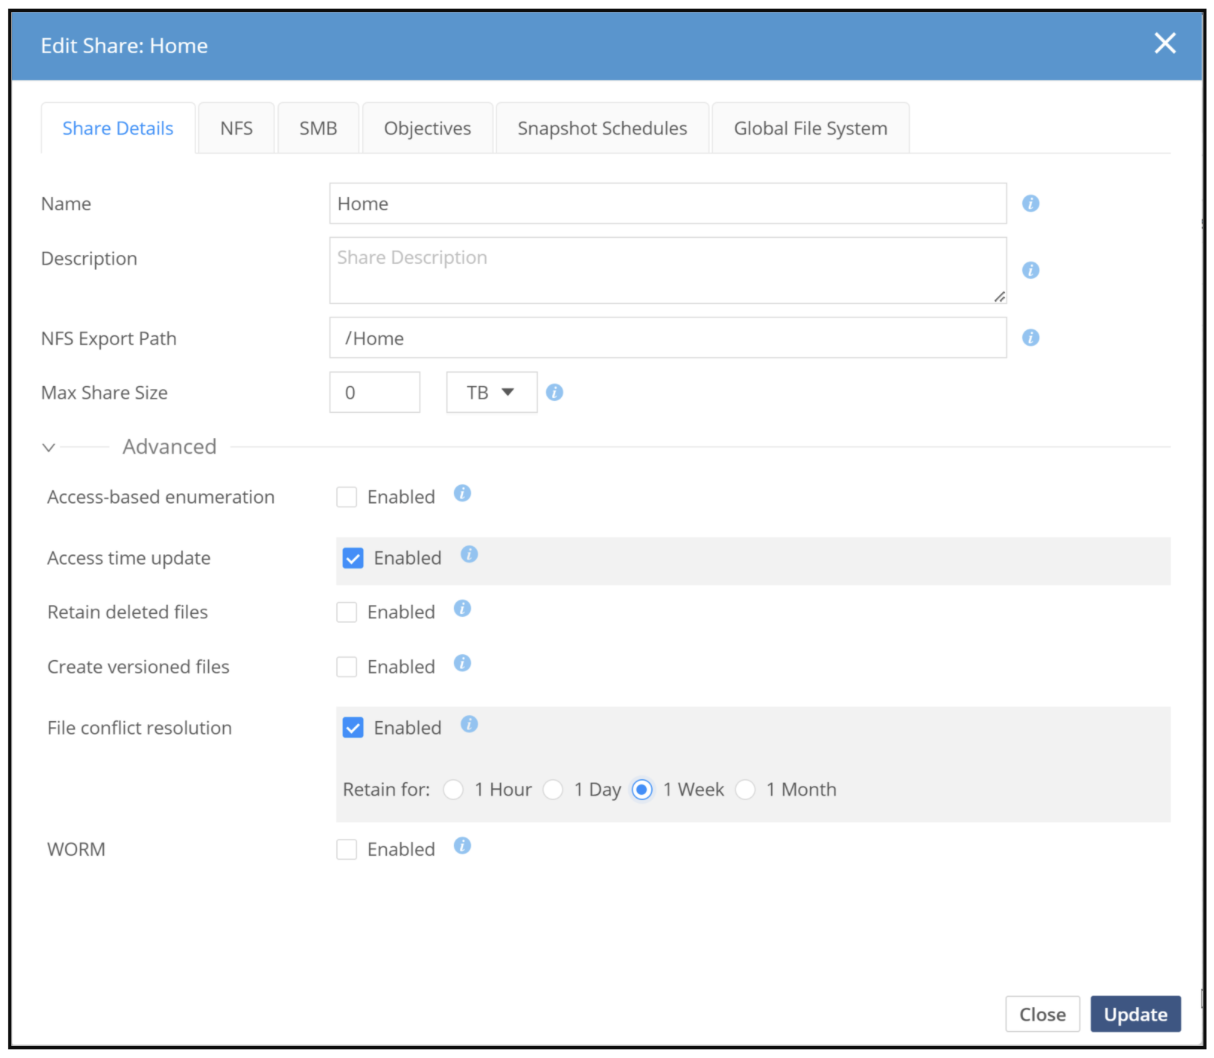
It is highly recommended to use the File Conflict Resolution objective (log-xfer-1-<time>) to ensure that any files that change site ownership are stored as a version for the selected time period. The example below has checked the option to save files for a week.
3. Click the Global File System tab and Add Participant. Note that the pull-down menu will be pre-populated with any other sites that are registered to use the shared bucket. In this example, SITE B and SITE C.
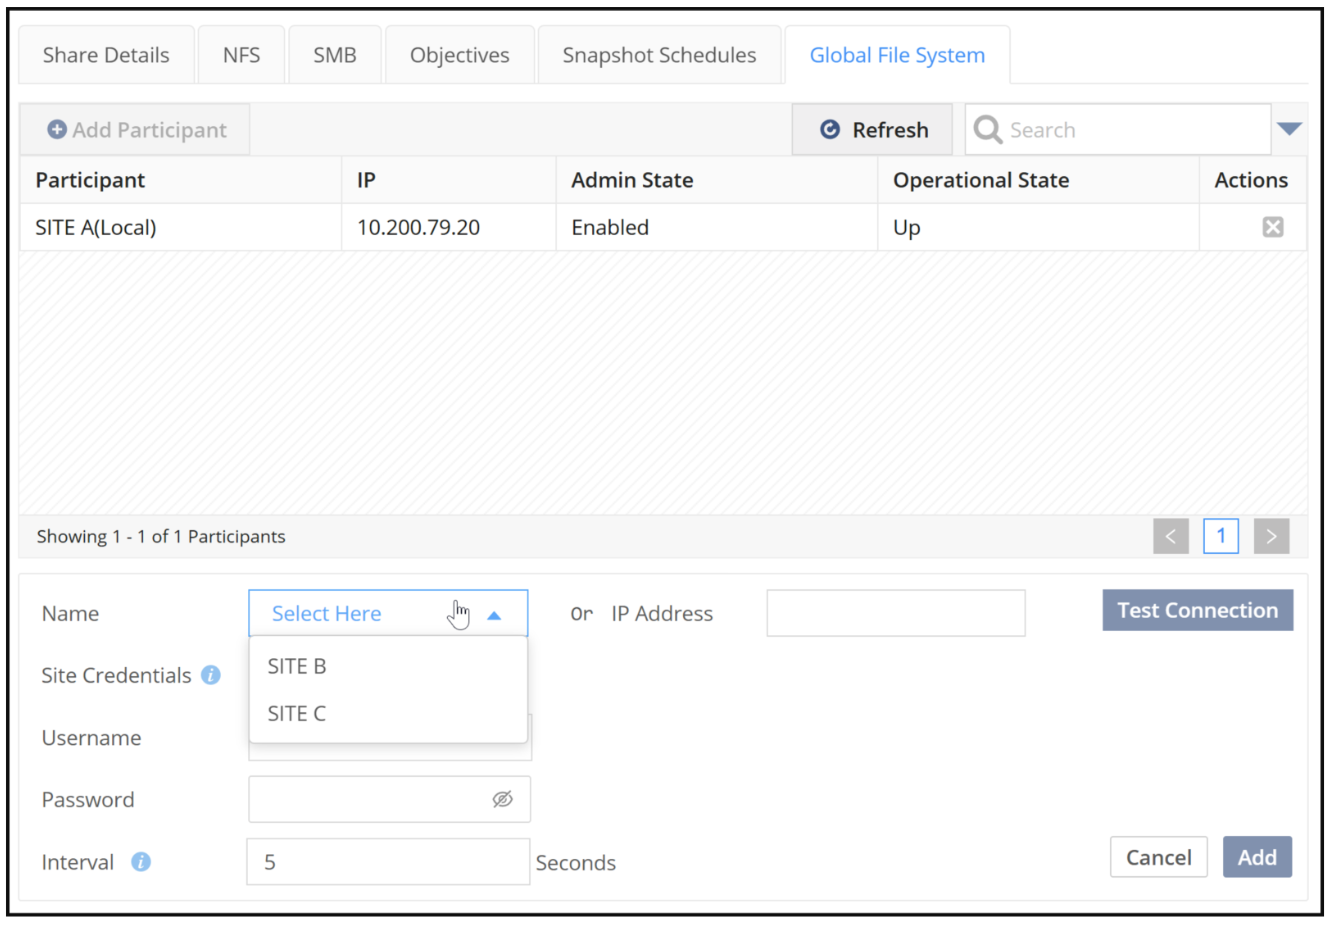
4. Add SITE B and SITE C to our Global Home share by executing the following for SITE B and then again for SITE C:
-
Select SITE B from the pulldown and the IP Address will be pre-populated. Check that connectivity works by clicking Test Connection.
-
Fill in the credentials for admin-level user for SITE B. These credentials will be used to set up a trusted connection between the two sites with regards to management operations, specific to the Home share.
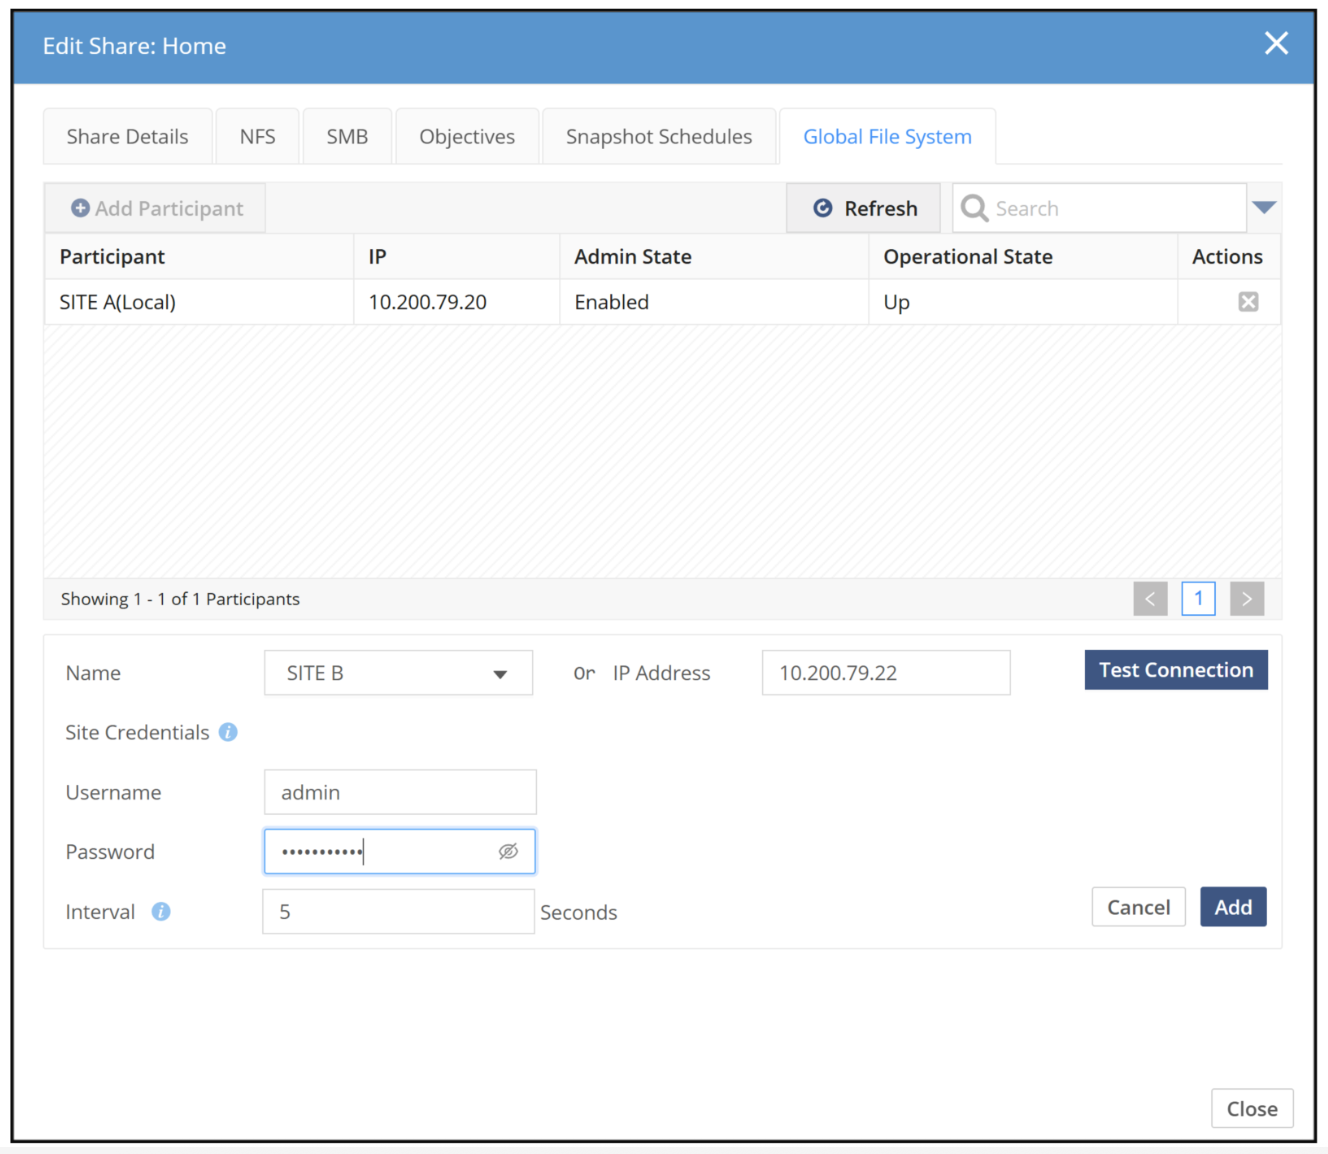
5. Once complete, click Add to add SITE B. The add operation will create the share on the remote SITE And start metadata replication using point-to-point connection. This typically takes 15-30 seconds on most systems.
Once the Add operation has completed, the screen will display an additional site in the participant table.
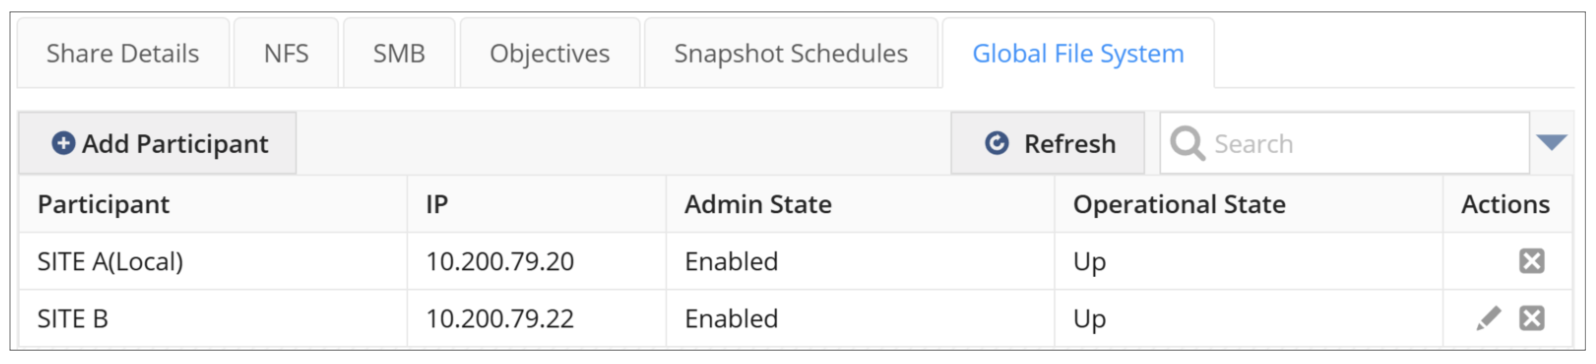
6. Repeat step 4 to add SITE C and have three participating sites for the Home share.
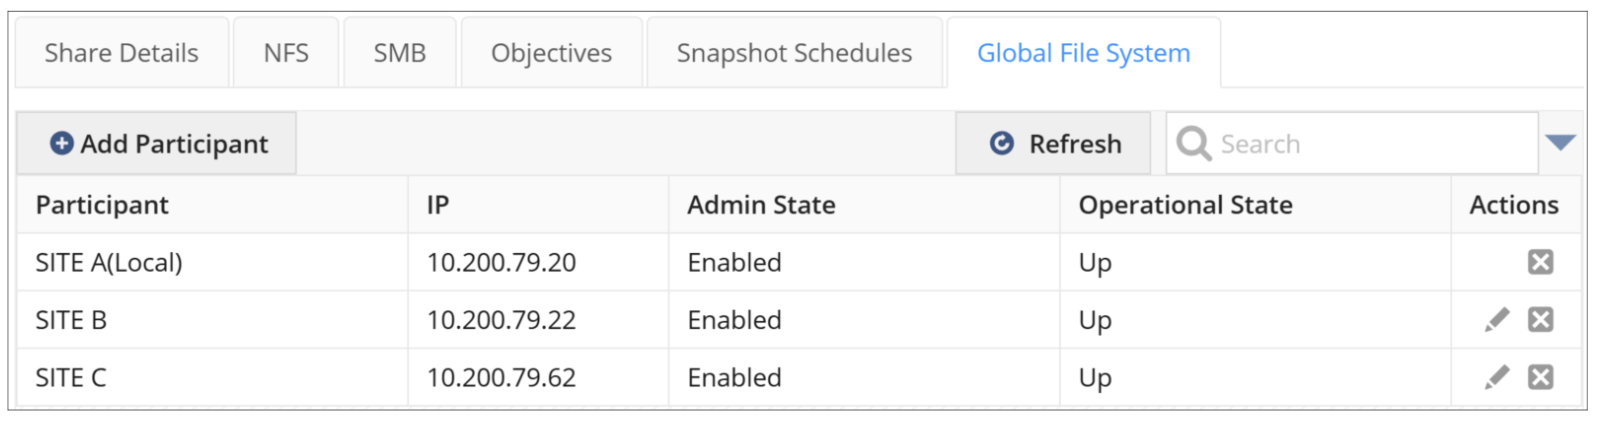
The global share has now been configured and can instantly be used on the new sites.
7. Once the global share has been configured, verify that it is replicating metadata between all participating sites by navigating to the Shares tab. Click on the Details icon under the Actions column.

8. Click on the Global File System tab to view Send and Receive latency.
NOTE: It is normal for these numbers to be 1.5x to 3x higher on a faster network, and higher when sites are located on very high latency networks. If the number is very large on an existing share, then it is likely that the initial metadata sync is taking some time. Either way, the shares can be used normally while the replication is being set up
.
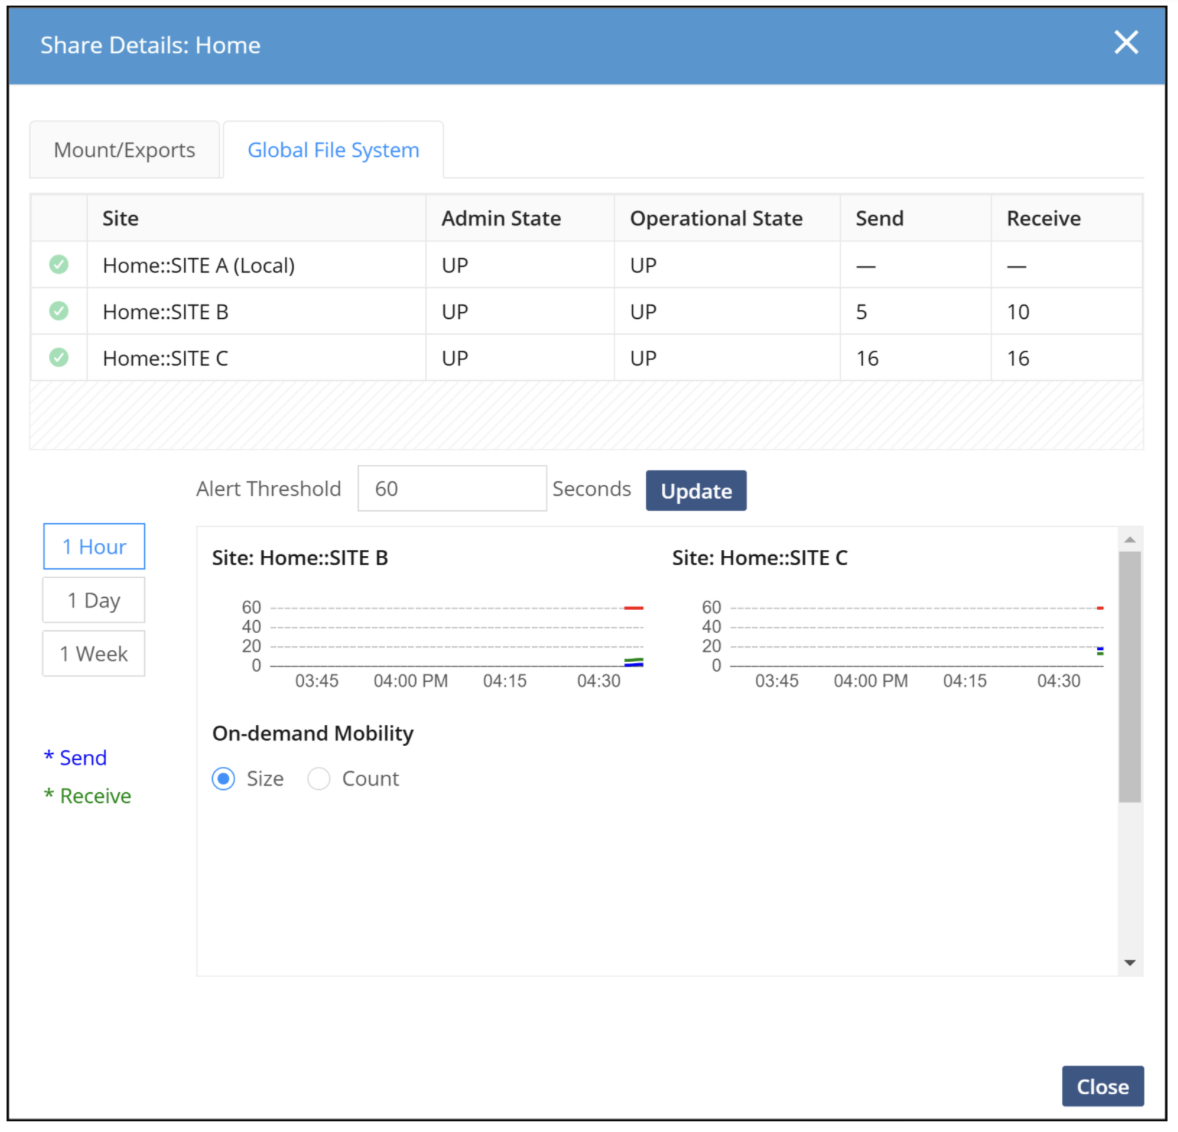
9. Confirm that the directory structure and metadata are visible and consistent across all participating sites. This can be achieved by mounting the export or share at one of the site participants and viewing that files and directories appear as they do on the source.
-
The default metadata Replication interval is 5 seconds. This is the frequency at which sites check for and process metadata changes to send to their partners. This value can be adjusted, but should be chosen carefully based on network conditions and workload.
NOTE: Metadata sync is fast and continuous. The actual file data will only move once objectives are applied (outlined in the next section) or on-demand.
Create a Global Share Using the CLI
Run the following commands on SITE A to create the share and add the participants, SITE B and SITE C.
*> share-create --name Home --path /home*

[NOTE]

ID: a959d74f-0dcd-4cb2-b674-0d323ca74591
Name: Home
Internal ID: 1
Path: /Home
Lifecycle: CREATED
State: PUBLISHED
Size limit state: NORMAL
<...additional output truncated...>

*> gfs-participant-add --share-name Home --site-name "SITE B" --site-username admin --site-password **********

[NOTE]

Name: Home::SITE B
ID: 968b5b51-c521-495e-937a-36b0ffc6f9d4
Local share name: Home
Admin state: Up
Oper state: Up
Participant share internal ID: 3
Participant site name: SITE B
Participant site management address: 10.200.79.22
Participant site data address: 10.200.79.22
Participant ID: 1
Replication interval: 5 seconds
<...additional output truncated...>

*> gfs-participant-add --share-name Home --site-name "SITE C" --site-username admin -- site-password **********

[NOTE]

Name: Home::SITE C
ID: 6fbdf5dc-93c5-4bfb-95b8-2ccf809f4921
Local share name: Home
Admin state: Up
Oper state: Up
Participant share internal ID: 3
Participant site name: SITE C
Participant site management address: 10.200.79.62
Participant site data address: 10.200.79.62
Participant ID: 2
Replication interval: 5 seconds
<...additional output truncated...>
Step 4: Define the Data Path with Objectives
With the Global File System, data is globally accessible by way of multiple standard protocols (NFS, SMB, and S3). The scope of data visibility is share-granular while data mobility is file granular. Because mobility across multiple sites leverages global deduplication (and/or compression and/or encryption), the data being transferred between sites may be less than the actual file content.
Each site is responsible for their own objectives to fully control data placement and performance without impacting other sites. This enables very dynamic usage of storage and supports a broad range of application workloads. Objectives dictate what data moves, when it moves, and where it is stored. These are the most critical settings for controlling Replication efficiency and data consistency.
A. Core Replication Objective
Apply a Place On objective to the replicated data set that directs files to the shared object storage. This objective initiates the creation of a copy on the shared object volume, triggering the upload process, effectively enabling Replication.
| Objective | Target | Why it’s Necessary |
|---|---|---|
Place On |
Shared Object Storage Volume |
This mandates that the data content is uploaded to the central bucket. |
B. Local instance/Performance Objectives
Define policies for local NAS tiers to manage performance, cost, and capacity at each site.
| Objective | Target | Rationale |
|---|---|---|
Keep Online |
Local NAS Volume (e.g., Tier 0) |
Ensures a copy of the file data is kept on the fastest local storage at a site where the data is actively being used. This maximizes local performance and avoids read latency. |
Optimize for Capacity |
Local NAS Volume |
Do not maintain instances on local storage when no objectives require a local copy. The file data will be in the cloud, on object storage or on other sites. Use with caution, as it interferes with durability (see Step 4). |
Step 5: Implement Durability and Consistency Controls
To mitigate the risk of data loss or corruption during Replication, especially for heavily modified data, apply the following controls.
| Control Point | Action/Objective | Best Practice Rationale |
|---|---|---|
File-Granular Protection |
Ensure Versioning and Undelete objectives are set for critical shares (e.g., LogXfer = 1 Week). |
This creates file-granular copies when data is overwritten or deleted, acting as a form of non-snapshot-based data protection against accidental changes. |
Snapshot Scheduling |
Schedule periodic Snapshots (e.g., daily) on the active primary site. |
Provides a consistent point-in-time recovery reference. Note, in cases in which files change frequently, file-granular protection by way of versioning and/or undelete are recommended over higher-frequency snapshots |