Adding NFS Storage
NetApp
For NetApp (both 7-mode and Cluster mode), use the NetApp Management IP address when adding the storage node.
| Hammerspace requires Read-only, Administrator credentials. |
Hammerspace uses legacy ZAPI APIs or the recently introduced ONTAP REST APIs to perform management operations (for example, to discover exported volumes to present to the user during an Add Storage workflow). Hammerspace will automatically detect when the REST API is available and switch to it when it is detected.
| Hammerspace does NOT make any changes to the NetApp configuration settings. |
Vservers and qtrees are supported.
Volume Settings
-
Volumes only need to be exported over NFSv3 (even if client access is over SMB or NFSv4.2).
-
Exports must be exported read/write to all NFS clients that will be using the shares for read/write activity.
-
Volumes must be exported with root=<ANVIL IPs>,<DSX IPs>,<Floating IPs> to ensure proper access by the product. Make sure cluster IPs, node IPs and floating IPs are included. This must be done for all volumes in the Junction path including the root volume.
-
Generally, it is required to export the root volume (/) as RO to be able to mount any shares under
/. -
Security style set to UNIX for R/W usage (required for R/W assimilation).
-
Security style set to Mixed or NTFS is supported using RO assimilation. For RO assimilation, no RW flags are required.
Volume Export Settings
Volumes must be exported with the following settings to all NFS client IPs that will use the storage directly. This includes NFSv4.2 clients, and Anvil and DSX nodes.
sec=sys,rw,nosuidONTAP Cluster-Mode Requirements
Ensure that ONTAPI is enabled by entering the vserver services web show command in the ONTAP command line.
Command:
# vserver services web showExpected output:
Vserver Type Service Name Description Enabled

--------- -------- ---------------- -------------------------- -------

NAS_1 data ontapi Remote Administrative API true

Support
If the ONTAPI service is disabled, enter the following command to enable it:
# vserver services web modify --enabled true --vserver <vserver-name> -name ontapiChange <vserver-name> to match your ONTAP cluster admin vServer. Consult the NetApp product documentation for more information.
For a restricted account instead of the default admin account, see Creating a Restricted Administrator for ONTAP Cluster Mode.
|
ONTAP 7-Mode Requirements
Ensure that the required settings: httpd.admin.enable, httpd.admin.ssl.enable and tls.enable are set to ON.To set these values, enter the following commands in the ONTAP command line:
# options httpd.admin.enable on

# options httpd.admin.ssl enable on

# options tls.enable on| If volume snapshots are turned on for the volume under Hammerspace management, it is highly recommended that they are turned off. Share-level snapshots are available in Hammerspace. Hammerspace snapshots can also be stored in the cloud and on other storage volumes to increase the resiliency of the snapshot data. |
Adding a NetApp Storage System
-
Log in to the Management GUI as admin.
-
Navigate to and click Add Storage System.
-
Provide the required information and click Add Storage System.
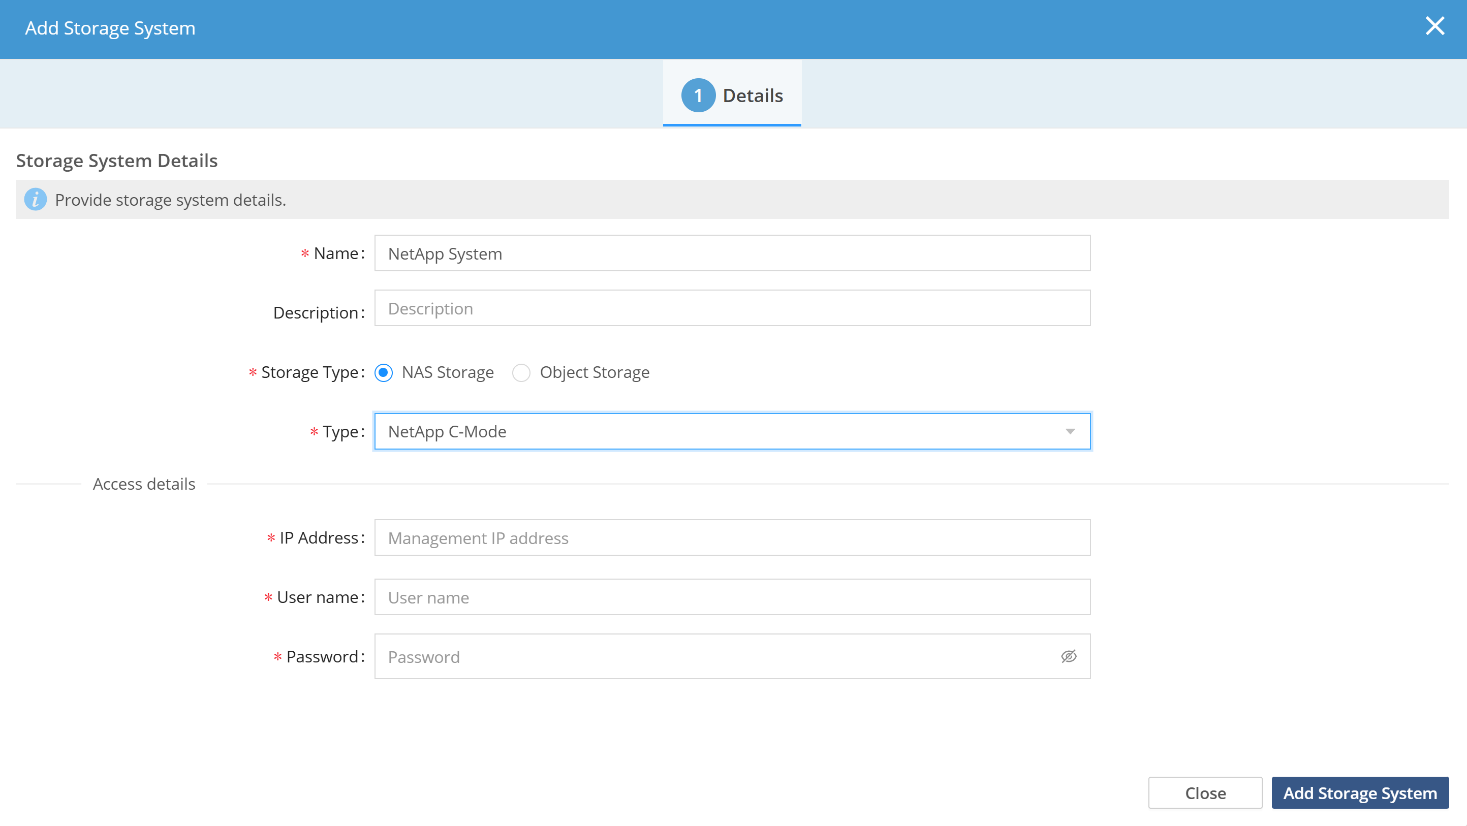 Figure 1. Adding NetApp C-Mode Storage System
Adding NetApp Storage Volumes
Perform the following workflow to add NetApp storage volumes.
Step 1: Select Volumes
Select the volumes to add from the added NetApp storage system. Note that for C-Mode configurations, the root volume (sometimes exported as /) is not supported as a valid volume, as it is most used to store internal files for ONTAP.
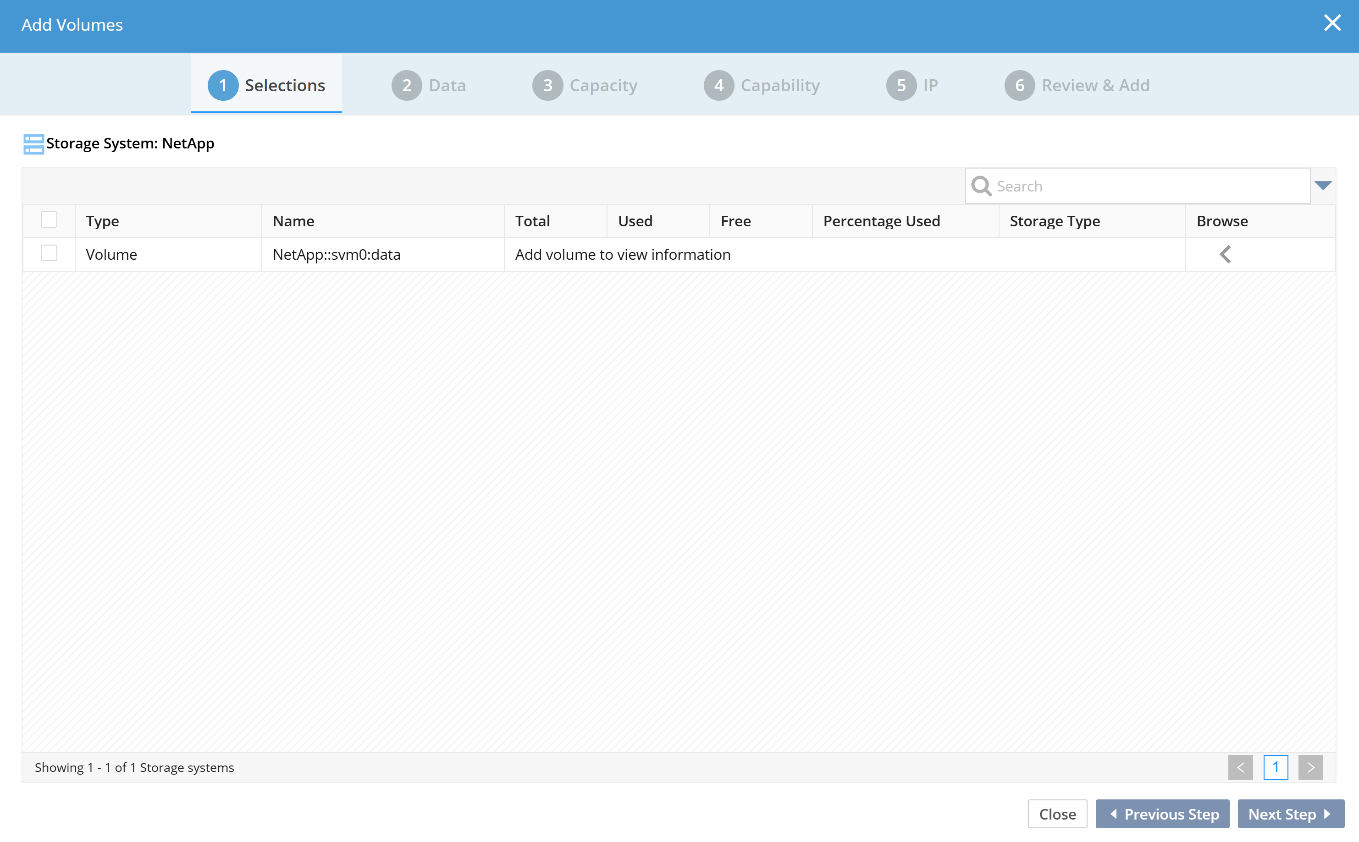
Alternatively, you can use the following command to add the volume:
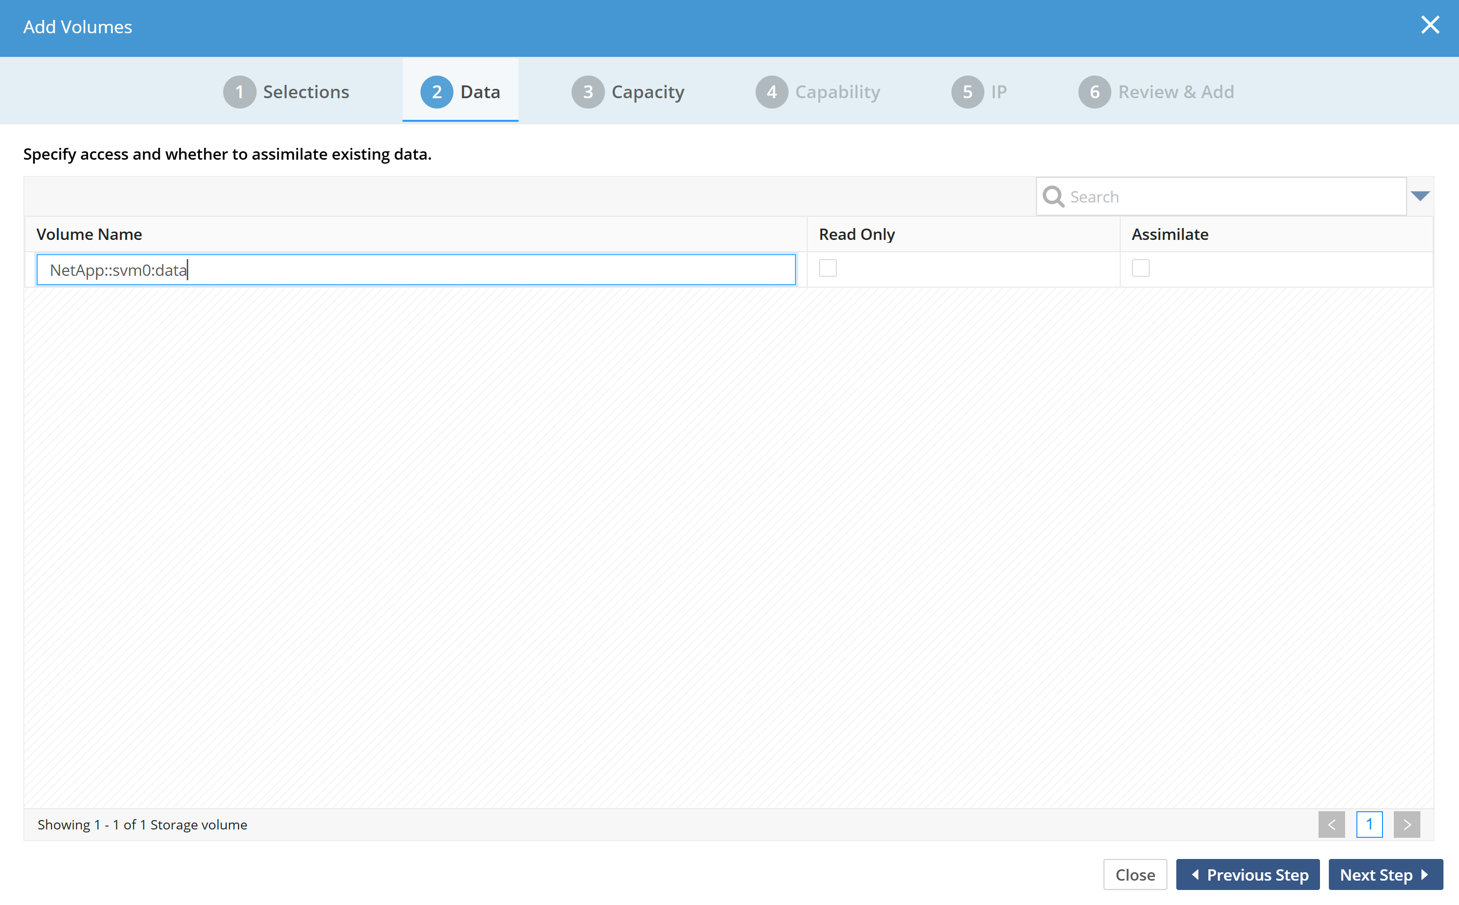
volume-addStep 2: Assimilate Data
The second step will detect existing data on the volume and prompt the user to go through the assimilation process.
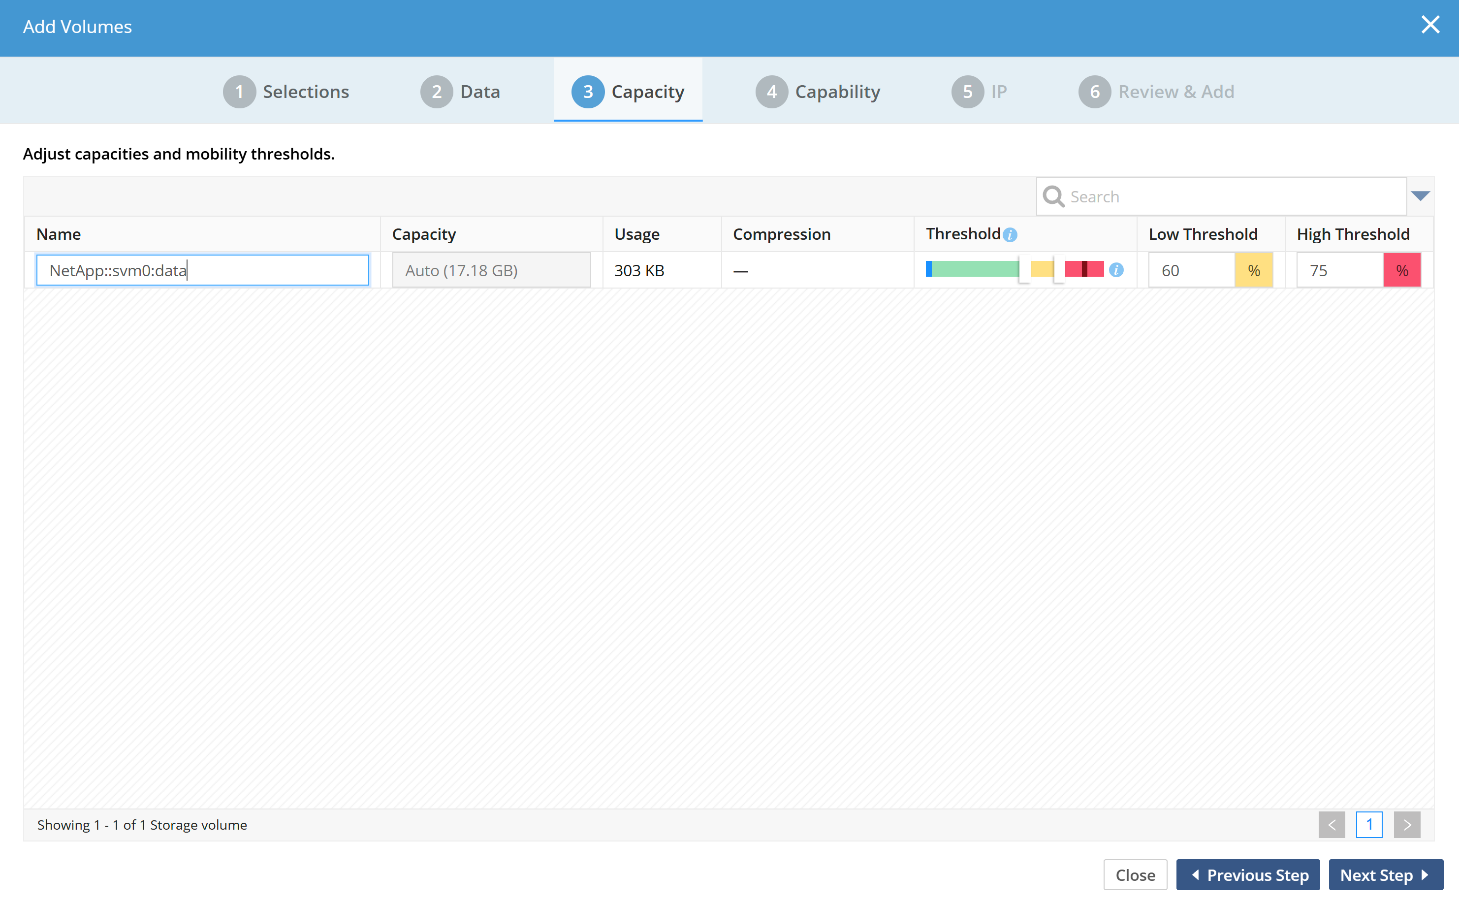
Step 3: Set Manage-to Capacity for the Storage Volume
Hammerspace enables live data mobility for all data stored on Hammerspace volumes. With this core functionality, the system can now automatically load-balance across storage volumes without disrupting data access.
The manage-to capacity for volumes allows administrators to set a high threshold for a volume, after which the system will no longer place new data on this volume unless it determines that all other volumes are full and that no object storage volume is available. The data placement logic is driven by a machine-learning engine that automatically accounts for capacity, placement, and user-driven needs when placing data.
The Low Threshold setting determines how much data moves from a volume once the high threshold has been reached. The system will schedule mobility from the volume until the low threshold has been met.
The high and low percentage values can be changed on the volume settings screen after the volume has been added.
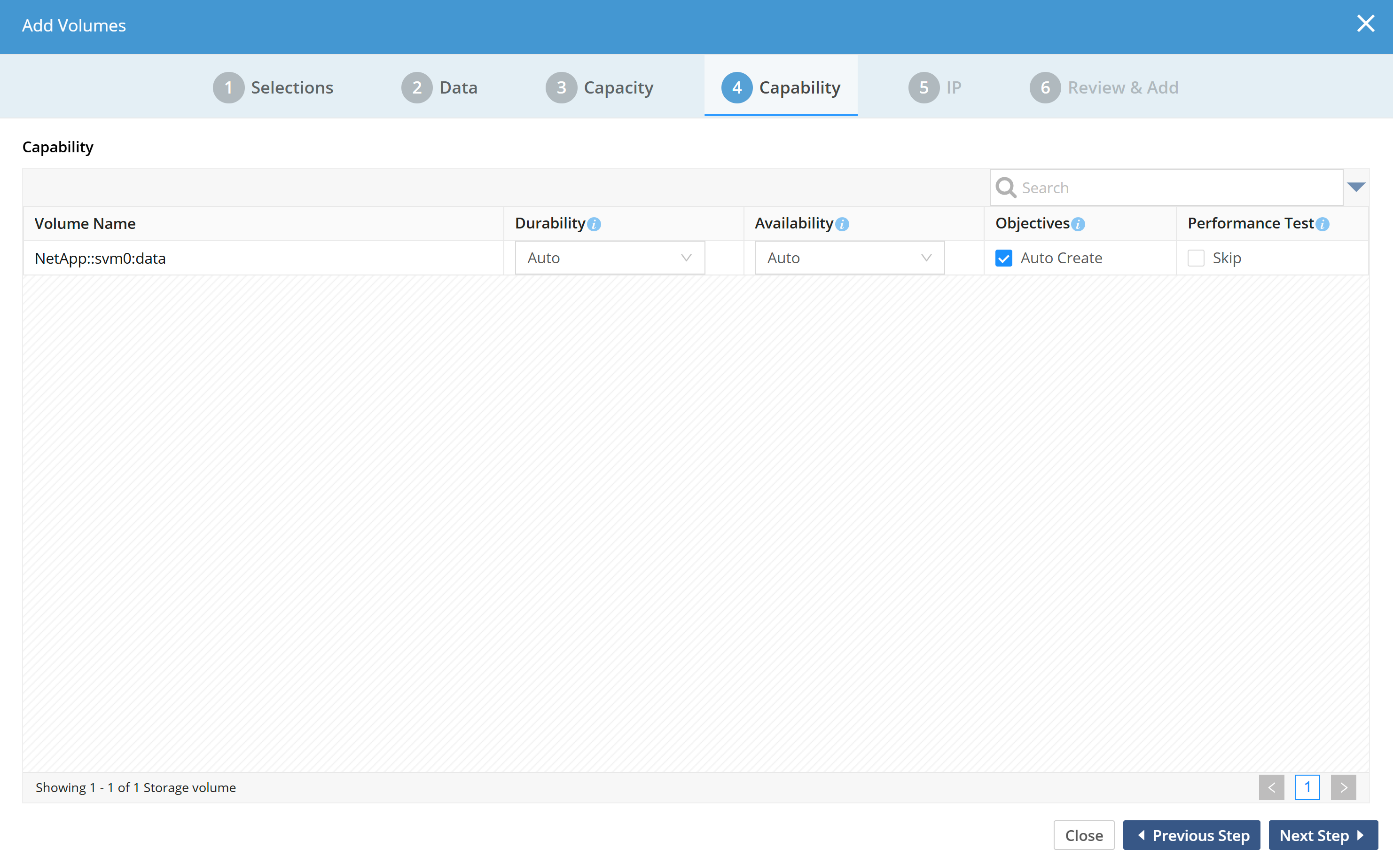
Step 4: Configure the Volume Capabilities
Each volume type is configured with a default set of capabilities. It is recommended to leave the Durability and Availability settings to the default values.
Objectives such as place-on-<volume-name>, exclude-from-<volume-name>, and confine-to-<volume-name> are auto-created when following the default GUI workflow. Unchecking the Auto Create box will require the admin to manually create those objectives after the volume is added.
The performance test will do a quick IOPS and throughput test of the volume; these values are used as the basis for performance-oriented objectives. The performance test will take approximately 1-2 minutes per volume.
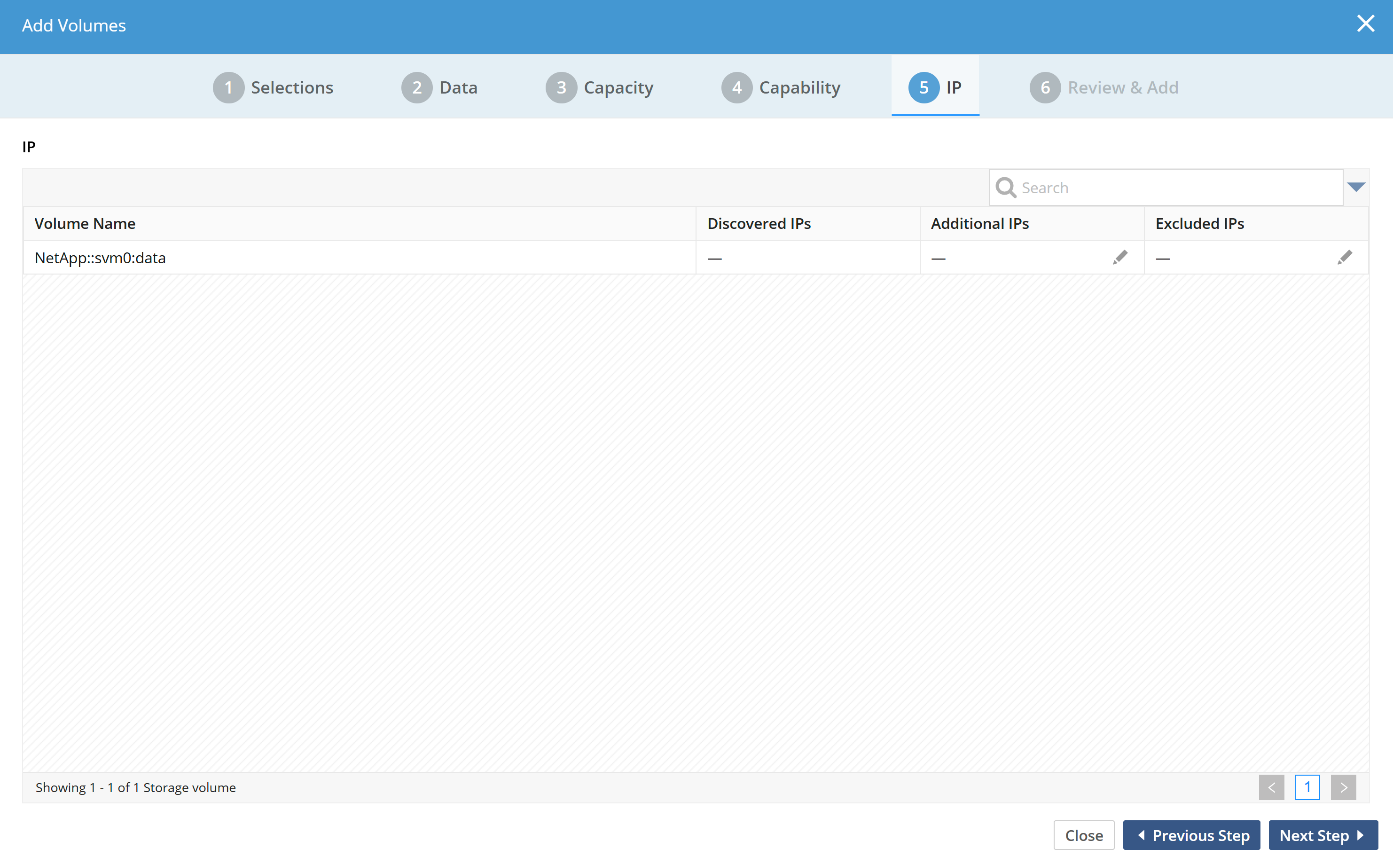
Step 5: Configure Additional IPs for the Data Volume (Optional)
A storage volume can have one or more IP addresses. Add or remove additional IPs as needed. The IP addresses can also be edited after the volume is added using the GUI or the admin CLI. IP addresses are generally auto-discovered.
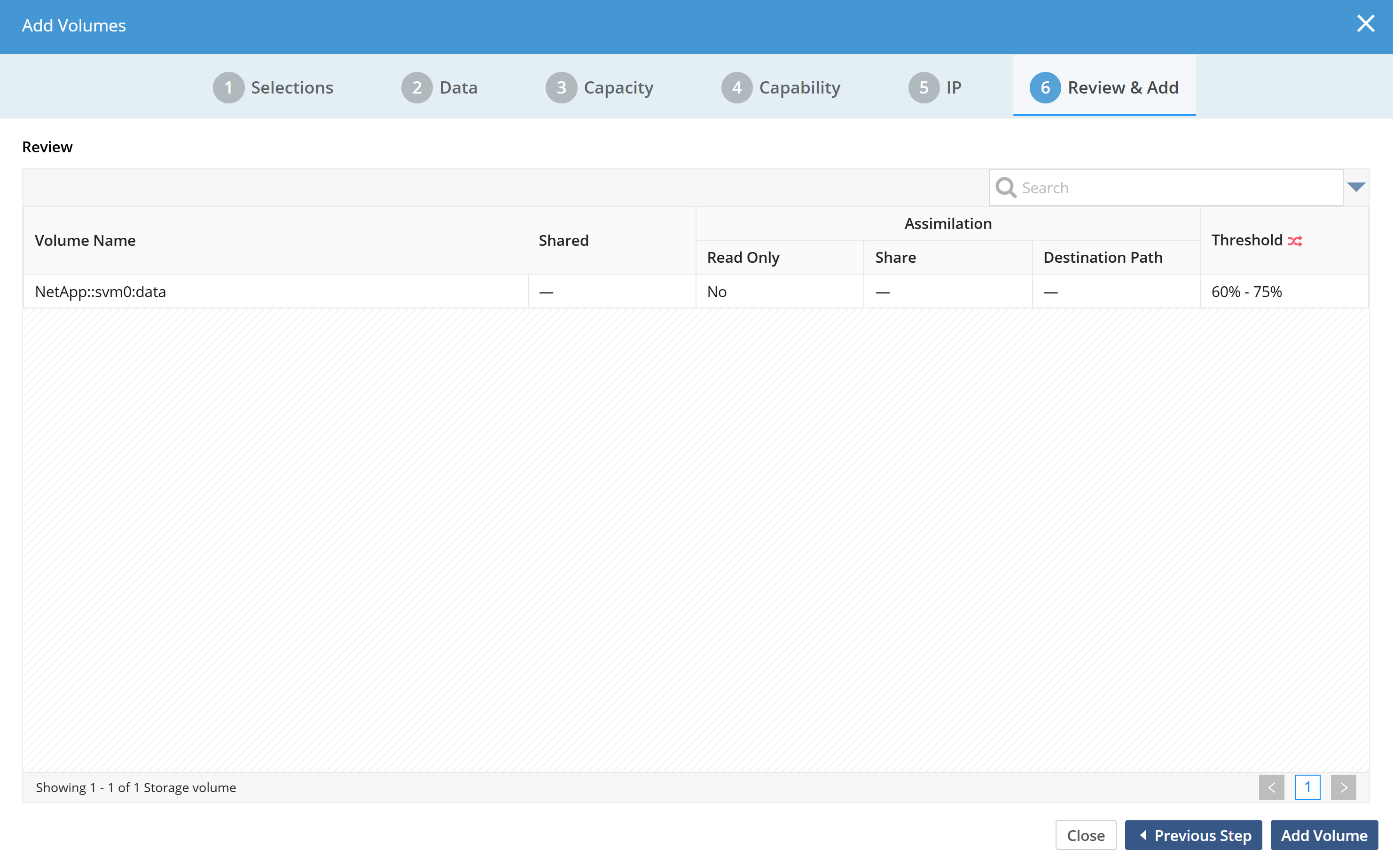
Step 6: Review the Configuration Summary
The final screen in the volume add step gives a summary of what will be done when clicking Add Volume.
Adding a volume is a background process and may take a few minutes to complete per volume. Progress can be viewed in the task window or on the CLI.
Alternatively, you can use the following command to add the volume:
volume-addTroubleshooting NetApp
The following errors can occur when the configuration does not meet expectations. Also, check the general troubleshooting section if needed.
RPCINFO Failed or "No Root Filehandle"
When a NetApp storage system is added to Anvil, the native NetApp APIs are used to detect the storage volumes and the parameters for them.
The following table shows an example of the output from node-list --full:
Command:
node-list --fullExpected output:
Name: NTAP
Type: NetApp C-Mode
Vendor: NetApp
Product name: NetApp Release 9.5P6: Wed Jul 10 18:43:50 UTC 2019
Platform services:
Type: LOGICAL_VOLUME
ID: 20dd5e43-e0d1-11ea-8d2c-005056a83b78
Name: pm-svm-3:nfs_svm3_1
Exported path: /nfs_svm3_1
#IPs: [10.200.79.6/22]#
Node: NTAP
Usage: DS
Reserved: false
Capacity: [Total: 4.2GB, Used: 421.8KB (<1%), Free: 4.2GB]
Extended info: volume: nfs_svm3_1; vserver: pm-svm-3
Type: LOGICAL_VOLUME
ID: 07fdea15-ac1e-11ea-8855-005056a83b78
Name: pm-svm-1:qa_vol
Exported path: /qa_vol
#IPs: [10.200.79.3/22]#
Node: NTAP
Usage: DS
Reserved: false
Capacity: [Total: 20.4GB, Used: 5.2GB (26%), Free: 15.1GB]
Extended info: volume: qa_vol; vserver: pm-svm-1
Try 'license-add --help' for more information.
The output shows that the detected IP addresses are different between the two volumes. In this example the two different volumes belong to different SVMs with different data interfaces, hence the different IP addresses.
When adding a volume to an Anvil node, the system first checks for NFS access to that volume and uses any IP addresses detected for it.
If an Anvil or DSX cannot reach the IP address(es) detected for the volume, the following message will show during the add-volume wizard in the GUI:
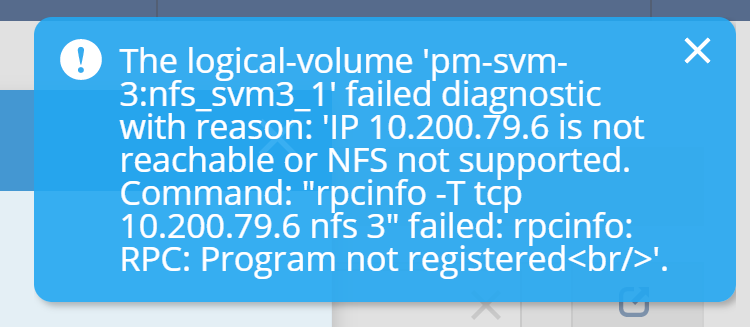
Command:
volume-add --node-name NTAP --logical-volume-name pm-svm-3:nfs_svm3_1Expected output:
volume-add: No root filehandle found for pm-svm-3:nfs_svm3_1:/nfs_svm3_1.Troubleshooting Steps
Verify that the NFS service is turned on for the NetApp SVM.
Verify that a regular Linux client can see the NFS export by issuing the showmount command. Note that the IP address used is from the volume.
# showmount -e 10.200.79.6
clnt_create: RPC: Program not registered
In this example, the NFS service was not turned on in the SVM. By turning on the NFS service, the showmount command results in the following output:
# showmount -e 10.200.79.6
Export list for 10.200.79.6:
/nfs_svm3_1 (everyone)
/ (everyone)
Code 13: Mount Error
The following error is seen when adding a volume:
The logical-volume 'svm0:data' failed diagnostic with reason: '10.200.79.4:/data failed I/O test with error: Exception('Exception: Mount error. Error code 13',)'.
The diagnostic starts with the mount command issued against 10.200.79.4:/data and it is failing with error code 13. Error code 13 in NFS is permission denied.
The error experienced in a Linux shell is:
# mount -t nfs -o vers=3 10.200.79.6:/nfs_svm3_1 /test

mount.nfs: access denied by server while mounting 10.200.79.6:/nfs_svm3_1
Troubleshooting Steps
This is most likely due to the export policy setting on the volume and the root junction. Both the junction path and in this example, / must allow for the directory to be mounted as root from both Anvil and DSX.
Access Denied by NFS
When the export policies are set correctly, and the NFS service is turned on and/or reachable by the auto-detected IP address and the error "Access was denied by NFS" is shown during the volume-add wizard, then it is likely the security style is set to NTFS/mixed. NTFS or mixed security styles are not supported as Read-Write volumes but rather must be added as Read-Only volumes.
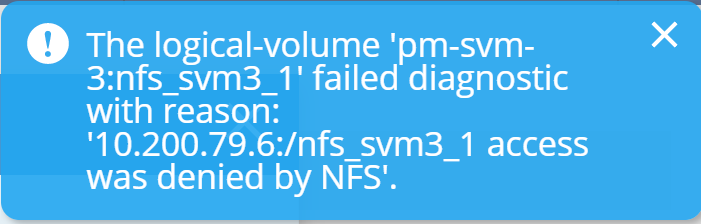
This can be further validated by looking in the NetApp event logs for a message like the following:
Event:
secd.nfsAuth.noNameMap: vserver (pm-svm-3) Cannot map UNIX name to CIFS name. Error: Get user credentials procedure failed [ 13 ms] Determined UNIX id 0 is UNIX user 'root' [ 13] Trying to map 'root' to Windows user 'root' using implicit mapping [ 13] Could not find Windows name 'root' [ 14] Unable to map 'root'. No default Windows user defined. **[ 14] FAILURE: Name mapping for UNIX user 'root' failed. No mapping found
From a Linux shell, the mount will succeed but no files can be listed or created.
# mount -t nfs -o vers=3 10.200.79.6:/nfs_svm3_1 /test
# cd /test
-bash: cd: /test: Permission denied

# date >> /test/file
-bash: /test/file: Permission denied
Troubleshooting Actions
-
If this is a new volume, change the security style from NTFS/Mixed to UNIX.
-
If this is a volume with existing data, add the volume as a Read-Only volume, this will allow the volume to be a source for assimilation jobs.
-
If the issue is seen on an NTFS or mixed-mode volume, make sure that a 1:1 mapping exists between
win\administratorandrootin the/etc/usermap.cfgfile.
Code 2: Mount Error
During the volume-add wizard, the error message Mount error code 2 is displayed. This is most likely because the volume was unmounted, or the junction path changed in the SVM namespace after the Storage System was added to Anvil.
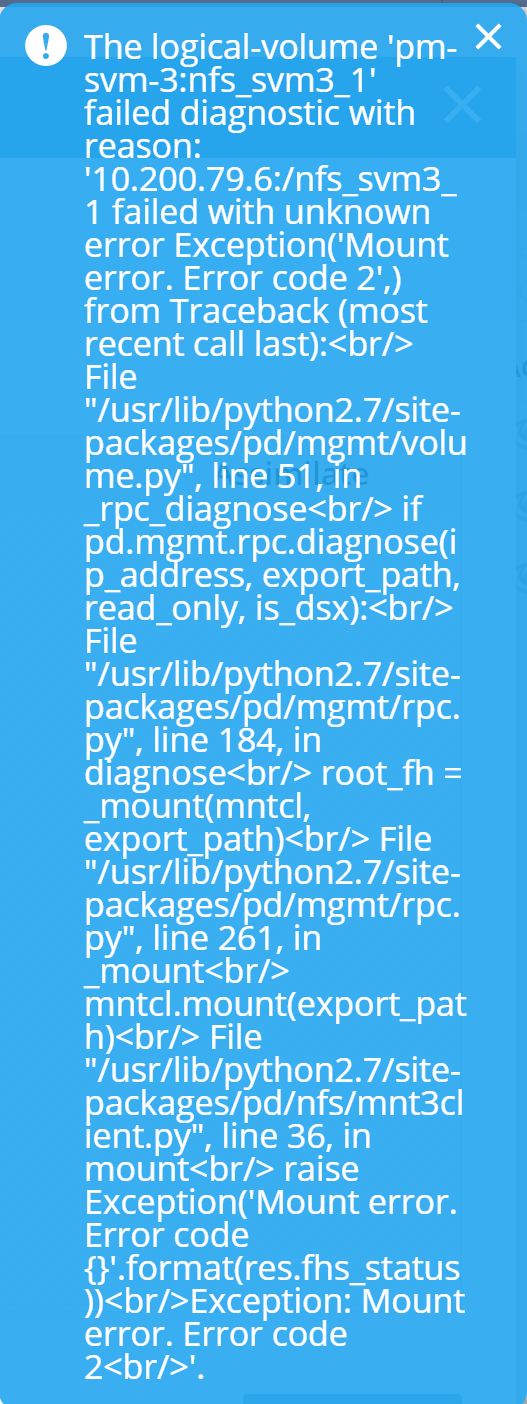
Troubleshooting Steps
-
Verify that the volume is mounted and exported in the SVM namespace.
-
Correct the problem by mounting the volume in the SVM namespace.
-
Re-scan the storage system from the Anvil to detect junction path changes.
Failed to Add Node
When trying to add a NetApp storage node, a message like this is displayed:
Failed to add node <netappname> - Authentication to the NetApp storage system at <IP> failed with the supplied credentials
Solution
This is most likely because the system was detected to have the REST APIs enabled but Hammerspace was not allowed access to those APIs.
If you are using a restricted administrator account rather than the built-in admin account, see Creating a Restricted Administrator for ONTAP Cluster Mode to confirm the account has the http and ontapi applications and the required read-only privileges.
Vserver API Missing Vserver Parameter
When trying to add a NetApp storage node, a message like this is displayed:

Solution
This is most likely because the wrong NetApp endpoint was specified, and the API could not be executed.
Dell-EMC Isilon
For Isilon, the Management IP is a cluster IP address. Hammerspace will use the credentials provided and discover the exported volumes to present to the user during the add-storage workflow.
The credentials provided will also be used when performing file cloning operations via the Isilon API. A dedicated user on the Isilon can be created to monitor and audit the activity if desired.
| Hammerspace does NOT make any changes to the Isilon configuration settings. |
The credentials must, at minimum, have the following privileges:
| Privilege | Description | Access | Function |
|---|---|---|---|
ISI_PRIV_LOGIN_PAPI |
Platform API |
Read-Only |
Discovery |
ISI_PRIV_NETWORK |
Network |
Read-Only |
Discovery |
ISI_PRIV_NFS |
NFS |
Read-Only |
Discovery |
ISI_PRIV_QUOTA |
Quota |
Read-Only |
Discovery |
ISI_PRIV_SNAPSHOT |
Snapshot |
Read-Only |
Cloning |
ISI_PRIV_IFS_RESTORE |
Restore |
Read-Only |
Cloning |
ISI_PRIV_IFS_BACKUP |
Backup |
Read-Only |
Cloning |
| Starting with Isilon OneFS 9.2 (and later), HTTP basic authentication is turned off by default, causing the storage system-add operation to fail. |
Re-enable Basic Authentication
HTTP basic authentication must be re-enabled using the following instructions:
-
Log in to the WebUI as a user with administrative privileges.
-
Click .
-
In the Authentication settings section, click the Authentication drop-down and select HTTP basic authentication.
The ISI CLI can also be used to change this setting:
# isi_gconfig -t web-config auth_basic=trueExport Settings
-
Exports only needs to be exported over NFS v3 (even if client access to shares and exports are over SMB or NFS 4.1/4.2). The exception for that is if data needs to be assimilated using SMB.
-
Enable SNMP and allow SNMP v2 access and set the Community Name Read-only string. This is used to authenticate SNMP API access.
-
Exports must be exported with the option Root Clients set to all Anvil and DSX IP addresses. Make sure cluster IPs, node Ips, and floating IPs are included.
-
Exports must be exported read/write to all NFS 4.2 clients that will use the shares.
-
The advanced Export option, Map lookup UID, must be set to Off.
Isilon ACL Requirements
Verify the following settings:
-
ACL policies environment is balanced: Environment “Balanced” is configured (default setting). If this value is changed to other than Balanced, adding exported share to the Hammerspace could fail. Currently, “Balanced” is the only validated ACL Policies setting.
-
Group owner inheritance is set: Ensure that Linux and Windows semantics is checked.
 Figure 12. Isilon group owner inheritance settings
Adding an Isilon Storage System
Complete the following steps to add an Isilon storage system:
-
Navigate to and click Add Storage System.
-
Provide the required input to add the storage system.
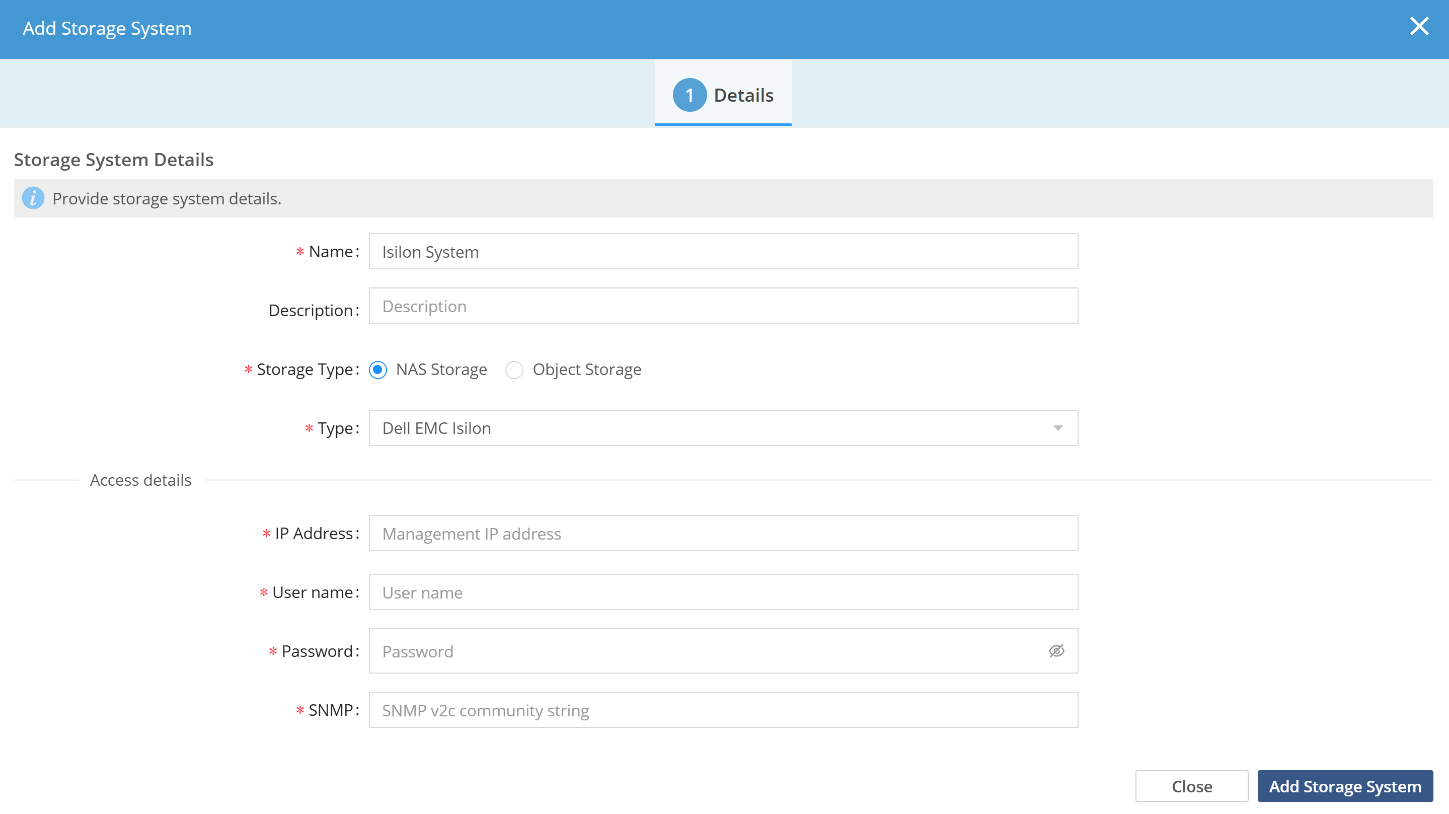 Figure 13. Adding an Isilon storage system
Adding Isilon Storage Volumes
Step 1: Select Volumes
Select the Isilon volumes to add.
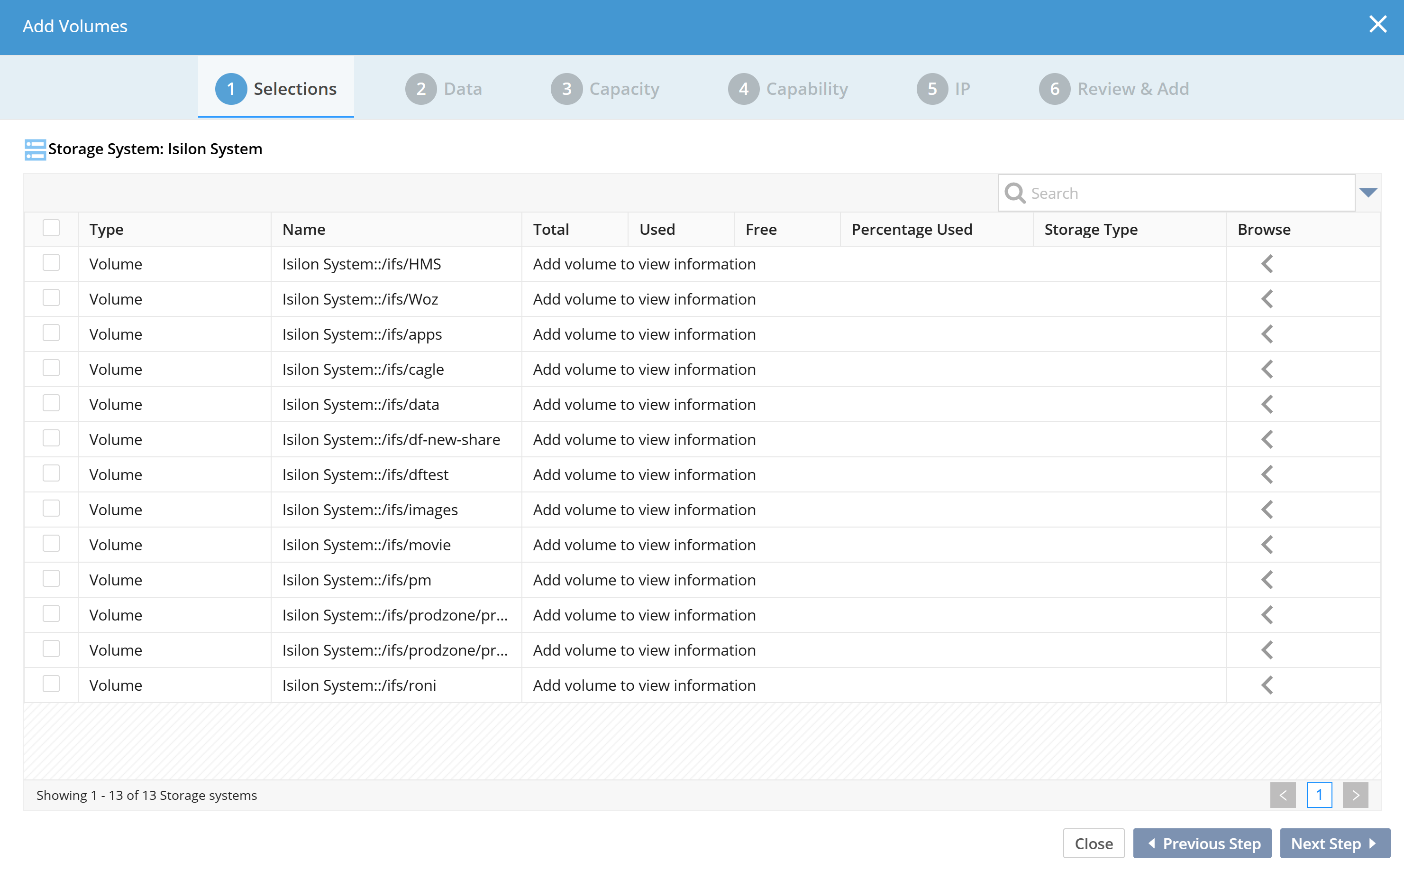
Alternatively, you can use the following command to add volumes:
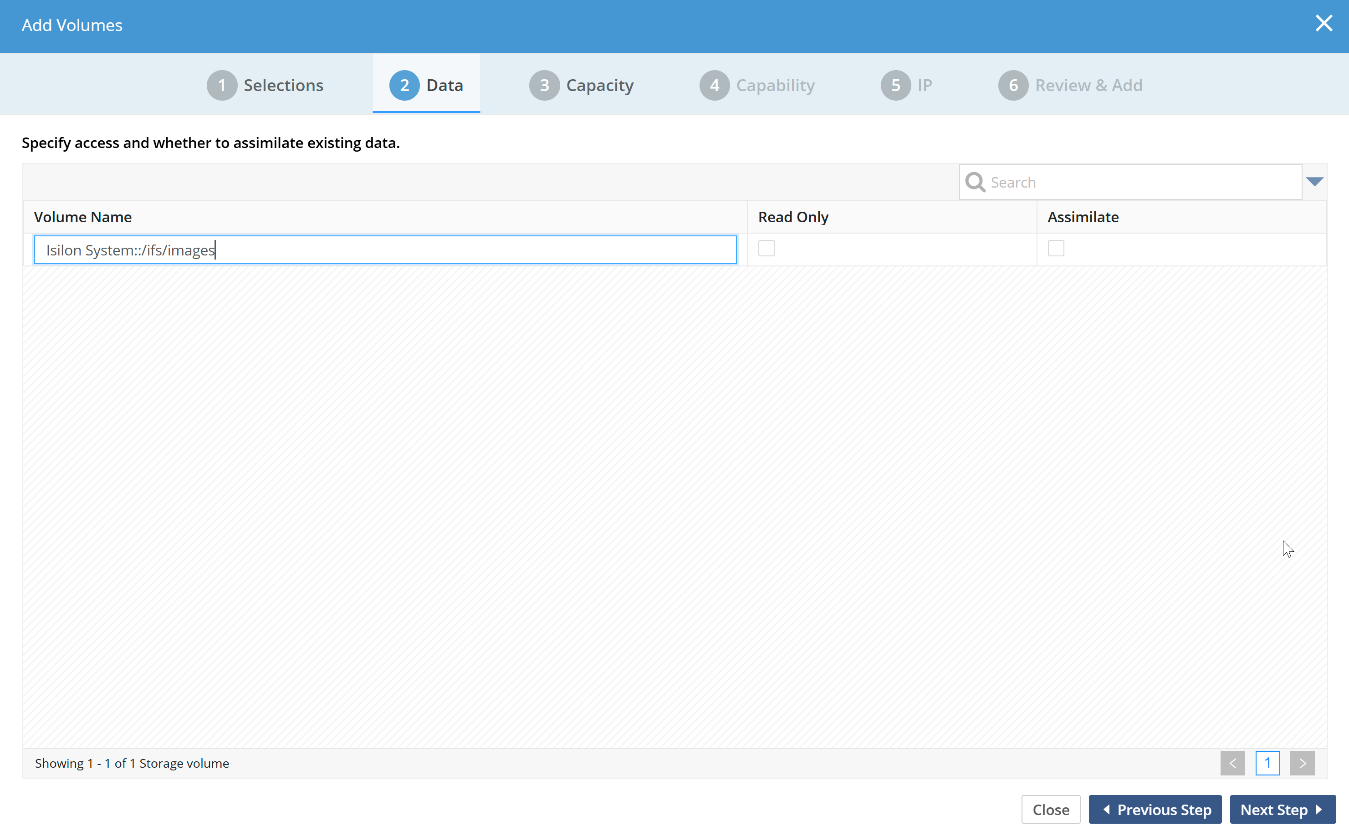
volume-addStep 2: Assimilate Data
The second step will detect existing data on the volume and prompt the user to go through the assimilation process.
Step 3: Set Manage-to Capacity for the Storage Volume
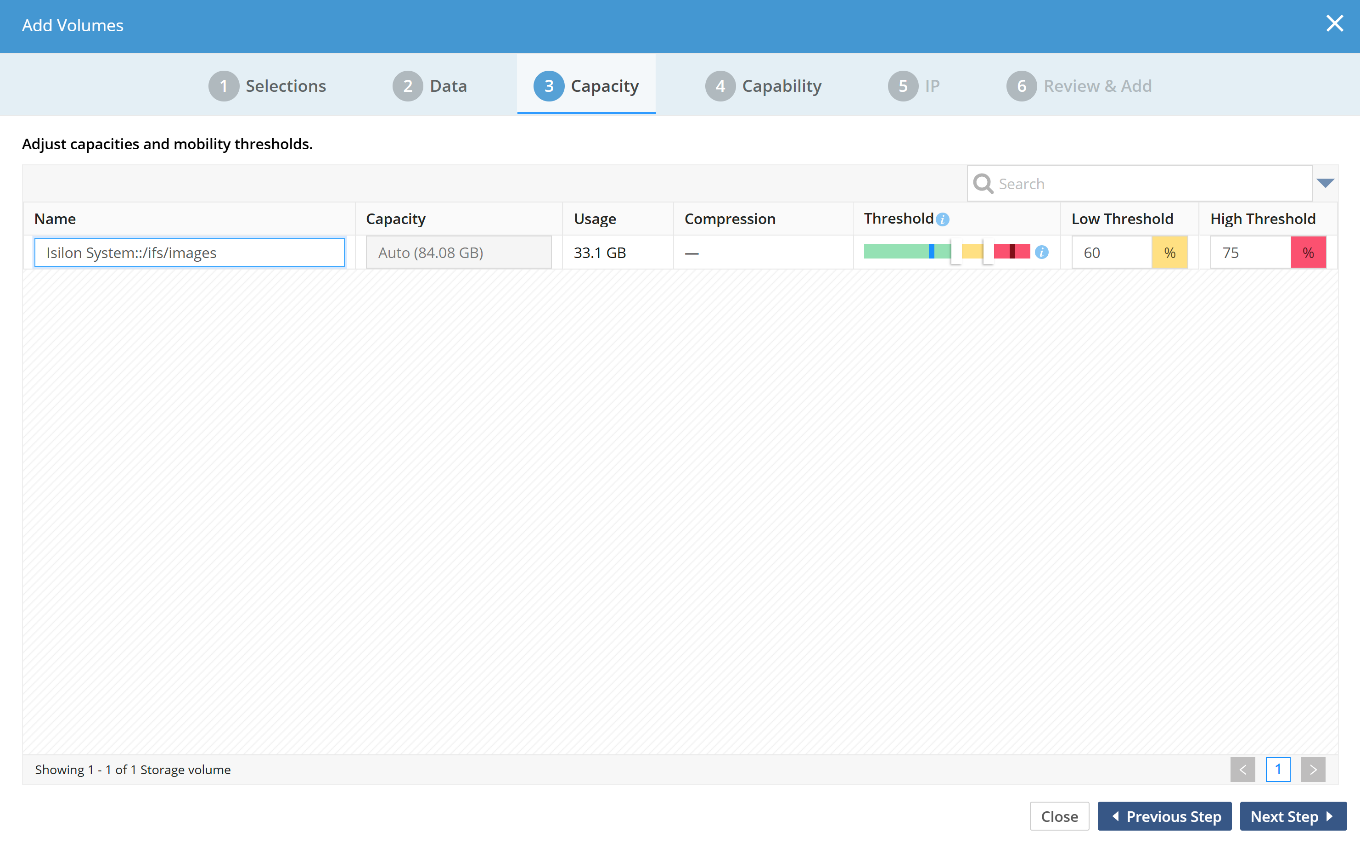
Hammerspace enables live data mobility for all data stored on managed volumes. With this core functionality, it is now possible to have the system automatically move data across storage volumes without any disruption to data access. The description of the thresholds below assumes that objectives are not influencing the data placement behavior.
The manage-to capacity for volumes allows administrators to set the desired thresholds of a volume before the system will no longer place new data on this volume unless it determines that all other volumes are above threshold or not available.
Once a volume goes above the low threshold, the system may consider moving data to other volumes that are below threshold. For new files, placement will generally prefer volumes that are below threshold.
The high and low percentage value can be changed on the volume settings screen after the volume has been added.
| If volumes are very small sizes, or very large files (as a percentage of the volume size) are used, then the system may exceed thresholds unexpectedly and may take longer to react to capacity changes. |
Step 4: Configure the Volume Capabilities
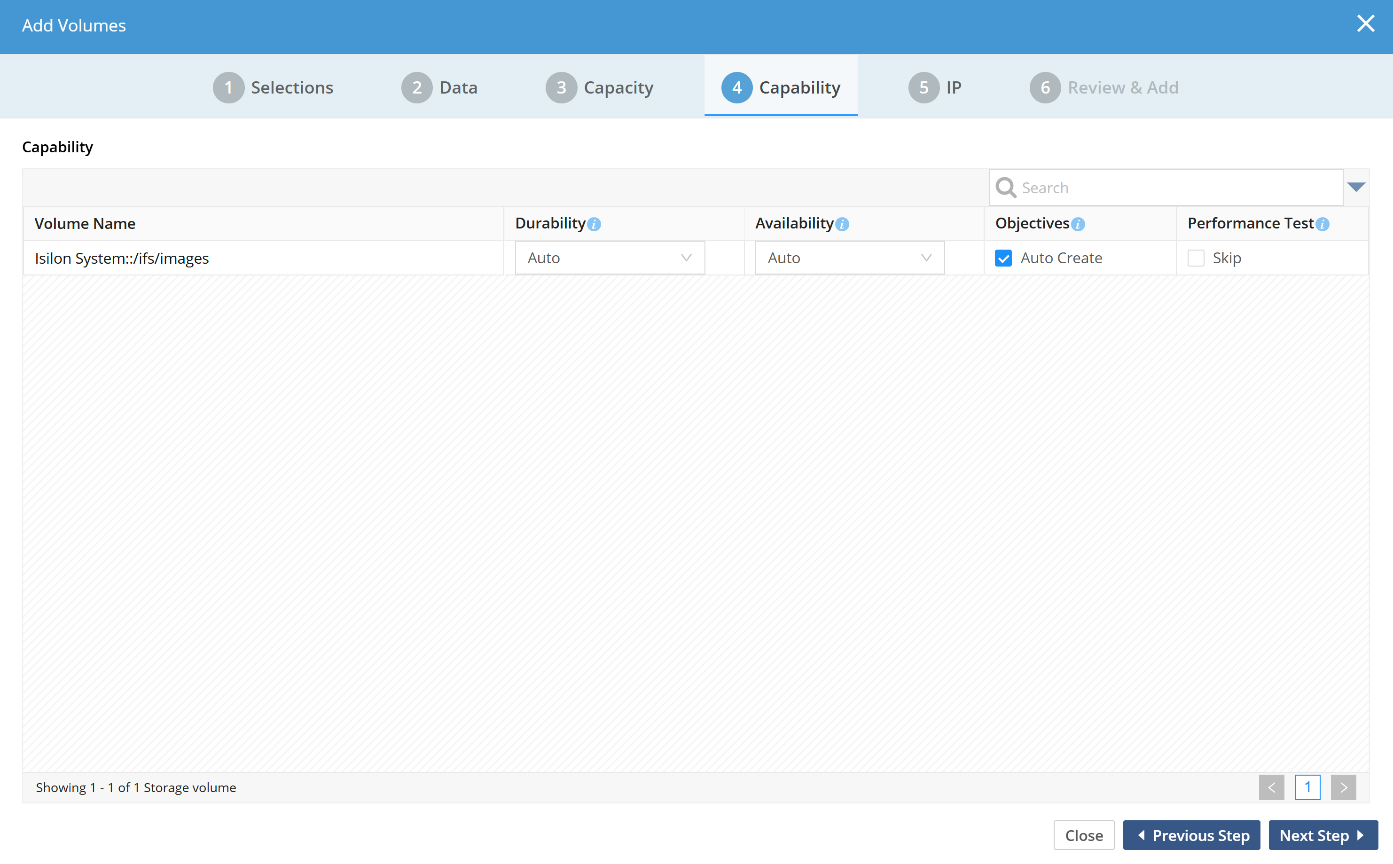
Each volume type is configured with a default set of capabilities. It is recommended to leave the Durability and Availability setting to the default values.
Objectives such as place-on-<volume name>, exclude-from-<volume-name> and confine-to-<volume-name> are auto-created when following the default GUI workflow. Unchecking the Auto Create box will require the admin to manually create those objectives after the volume is added.
The performance test will do a quick IOPS and throughput test of the volume; these values are used as the basis for performance-oriented objectives. The performance test will take approximately 1-2 minutes per volume.
Step 5: Configure Additional IPs for the Data Volume (Optional)
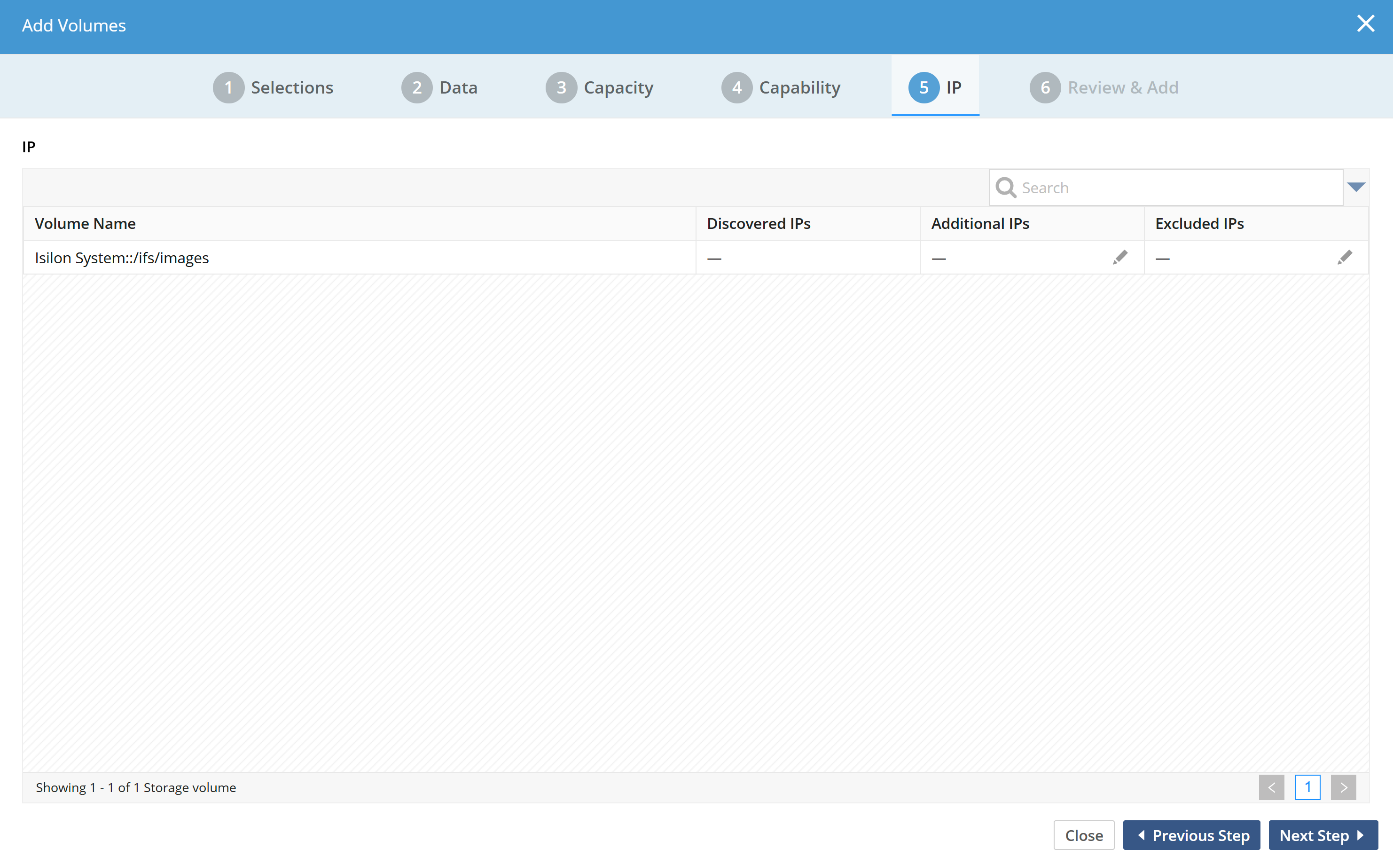
A storage volume can have one or more IP addresses. Add or remove additional IPs as needed. The IP addresses can also be edited after the volume is added using the GUI or the admin CLI. IP addresses are generally auto-discovered.
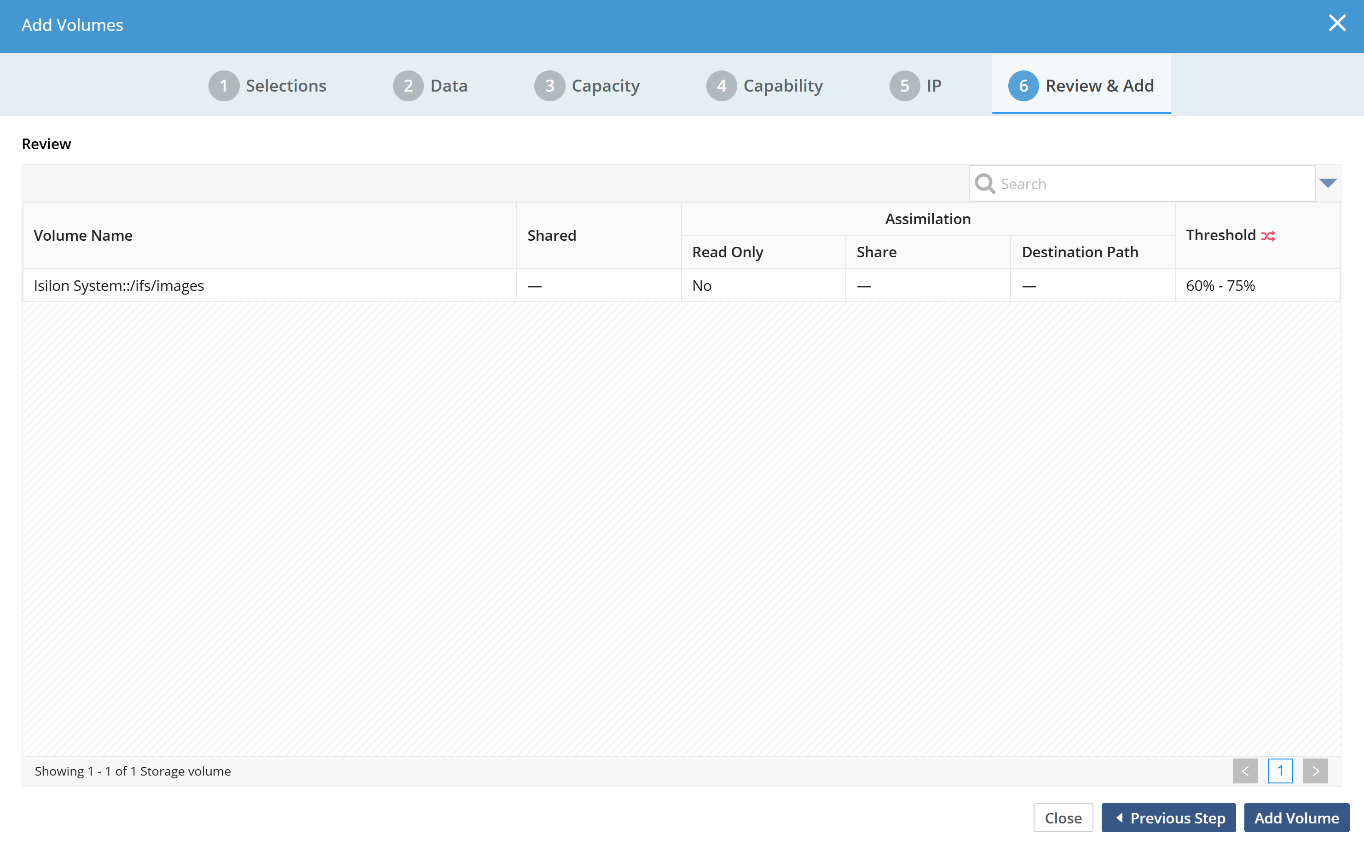
Step 6: Review the Configuration Summary
The final screen in the volume-add workflow gives a summary of what will be done when clicking Add Volume.
Adding a volume is a background process and may take a few minutes per volume to complete. The progress of the operation can be viewed in the task window or on the CLI.
Alternatively, you can use the following command to view the operation progress:
task-list