DSX High Availability Configuration
Microsoft Azure networking does not support Gratuitous ARP. Therefore, you must configure an Azure Load Balancer to support high availability. DSX high availability in Microsoft Azure requires configuring the following items at a minimum:
-
An Azure Load Balancer, including:
-
A frontend IP address.
-
A backend pool.
-
A health probe.
-
A load-balancing rule.
-
RBAC Permissions Required
To configure an Azure Load Balancer, the primary Azure Role-Based Access Control (RBAC) role required is Network Contributor. This role provides the permissions needed to manage network resources, including creating, configuring, and managing Azure Load Balancers.
For a more granular approach, you can create a custom role with only the specific permissions needed for load-balancer operations, adhering to the principle of least privilege. This can be achieved by including actions such as Microsoft.Network/loadBalancers/*.
Azure Load Balancer Configuration
This section requires the following configurations:
-
Frontend IP address.
-
Backend IP pool.
-
Inbound load-balancing rules.
-
Log in to the Azure Portal at https://portal.azure.com.
-
Search for load balancers in the top-center search bar.
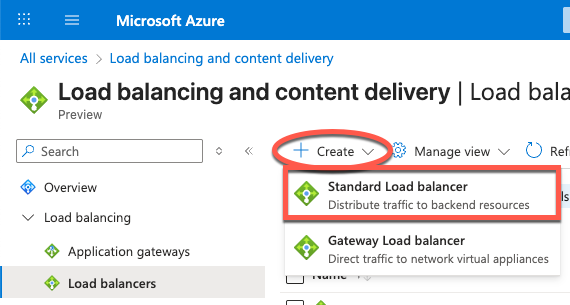 Figure 1. Searching for load balancers
 -
Select Load balancers from the dropdown search menu.
-
Select Standard Load balancer.
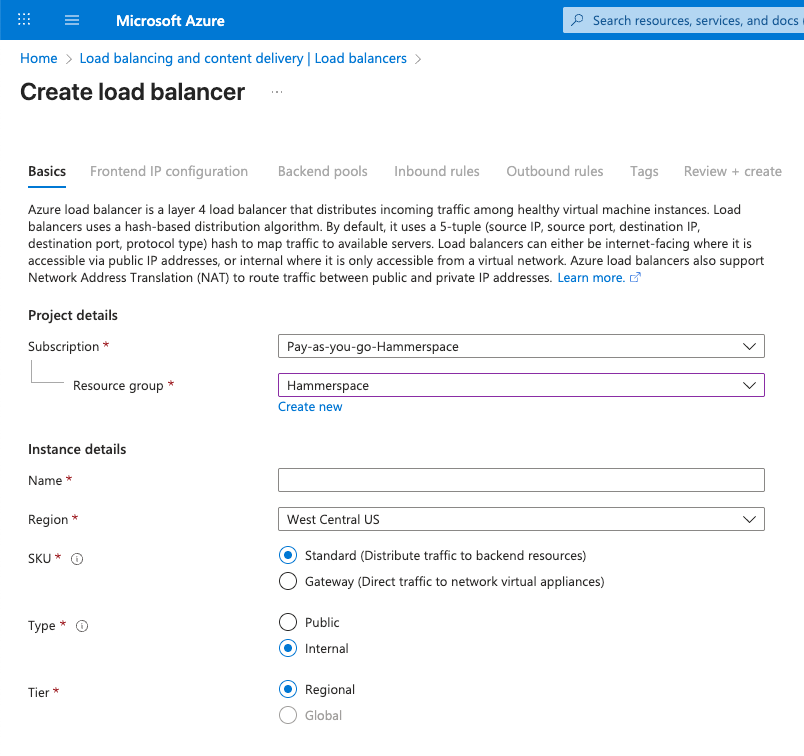 Figure 2. Load Balancer configuration
Table 1. Load-balancer settings Setting Value Project Details
Subscription
Select your subscription.
Resource group
Select the target resource group containing the Hammerspace nodes.
Instance Details
Name
Give the load balancer a name.
Region
Select the Azure region.
SKU
Standard.
Type
Internal.
Tier
Regional.
-
Select Next: Frontend IP configuration at the bottom of the page.
-
Click + Add a frontend IP configuration.
Table 2. Front-end configuration settings Setting Value Name
Provide a name.
IP version
Select the IPv4 radio button.
Virtual network
Select the target network.
Subnet
Select the target subnet.
Assignment
Static.
IP address
Enter the frontend IP address for your load balancer.
-
Click Save at the bottom of the Add frontend IP configuration panel.
-
Select Next: Backend pools at the bottom of the page.
-
Click + Add a backend pool.
Table 3. Back-end pool settings Setting Value Name
Provide a name for the backend pool.
Backend Pool Configuration
Select the NIC radio button.
-
Click + Add below the IP configurations heading.
-
When the side panel opens, check the DSX instances you wish to load balance.
-
Click Add at the bottom of the panel.
-
When the side panel closes, click Save at the bottom of the page.
-
Click Next: Inbound rules.
-
Select + Add a load balancing rule.
-
Select the following when the Add load balancing rule panel opens.
Table 4. Load-balancing rule settings Setting Value Name
Provide a name for the load-balancing rule.
IP version
Select the IPv4 radio button.
Frontend IP address
Select the frontend IP address you previously configured.
Backend pool
Select the backend pool you previously configured.
HA ports
Check.
Protocol
TCP.
Port
Turns off when selecting High Availability ports.
Backend port
Turns off when selecting High Availability ports.
Health probe
Click to create a health probe (required).
Session persistence
Source IP.
Idle timeout
30.
Enable TCP Reset
Check.
Enable Floating IP
Unchecked.
Table 5. Health-probe settings Setting Value Name
Give the health probe a name.
Protocol
Select TCP.
Port
445 (suggested), but it can be any open port.
Interval
5.
-
Click Save at the bottom of the panel.
-
Click Next: Outbound rule.
-
Click Next: Tags.
-
Optionally, create tags for the load balancer.
-
Select Next: Review + create.
-
After reviewing that the configuration is correct, select Create.
-
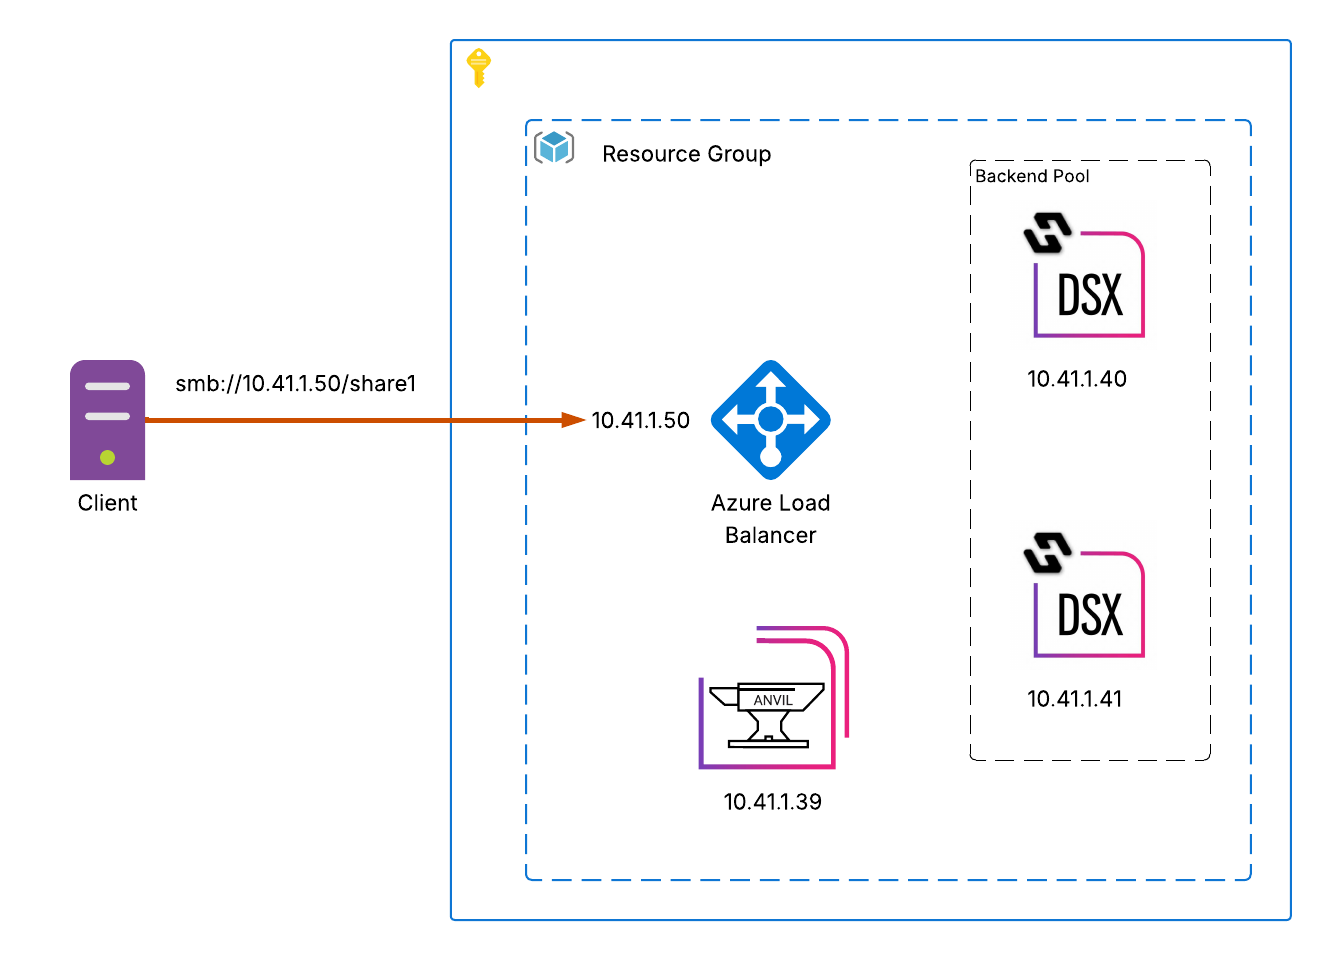
Example Topology Diagram
The following simplified diagram illustrates a client mounting the virtual IP address of the Azure Load Balancer. The Anvil HA configuration is omitted to simplify the illustration and highlight how DSX high availability works with Microsoft Azure.