Maintenance
Volume Concepts
A volume used by Hammerspace can be in one of several states as defined in this table.
| Volume State | Description |
|---|---|
Healthy |
Fully operational volume. |
Suspected |
Volume is detected as potentially unhealthy (e.g., RPC communication failure). Transition to Suspected is typically fast (seconds to a couple of minutes). |
Unavailable |
Volume is confirmed unhealthy and automatically transitions from Suspected after a configurable Max Suspected Time (default is 30 minutes). |
Failed |
Volume is permanently offline or explicitly marked as failed. |
Adding Tier 0 or LSS Nodes
When adding nodes, one key consideration is to update the exports on all other nodes that provide services so the new nodes can access shares and exports with the same options as existing nodes. To facilitate this, it is useful to maintain a master list of IPs and export options.
Node Failures
Managing how the cluster responds to a "suspected" node failure is critical to preventing unnecessary data migration.
Calculate "Max Suspected Time": Max Suspected Time is the amount of time a volume may remain in a SUSPECTED operational state before its storage volume state is automatically transitioned to UNAVAILABLE.
Max Suspected Time must exceed the sum of a node’s shutdown and startup times. For example, if it takes 5 minutes to shut down and 10 minutes to start up, a 15-minute Max Suspected Time is too short and will trigger an unnecessary data resilver process. You should test the actual shutdown/startup/reboot times of some of your nodes, and add a buffer, such as 5 minutes, to the reboot time and use that value as the Max Suspected Time.
Tier 0 Node Hardening: Apply safety breaks via automation (like Ansible) to prevent unintentional unmounts. Ensure a service is running that automatically remounts volumes within seconds if they are detached. The Hammerspace Tier 0 Ansible adds scripts and services to ensure devices and volumes used for Tier 0 remain properly mounted. Reimaging a node may remove these features, but re-running the Ansible playbooks will reinstall them.
Failure Recovery Workflow
-
Identify failure type: First, determine if it’s a "soft" (recoverable via reboot) or "hard" failure. Soft failures shouldn’t require instance deletion. Check if the volume is listed as "Unavailable" in the Hammerspace Admin UI. If the volume is offline but the node is still pingable, it may be a soft failure of the storage service. If the node is entirely unresponsive, it is likely a hardware or kernel-level hang.
-
Check the time: If a node has been unavailable for more than the Max Suspected Time and "availability drop" is enabled, the system has likely begun migrating or re-silvering data to other nodes.
-
Safe Removal: Verify if failed nodes span multiple AZs before proceeding to remove. Deleting instances across 3 AZs can result in permanent data loss.
-
Cleanup: Manually "fail" volumes and "remove" nodes in the Hammerspace admin to prevent orphaned or trash entries from remaining in the database.
Failure Cleanup
Regardless of the failure type, once a node is determined to be non-recoverable (hard) or has exceeded the Max Suspected Time (soft-turned-hard failure), you must:
-
Fail the Volume by marking it as failed and remove it in the Hammerspace GUI or CLI, or use an Ansible playbook.
-
Remove the Node by ejecting the failed node from the cluster to prevent "orphaned" metadata from lingering in the database.
-
Redeploy by adding a new instance back into the cluster to maintain capacity and protection levels.
Taking Nodes Offline for Maintenance
With availability zones, you can take one Tier 0 node or many offline at the same time, provided they are all within the same AZ. Certain steps should be taken to minimize impact, depending on how long a node will be offline, meaning short term, long term or even permanently.
IMPORTANT: Before removing nodes for maintenance, query the fault domains to ensure you aren’t removing nodes from more than one AZ simultaneously. See Availability Zones for more information.
Brief Planned Outage
When taking Tier 0 nodes offline briefly for maintenance, whether for a simple reboot, replacing a failed component, or other brief task, it may not be desirable for files with instances on the down node to be resilvered (copied from other nodes that have instances to one or more nodes that don’t, in order to keep the instance count compliant with the policy).
Hammerspace refers to the state where a file has all the instances it is supposed to as "aligned to its objectives". To prevent data mobility from making more instances during a brief, planned outage, Hammerspace offers the ability to disable the function that determines a volume is not available, and the data requires resilvering. The per-volume parameter is called availability-drop.
Another important consideration before taking nodes offline is whether the data on them is currently aligned to its objectives. In other words, do the files with instances on the volumes of these nodes have all the instances they should have somewhere else? Here are two ways to see that.
In the Hammerspace GUI, go to Infrastructure > Volumes, then click the volume name, then click Alignment at the top.
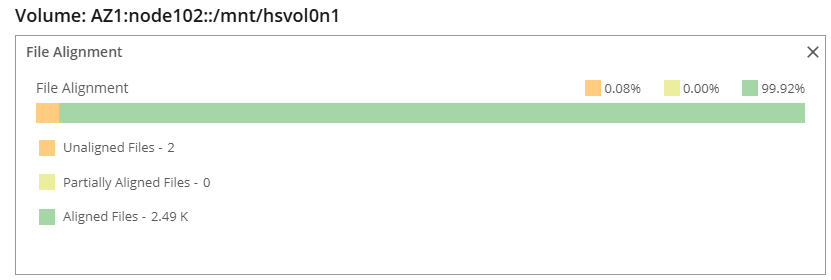
In this example, 2 files are unaligned, which should be resolved before this node is taken offline. The mobility screen in the GUI may provide clues such as failed mobilities from the volume. The List view can show specific files that are failing mobility, along with their sources and destination volumes. The following HSTK command shows misaligned files for a specific volume in a specific share:
# hs eval -r -e 'IS_FILE&&OVERALL_ALIGNMENT!=ALIGNMENT("ALIGNED")&&!ISNA(instances[|volume=storage_volume("gpu67.compute.company.com::/hammerspace/hsvol0")])?{PATH,SIZE/BYTES}' /mnt/hs_share01

{"./urnumber", 8675309}

{"./something", 3502}
Note that you may need to run the above HSTK command for each Hammerspace share.
You can also query alignment of files with instances on a given volume using the API. This curl command queries the same volume in the GUI example above, referenced by its UUID.
# curl -s -H "Content-Type: application/json" -u "admin:$ADMIN_PASSWORD" -k "https://10.200.109.239:8443/mgmt/v1.2/rest/reports/moe/compliance?storageContainerUuid=e628ce6d-d948-405f-9c4d-6d81fc990f06&storageContainerType=STORAGE_VOLUME&breakdown=NONE"|jq

{

"breakdown": [

{

"storageContainer": {

"uoid": {

"uuid": "e628ce6d-d948-405f-9c4d-6d81fc990f06",

"objectType": "STORAGE_VOLUME"

},

"name": "AZ1:node102::/mnt/hsvol0n1"

},

"data": {

"compliantFilesUsed": 2499,

"nonCompliantFilesUsed": 0,

"severelyNonCompliantFilesUsed": 2,

"compliantSpaceUsed": 10235904,

"nonCompliantSpaceUsed": 0,

"severelyNonCompliantSpaceUsed": 8192,

"timestamp": 1758759428575

}

}

]

}-
Check the alignment of files on volumes on the node(s) requiring a maintenance outage, as explained above.
-
Disable availability drop for the affected volumes. This example uses UUID, but you can use name or internal ID.
anvil1> volume-update --id e628ce6d-d948-405f-9c4d-6d81fc990f06 --availability-drop-disabled

ID: e628ce6d-d948-405f-9c4d-6d81fc990f06

Name: AZ1:node102::/mnt/hsvol0n1

Internal ID: 58

Discovered addresses:

[IP: 10.200.100.17/32, Port: 2049, NetId: tcp, NodeNum: 0]

Effective IPs:

[IP: 10.200.100.17/32, Port: 2049, NetId: tcp, NodeNum: 0]

Path: /mnt/hsvol0n1

State: OK

Access type: Read Write

Node: AZ1:node102

Oper state: Up

Admin state: Up

Capacity: [Total: 2GB, Used: 89.9MB (4%), Free: 1.9GB]

Capabilities:

Availability: 99%

Availability (effective): 99%

Availability drop: Disabled-
Take the nodes down, perform maintenance, and bring them back up.
-
Enable availability drop for the affected volumes.
anvil1> volume-update --id e628ce6d-d948-405f-9c4d-6d81fc990f06 --availability-drop-enabled

ID: e628ce6d-d948-405f-9c4d-6d81fc990f06

Name: AZ1:node102::/mnt/hsvol0n1

Internal ID: 58

Discovered addresses:

[IP: 10.200.100.17/32, Port: 2049, NetId: tcp, NodeNum: 0]

Effective IPs:

[IP: 10.200.100.17/32, Port: 2049, NetId: tcp, NodeNum: 0]

Path: /mnt/hsvol0n1

State: OK

Access type: Read Write

Node: AZ1:node102

Oper state: Up

Admin state: Up

Capacity: [Total: 2GB, Used: 89.9MB (4%), Free: 1.9GB]

Capabilities:

Availability: 99%

Availability (effective): 99%

Availability drop: Enabled
Long Term or Permanent Outage
Data must be removed and placed on other storage (evacuated) before a node can be taken offline long term or permanently. While Hammerspace will self-heal when there are objectives requiring multiple instances and "the plug is pulled" on a node, it is safer to decommission the volume(s) using the built-in functionality, either via GUI, CLI, or API, which can also remove the volume from Hammerspace after evacuation. The volume-decommission command evacuates the volume without removing it from Hammerspace. You can then use volume-remove to remove it once you’re satisfied that the data is evacuated. You can combine both of these by just running volume-remove which will do the decommission if it wasn’t already done. There is a --replace-with parameter for these two commands, but it is usually better to let Anvil figure out for itself where to place the evacuated instances.
It is also possible to use an exclude-from-node objective to evacuate data from all the volumes on the node. You still need to remove the volumes from Hammerspace.
-
Check the alignment of files on volumes on the node(s) requiring a maintenance outage, as explained above. While the decommission procedure will create an instance elsewhere, it is better to start from a fully protected state.
-
(Optional) Run volume-decommission to evacuate the volume.
anvil1> volume-decommission --name "AZ1:node102::/mnt/hsvol0n1"

ID: e628ce6d-d948-405f-9c4d-6d81fc990f06

Name: AZ1:node102::/mnt/hsvol0n1

Internal ID: 58

Discovered addresses:

[IP: 10.200.100.17/32, Port: 2049, NetId: tcp, NodeNum: 0]

Effective IPs:

[IP: 10.200.100.17/32, Port: 2049, NetId: tcp, NodeNum: 0]

Path: /mnt/hsvol0n1

State: Decommissioning (quiescing)

Access type: Read Write

Node: AZ1:node102

Oper state: Up

Admin state: Up

Capacity: [Total: 2GB, Used: 89.9MB (4%), Free: 1.9GB]

Capabilities:

Availability: 99%

Availability (effective): Disposable

Availability drop: Enabled

Durability: 99.9%

Durability (effective): Disposable-
Run volume-remove to remove the volume from Hammerspace. The --async option performs the task in the background allowing you to run several in parallel without waiting.
anvil1> volume-remove --name "AZ1:node102::/mnt/hsvol0n1" --async

The process started. To monitor progress, use: task-list --id 1ee658a1-ea85-4e37-b3d1-ff8d5384981e-
Once all volumes of this node have been removed from Hammerspace, remove the node.
anvil1> node-remove --name AZ1:node102-
Power off and/or repurpose the node.