Deploy and Configure a Global File System
This chapter is the end-to-end worked example. Once you understand the shared-OSV concept (Core Concepts: The Shared Object Storage Volume) and the architecture (Architecture), deployment is a matter of following these steps in order. The example builds a Global File System across three sites that use different vendors and capacities:
-
Site A — Anvil and DSX virtualized in VMware ESX with local NVMe and EMC Isilon.
-
Site B — Anvil and DSX virtualized in VMware ESX with local SSD and NetApp 7-mode.
-
Site C — Anvil and DSX in AWS, DSX using local EBS volumes.
Part 1: Install Anvil and DSX
Install Anvil and DSX at each site; this can run concurrently across sites and takes roughly 20–60 minutes per site. See Installing the metadata server (Anvil) and Installing data services (DSX) for details.
Part 2: Configure Local Storage
Each site needs local file storage — a DSX with local block storage or a local NAS export — to hold data used at that site. See Adding storage to Hammerspace for details.
Part 3: Set a User-Friendly Name for Each Site (Optional)
Each site has a cluster name set at install time. Setting a descriptive name makes multi-site management easier and lets you use the name in place of an IP address during replication setup.
Command:
local-site-config --name "SITE A"Expected output:
ID:                            179ca903-af1e-4e37-9086-505fa83fdcf7
Name:                          SITE A
Internal ID:                   0
Site management address:       192.0.2.10
Site data address:             192.0.2.10
Effective management address:  192.0.2.10
Effective data address:        192.0.2.10
Trust client certificate:      true
Client certificate:
                         Version:      3
                         Serial:       <serial number>
                         Algorithm:    SHA512withRSA
                         Issuer:       CN=<site ID>, OU=SITE, O=Hammerspace
                         Subject:      CN=<site ID>, OU=SITE, O=Hammerspace
                         Validity:
                           Not Before: <timestamp>
                           Not After:  <timestamp>
                         Fingerprints:
                           SHA1:       <fingerprint>
                           MD5:        <fingerprint>
                           CRC32:      <fingerprint>

GFS participants:
                         [Share participant ID: <id>, ID: <uuid>]
The GFS participants list has one entry for each share on this site — every
share carries its own local participant, whether or not it replicates anywhere —
so it is empty only on a site that has no shares yet. It does not show which
shares are part of a Global File System; use gfs-participant-list for that.
Repeat on Site B and Site C.
Part 4: Configure a Shared Bucket (Required)
|
Stop here and complete a full chapter before continuing
This part is a summary, not the procedure. The actual steps — adding a storage system, selecting or creating a bucket, and marking it shared — are a complete chapter of their own: Adding a shared bucket. Go there now, complete it for every site, and then come back to Part 5 below. Part 5 assumes the shared bucket is already configured on every site. |
Any supported object-storage vendor/cloud can be the shared bucket; if none is available, Hammerspace S3 functionality can serve as the shared bucket. The bucket is used for cross-site data transfer (never metadata), must be reachable by all Anvil and DSX nodes at every site, and is added with the shared flag so other sites can join it.
Part 5: Create a Global Share
Create a new share (or use an existing one) and turn on share replication, which bi-directionally replicates all metadata changes to every participating site. The initial setup is done on the site holding the source share. The share must not already exist on a target site; GFS creates it there and immediately begins a near continuous stream of metadata.
Using the CLI
Run on Site A to create the share and add Site B and Site C as participants.
Command:
share-create --name Home --path /homeExpected output:
Name:                                Home
Internal ID:                         <id>
ID:                                  <uuid>
Path:                                /home
Lifecycle:                           CREATED
State:                               PUBLISHED
Size limit state:                    NORMAL
Export options:
                         [Client specification: *, Access permissions: RW, Root-squash: false, Insecure: false, Security options: [SYS]]
SMB-browsable:                       On
Is referral:                         No
Objectives:
                         [Name: delegate-on-open, ...]
                         (the share's default objective set — see xref:objectives-and-data-placement.adoc[])
Logical ID:                          <uuid>
Replication latency alert threshold: 300 seconds
Local GFS participant ID:            0
GFS participants:
                         Name:                                Home::SITE A
                         ID:                                  <uuid>
                         Admin state:                         Up
                         Oper state:                          Up
                         Participant share internal ID:       <id>
                         Participant site name:               SITE A
                         Participant site management address: <ip>
                         Participant site data address:       <ip>
                         Participant ID:                      0
Client certificate:
                         (certificate detail, same shape as in local-site-config)
Private key CRC32:                   <checksum>
Command:
gfs-participant-add --share-name Home --site-name "SITE B" --site-username admin --site-password ********Expected output:
Name:                                Home::SITE B
ID:                                  bc5a2f12-37f7-40eb-8c92-b1def99e21c2
Local share name:                    Home
Admin state:                         Up
Oper state:                          Up
Participant share internal ID:       6
Participant site name:               SITE B
Participant site management address: 198.51.100.10
Participant site data address:       198.51.100.10
Participant ID:                      1
Replication interval:                5 seconds
Send Latency:                        0 seconds
Shared object storage volumes:
                         [Name: ObjectStorage::sharedbucket, Internal ID: 268435472, ID: 05df6a99-7f3d-4f45-a722-59aa54c2cf05]
Internal ID:                         7
Local share internal ID:             6
If Part 3’s site naming was skipped for a given site, use that site’s actual cluster
name (its auto-generated ID, e.g. AE15J7QCN01WL4) in place of "SITE B" — naming
sites is optional, not required, for gfs-participant-add to work. Using an
unrecognized site name fails clearly:
gfs-participant-add: site 'SITE B' not found.Repeat gfs-participant-add for Site C.
Using the GUI
-
Navigate to Data › Shares and click Create Share. Name the share (Home in this example) — the NFS Export Path field auto-fills from the name (confirmed: typing
Homeimmediately populates/Home). Click Create. The share is created on the local (source) site only.The NFS Export Path auto-fill only works until the field is manually edited. If you type directly into NFS Export Path, the field does not cleanly revert to the derived value — it collapses to just
/. Retyping the Name field afterward does not re-trigger auto-derivation for that dialog session. If this happens, either type the full correct path manually (e.g./Home) or close and reopen the dialog.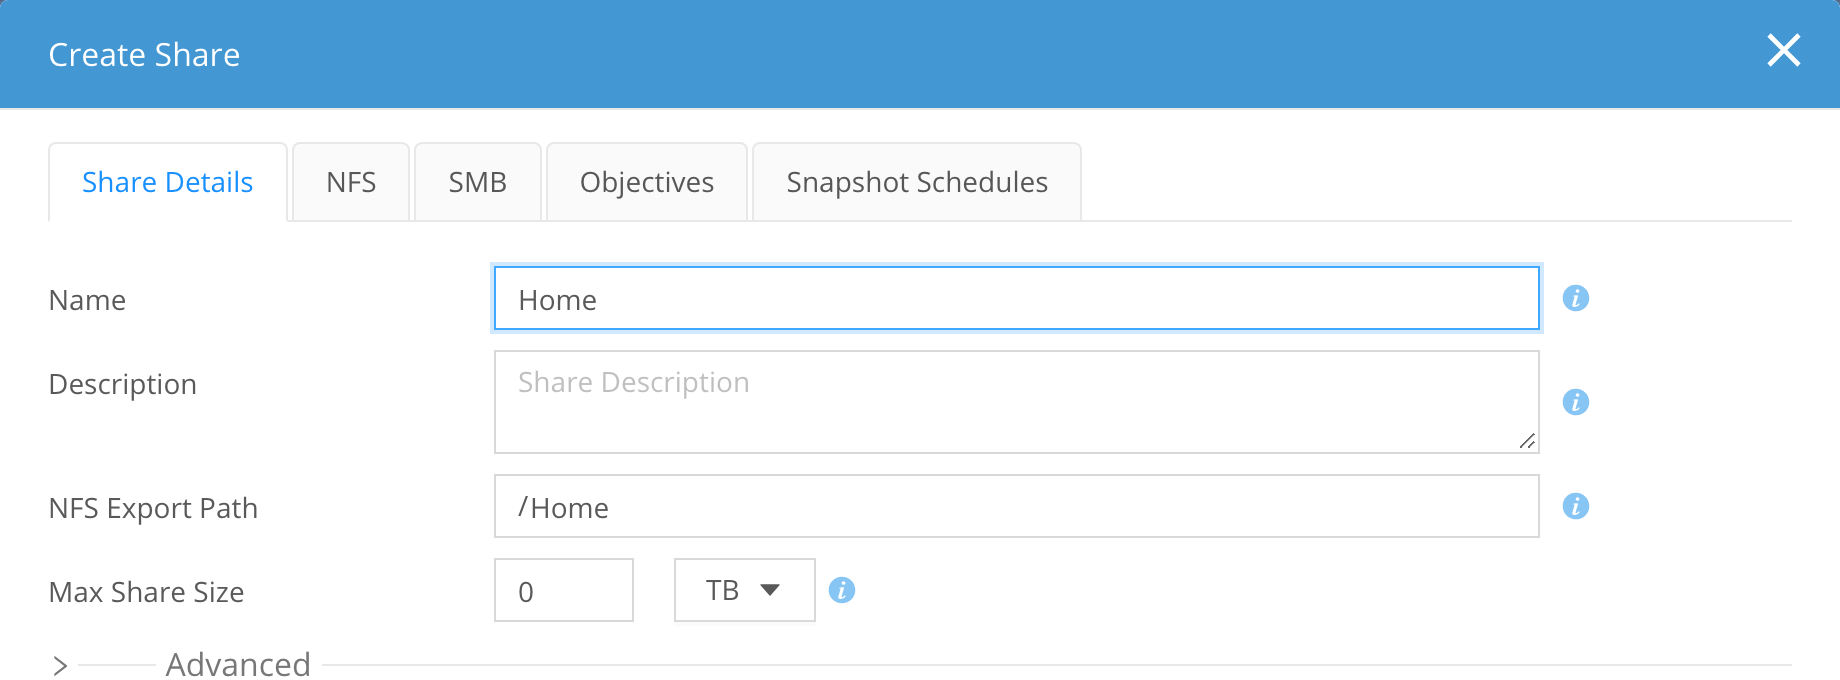 Figure 1. The Create Share dialog with the NFS Export Path auto-filled from the share name
 -
Back on Data › Shares, click the Edit (pen) icon in the Home row to open the share-configuration dialog, then the Objectives tab. The File Conflict Resolution objective (
log-xfer-1-<time>) is already selected by default — there is nothing to manually enable. It shows as inactive in the Active column only because its applicability condition (IS_GFS_SHARE) isn’t true yet; it activates automatically once the share has GFS participants. -
Click the Global File System tab. It lists the share’s current participants — initially just the local site, shown Up. Click Add Participant.
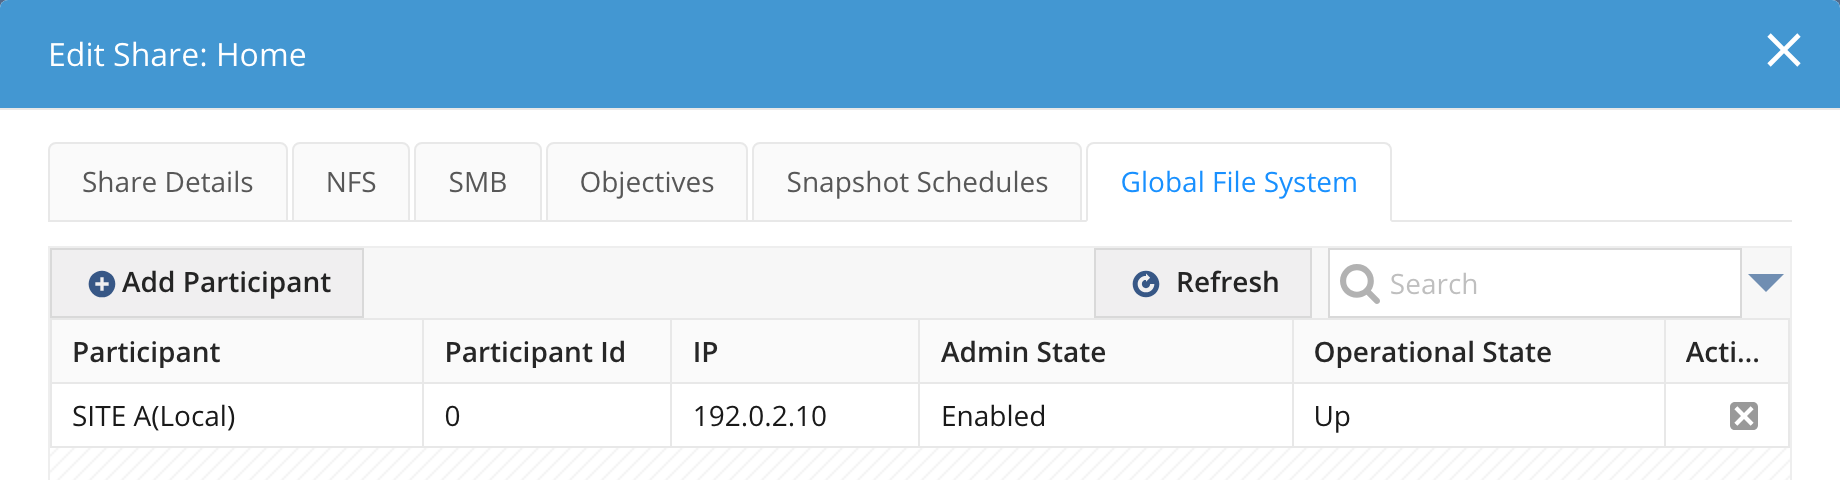 Figure 2. The Global File System tab before any remote participants are added
 -
In Name, select the remote site (Site B). The pull-down is pre-populated with every site registered to the shared bucket: there is no separate "pair the clusters" step, because adding the shared OSV to both sites already registered them with each other. Selecting the site auto-fills its IP Address.
 Figure 3. The Name pull-down pre-populated with the registered remote site
 -
Under Site Credentials, enter the Username (
admin) and Site B’s admin password, then click Test Connection to confirm reachability — a "The site is reachable" message confirms this. Leave Interval at the default (5 seconds) unless you need a different replication poll interval. Click Add.What the replication interval controlsThe Interval is how often each Anvil polls its participants for metadata changes to replicate — it does not set an upper bound on how current the two sites can be, only how frequently they check in with each other. A shorter interval means changes propagate faster but generates more inter-Anvil traffic; a longer interval reduces that traffic at the cost of more lag between a write and its replication. 5 seconds is the default and is appropriate for most deployments; there is no currently documented minimum or maximum — treat very short intervals (well under 5 seconds) as unverified for this guide.
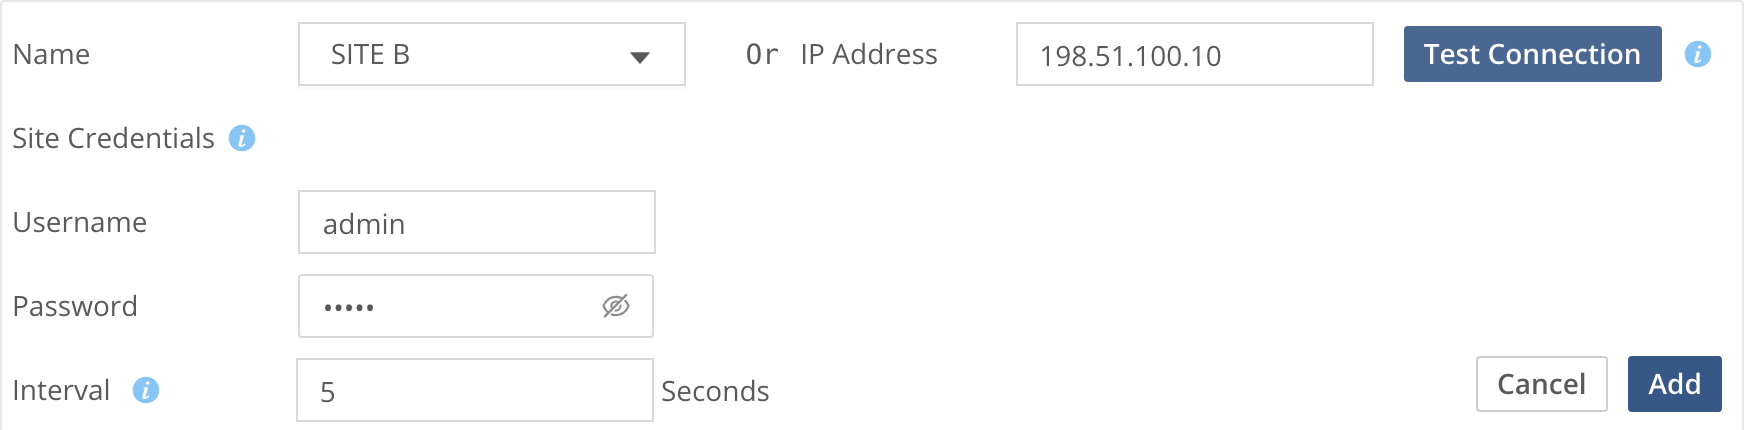 Figure 4. Site credentials filled in and connection confirmed
 -
GFS creates the share on the remote site and starts metadata replication — confirmed live at roughly 13 seconds, within the 15–30 second range. The new participant appears on the Global File System tab with both Admin State and Operational State showing Up.
On this tab, Admin State displays as the word Enabled, notUp; only Operational State literally readsUp. Both indicate the same healthy state — see the terminology note in the next step.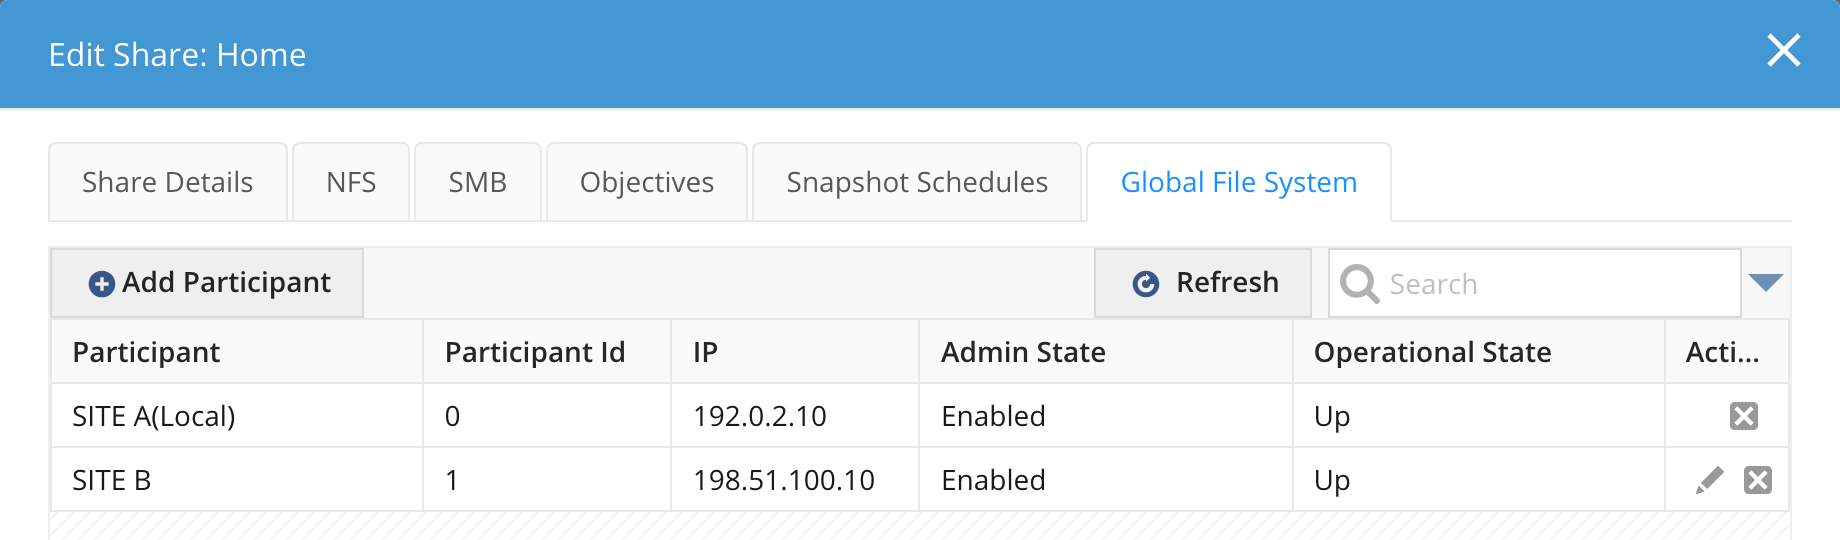 Figure 5. Both participants confirmed Up after adding Site B
Repeat for Site C.
-
Verify replication on the Shares tab via the Details icon (the eye icon — not the Edit pen icon) and the Global File System tab, which shows each participant’s state along with Send and Receive latency.
This Details view’s Global File System tab is a different screen from the Edit dialog’s Global File System tab used in the previous steps, and uses different terminology for the same value: Admin State here reads UP, whereas the Edit dialog’s Admin State column readEnabled. Both refer to the same underlying state.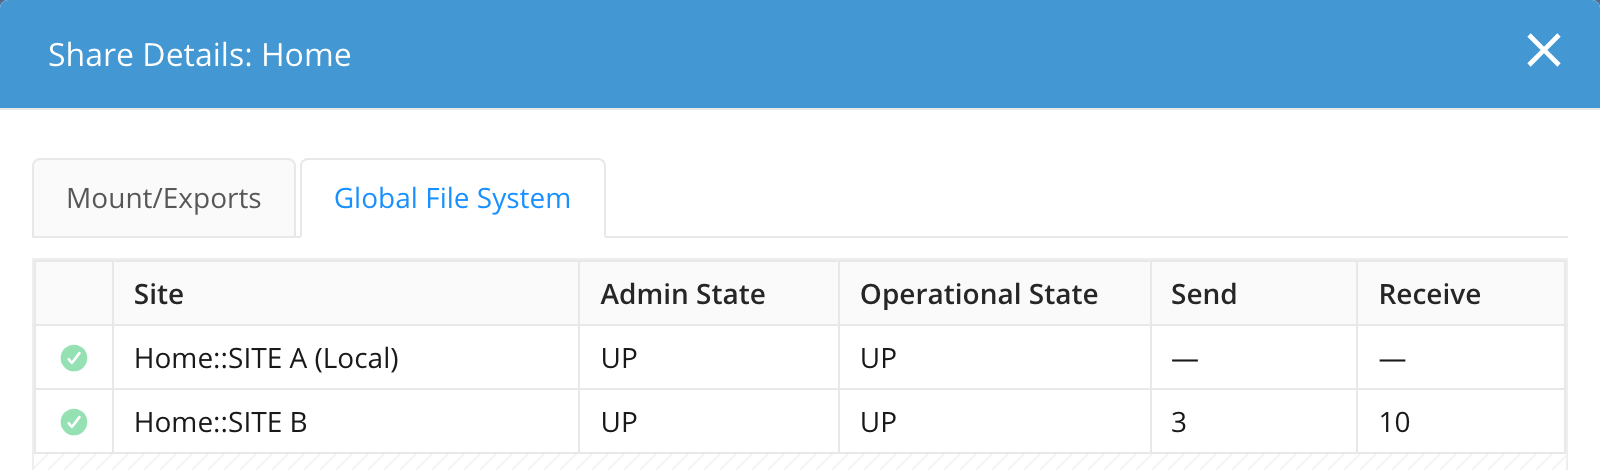 Figure 6. Verifying participant state and latency via the Details view
|
It is normal for latency figures to read 1.5x–3x higher than the raw network
round-trip time (ping RTT) between the two sites — the replication-latency
metric measures more than just network transit, so it will not match a plain
On an idle share with no data written yet, Send and Receive both
show |
Verifying and Managing Participants
The GUI’s Details view (previous step) is one way to check participant
health. The CLI equivalent — and the more complete one — is
gfs-participant-list, which is the canonical way to check a share’s
replication health from a script or terminal:
Command:
gfs-participant-list --share-name HomeExpected output (one block per participant, including the local site):
total 2
Name:                                Home::SITE A
ID:                                  8e6c28a5-5283-479c-b6e7-2244ac52ca82
Local share name:                    Home
Admin state:                         Up
Oper state:                          Up
Participant share internal ID:       6
Participant site name:               SITE A
Participant site management address: 192.0.2.10
Participant site data address:       192.0.2.10
Participant ID:                      0
Replication interval:                0 milliseconds

Name:                                Home::SITE B
ID:                                  bc5a2f12-37f7-40eb-8c92-b1def99e21c2
Local share name:                    Home
Admin state:                         Up
Oper state:                          Up
Participant share internal ID:       6
Participant site name:               SITE B
Participant site management address: 198.51.100.10
Participant site data address:       198.51.100.10
Participant ID:                      1
Replication interval:                5 seconds
Send Latency:                        1 seconds
Receive Latency:                     5 seconds
Shared object storage volumes:
                         [Name: ObjectStorage::sharedbucket, Internal ID: 268435472, ID: 05df6a99-7f3d-4f45-a722-59aa54c2cf05]
A healthy participant shows Admin state and Oper state both Up. The local
site’s own entry always shows a Replication interval of 0 milliseconds — it
isn’t polling itself.
To temporarily pause replication to one participant without removing it —
useful for planned maintenance on the remote site — use
gfs-participant-disable, then gfs-participant-enable to resume:
gfs-participant-disable --share-name Home --site-name "SITE B"Expected output:
Success with some errors:

Name:                                Home::SITE B
ID:                                  bc5a2f12-37f7-40eb-8c92-b1def99e21c2
Local share name:                    Home
Admin state:                         Down
Oper state:                          Up
Participant share internal ID:       6
Participant site name:               SITE B
Participant site management address: 198.51.100.10
Participant site data address:       198.51.100.10
Participant ID:                      1
Replication interval:                5 seconds
Send Latency:                        5 seconds
Receive Latency:                     9 seconds
Shared object storage volumes:
                         [Name: ObjectStorage::sharedbucket, Internal ID: 268435472, ID: 05df6a99-7f3d-4f45-a722-59aa54c2cf05]
Internal ID:                         7
Local share internal ID: 6|
Both This header is CLI boilerplate, not a real error indicator — confirmed in the
CLI source ( |
This sets Admin state to Down for that participant while leaving the
participant relationship itself intact — confirmed live: replication lag
(Send/Receive latency) grows while disabled, since polling has stopped, and the
participant remains listed in gfs-participant-list throughout.
Oper state keeps reading Up while the participant is disabled; Admin
state is the field that shows the pause.
Re-enable with:
gfs-participant-enable --share-name Home --site-name "SITE B"Expected output:
Success
with some errors:
Name: Home::SITE B
ID: bc5a2f12-37f7-40eb-8c92-b1def99e21c2
Local share name: Home
Admin state: Up
Oper state: Up
Participant share internal ID: 6
Participant site name: SITE B
Participant site management address: 198.51.100.10
Participant site data address: 198.51.100.10
Participant ID: 1
Replication interval: 5 seconds
Send Latency: 8 seconds
Receive Latency: 7 seconds
Shared object storage volumes:
[Name: ObjectStorage::sharedbucket, Internal ID: 268435472, ID: 05df6a99-7f3d-4f45-a722-59aa54c2cf05]
Internal ID: 7
Local share internal ID: 6Admin state returns to Up and replication resumes; latency catches up over
subsequent polling intervals rather than instantly. Both commands are reversible
and non-destructive — unlike gfs-participant-remove, they do not affect data
or unwind the replication relationship.