Installing and Deploying Hammerspace
Hammerspace consists of a set of software services on an appliance-style OS, and can be deployed in the cloud, on virtual machines, or on bare-metal hardware. One or more NAS storage volumes are needed to hold user data. For details on configuring storage, please see the Configuration Guide.
System Overview
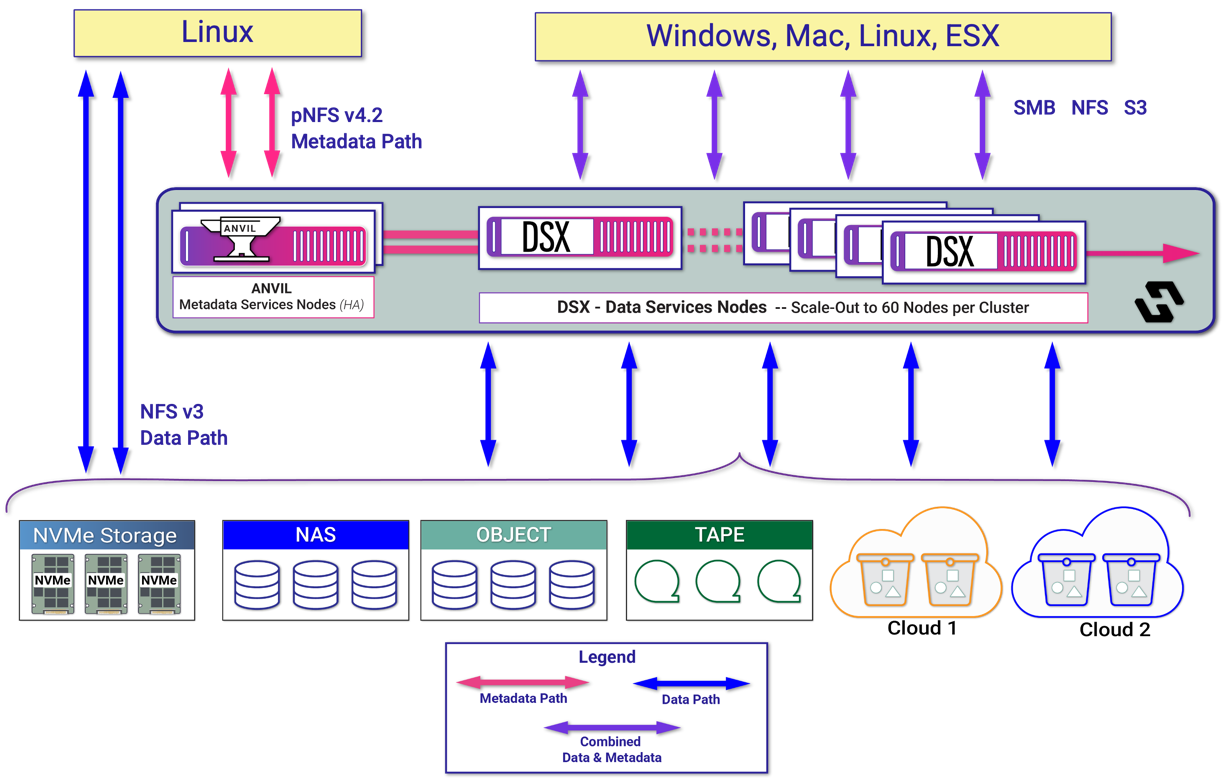
The Hammerspace software platform contains the following main components:
-
Anvil: Metadata server deployed as a highly available (HA) service and is responsible for managing all the metadata for the global file system. It also hosts the API and Management GUI services.
-
DSX (Data Services nodes): DSX nodes are the workhorses of the Hammerspace Global Data Platform, and include several different functional capabilities:
-
Portal: Enables protocol access for NFS, SMB and S3 clients. The portal is primarily stateless; file locking, such as SMB file locks, are appropriately clustered.
-
Mover: The mover service is stateless and runs on each DSX instance. It moves files non-disruptively between file storage volumes.
-
Cloud Mover: The cloud mover service is responsible for uploading and downloading data from cloud and object storage. See the hardware compatibility list for the complete support matrix.
-
Store: The store service makes block storage available as file storage volumes. Using DSX Store is a simple way to include local NVMe drives and white box storage solutions into the global file system. Block storage is made available using XFS as a file system on top of the block device.
-
| If you are deploying Hammerspace in the cloud, see the deployment guide specific to each respective cloud platform. Cloud deployment guides [Support article may require login to view.] are available in the Hammerspace Support Hub. |
Figure 1 illustrates an example of a Hammerspace instance deployed in an enterprise infrastructure. A deployment can be as small as an HA pair of two Anvils and two DSX nodes. However, DSX nodes can scale out to 60 nodes per cluster to support enterprise capacity and performance requirements.
System Requirements
This section provides information on the system requirements for all system elements.
Anvil (Metadata Services Node)
Each Anvil must be equipped with sufficient resources to deliver low-latency metadata operations to clients. The Anvil will make full use of the assigned resources as it runs continuous optimizations of metadata and data placement. It is normal for the Anvil to operate at 20-40% CPU utilization or higher, even with a modest metadata load, in large-file environments. The Anvil automatically scales resources based on available CPU and memory.
Production deployments should not use fewer resources than specified in Table 1.
| The figures in this table are production recommendations. The installer enforces its own, lower floor and reports anything below the recommendation as a caution rather than an error, so a system can be installed on less than this table specifies. Size to this table for production; expect the validation screen to be the place where a smaller system announces itself. |
| The size of the metadata drive depends on the number of files and directories in the system. Please see Sizing Guidelines for more specifics. |
| Virtual machine | Bare metal | |||
|---|---|---|---|---|
CPU1 |
24 vCPU |
|
||
Memory |
>=64 GB |
>=128 GB |
||
Boot drive2 |
200 GB (Hardware RAID recommended). If memory is larger than 160 GB, then the minimum boot drive size is memory x 1.3. |
|||
Additional drives for metadata storage |
Minimum (2x) 400 GB, backed by SSD or NVMe. |
(2x) 512 GB. NVMe recommended. Hardware RAID is not required. |
||
Network adapter |
Minimum 10 GbE |
|||
Notes:
-
(1) Only two NUMA nodes are supported. On systems where the BIOS can configure additional NUMA nodes, ensure it is configured for a maximum of two.
-
(2) Intel VROC is supported. Details are documented here: Intel VROC support.
| Only a 512-byte sector size is supported for boot drives. |
DSX (Data Services Node)
The resources required for DSX nodes depend on which services are in use. For example, if a single DSX is used for all the Portal, Store, Cloud Connector, and Mover functions, then it will need more resources than if multiple DSX nodes are deployed. The specifications in Table 2 outline the requirements to get started.
DSX nodes can be easily added (and removed) after initial installation to support a scale-as-you-grow deployment.
| The installer’s own CPU floor for a DSX node is higher than the minimum shown in this table. A node built to the CPU minimum below is therefore still flagged with a caution on the Virtual Hardware Validation screen. The caution does not block the installation, but if you want a clean validation screen, allocate more CPU than the table’s minimum. |
| Virtual machine | Bare metal | |||
|---|---|---|---|---|
CPU1 |
>= 4 |
|
||
Memory |
>=16GB |
>=64 GB |
||
Boot drive2 |
(1x) 100 GB (Recommended) |
512 GB (Hardware RAID recommended) |
||
Additional drives |
Only required for DSX Store |
|||
Network adapter |
Minimum 10 GbE |
|||
Notes:
-
(1) Only two NUMA nodes are supported. On systems where the BIOS can configure additional NUMA nodes, ensure it is set to a maximum of two.
-
(2) Intel VROC is supported. Details are documented here: Intel VROC support.
| Only a 512-byte sector size is supported for boot drives. |
See the Hardware Compatibility List for additional information regarding specific hardware that has been tested.
| The Hardware Compatibility List and other Product guides are available as PDF downloads on the Download Packages page of the Hammerspace License and Delivery Portal. |
Intel VROC Support
Intel VROC (Virtual RAID On a Chip) is an Intel technology that allows systems to create RAID arrays using NVMe SSDs connected directly to the CPU’s PCIe lanes, without needing a traditional RAID controller card. Additional Intel VROC product details can be found here: https://www.intel.com/content/www/us/en/software/virtual-raid-on-cpu-vroc.html
Hammerspace supports booting from Intel VROC-configured storage arrays.
Requirements:
-
Only supported with UEFI. Traditional BIOS is not supported with Intel VROC.
-
Only a single VROC device set is supported. Any additional arrays must be deleted.
-
VROC-configured storage is only supported for the boot drive. It is not supported for metadata or data drive.
-
It is not supported to use software mirroring on top of VROC arrays. It is expected that the VROC array can provide the required mirroring.
Installation notes:
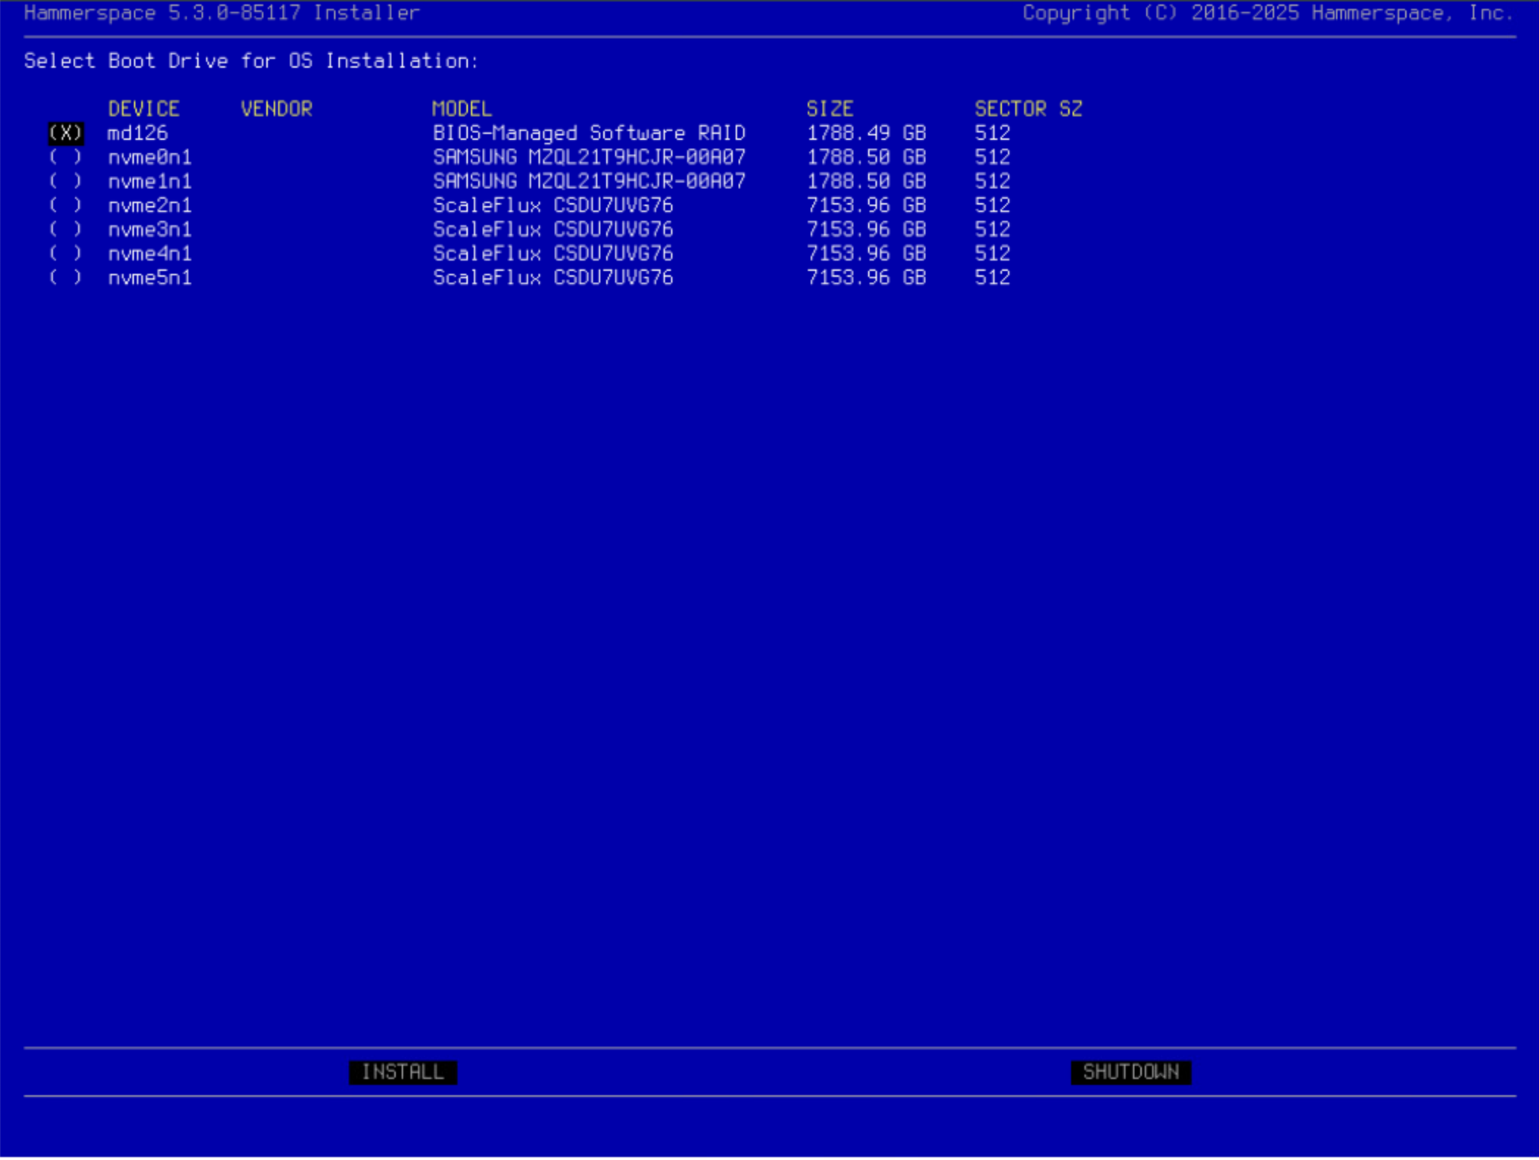
When booting the ISO, the drive selection screen will look like the screenshot below. Select the device as the boot drive and proceed with the installation.
| A RAID1 Intel VROC device will sync in the background on boot. If an unclean shutdown has just occurred, it will resync the entire device. Shutdown gracefully whenever possible. |
Sizing Guidelines
Both the Anvil and DSX nodes will auto-size internal tunables based on the resources available at boot time.
| This sizing section provides generic recommendations; however, these are provided as guidelines since it is difficult to accurately rely on generic sizing to accommodate the many possible variations found in enterprise environments. The integrated Prometheus exporters provide detailed visibility into the systems utilization and should be used for high-performance environments. |
Anvil Sizing Guidelines
To deliver fast metadata operations, it is highly recommended to provide Anvil’s metadata drive with NVMe storage.
The size of the metadata drive determines how many files (versions of files, snapshots, etc.) can be stored in the system.
-
It is recommended to size the system using 4,096 bytes per unique file and directory. That covers the most common configurations and regular snapshot usage (e.g., daily/weekly snapshots).
-
If many snapshots (256+) are kept, it is recommended to double the size to 8,192 bytes per unique file and directory to ensure sufficient metadata space.
| When the file count scales into the 10s of millions, optimizations built into the metadata storage will reduce the amount of actual capacity used per file. This reduction is not considered in Table 3, as it can be difficult to programmatically predict. |
| Number of files and directories | Recommended metadata capacity |
|---|---|
10 million |
41 GB |
100 million |
410 GB |
500 million |
2 TB |
2 billion |
8 TB |
The other vector for sizing is memory consumption on the Anvil. Each file that is opened and actively used by a client utilizes a small amount of memory, approximately 12k bytes per file.
Metadata Replication Sizing Guidelines
Replication (used to deliver the Global File System functionality) increases the CPU usage. The exact amount is not static as it depends on the activity in the system and the activity of the remote sites. It is recommended to allocate approximately 20% of the CPU capacity to handle replication traffic in an active environment; however, in some configurations, it could be necessary to go to 40%.
DSX Sizing Guidelines
DSX nodes have multiple roles, and depending on the function, the sizing approach will be different.
| Network throughput is critical as DSX nodes are either serving data, storing data, or moving data to the cloud or between NAS volumes. It is recommended to use at least 10 Gb networking. |
Each open SMB connection to a DSX node consumes approximately 1 MB of memory. One thousand SMB clients would consume 1 GB of memory while connected.
CPU consumption on DSX depends on the task. Moving data to and from the cloud is the most CPU-intensive task due to compression.
| For environments where >100 GBs of data will be moved to and from object/cloud every day, it is recommended to use a minimum of 8 CPUs / 32 GB of RAM for optimal performance. |
VMware Settings
For VMware deployments, it is strongly suggested to reserve 100% of CPU and memory. In vSphere this may be done by setting the Latency Sensitivity setting to High. The following table shows settings for installing the cluster on VMware ESXi.
| VMware ESXi specific settings | Value |
|---|---|
CPU reservation |
CPU cores * CPU core MHz |
Memory reservation |
Reserve all memory |
Network adapter |
VMXNET 3 |
SCSI adapter |
Para virtualized SCSI controller |
Guest OS version |
Red Hat Enterprise Linux 7 (64-bit) |
VM hardware version |
VM version 9 or higher |
Time Synchronization in VMware Deployments
It is critical that Anvil and DSX nodes be time synchronized. Hammerspace uses Network Time Protocol (chrony implementation), and the Anvil acts as a time server for all DSX nodes.
In VMware environments, vSphere can sometimes adjust the clocks on the virtual machines, which can cause the Hammerspace nodes to lose time sync, potentially causing issues. For this reason, it is necessary to follow the guidance in the VMware knowledge base article, Disabling Time Synchronization (1189).
Before installing Anvil and DSX software in VMware environments, prevent loss of time synchronization by performing the following procedure:
| The following instructions are for an ESX 7.x environment. |
-
Log in to vCenter vSphere client.
-
Select the virtual machine in the client inventory and choose Edit Settings….
-
Click the VM Options tab.
-
Expand the VMware Tools section.
-
Make sure Synchronize guest time with host is UNSELECTED.
Hyper-V Settings
The following settings are recommended in a Hyper-V environment.
-
Use Static MAC addresses for the Anvil and DSX nodes
-
Disable Time synchronization using the Hyper-V management tool
Firewall Port Requirements
All Anvil and DSX nodes are protected by their own firewalls for increased security. However, if any other firewalls are used between the nodes, the following ports must be configured correctly for proper operations. The following tables identify the required ports between Anvil and DSX nodes, required connectivity to other NFS systems and object and cloud storage. Note that if certain functionality is not used —for example, syslog or SNMP —then it is not necessary to open those ports.
Global File System Port Requirements
-
Ports 443, 9097, 9298, and 9299 must be open between Anvils across all sites.
Anvil Firewall Port Settings
| Source | Port | Protocol | Service description | Mgmt | Data | HA | DSX | NFS storage | Object / Cloud |
|---|---|---|---|---|---|---|---|---|---|
Any |
22 |
TCP |
Secure Shell for Management Console |
✔ |
✔ |
✔ |
|||
Any |
80 |
TCP |
GUI, Port redirect to https |
✔ |
✔ |
||||
Any |
111 |
TCP/UDP |
Storage, RPC (rpcbind) |
✔ |
✔ |
✔ |
|||
NTP |
123 |
UDP |
NTP, Network Time Protocol |
✔ |
✔ |
✔ |
|||
Any |
161 |
TCP/UDP |
SNMP |
✔ |
✔ |
||||
Any |
389, 636 |
TCP |
LDAP |
✔ |
|||||
Any |
443 |
TCP |
GUI and REST end point, HTTPS, redirect to 8443 |
✔ |
✔ |
||||
Any |
445 |
TCP |
SMB, used for assimilation |
✔ |
✔ |
||||
External Syslog |
514 |
UDP |
syslogd |
✔ |
✔ |
||||
NFS |
635 |
TCP |
NFS - mountd |
✔ |
✔ |
✔ |
|||
NFS client |
662 |
TCP/UDP |
NFS - statd |
✔ |
✔ |
||||
NFS |
2049 |
TCP |
NFS |
✔ |
✔ |
✔ |
|||
Anvil |
2224 |
TCP |
High Availability |
✔ |
|||||
Anvil |
3049 |
TCP/UDP |
HS Store |
✔ |
|||||
Anvil |
3121 |
TCP |
High Availability |
✔ |
|||||
DSX |
4379 |
TCP/UDP |
SMB High Availability, CTDB |
✔ |
✔ |
||||
Anvil |
4505 - 4506 |
TCP |
Node management (salt) |
✔ |
✔ |
||||
Anvil |
5403 - 5405 |
TCP |
High Availability |
✔ |
|||||
External Syslog-TLS |
6514 |
TCP/UDP |
Syslog with TLS encryption |
✔ |
✔ |
||||
Anvil |
7789 - 7812 |
TCP |
High Availability, DRDB |
✔ |
|||||
Anvil |
8443 |
TCP |
GUI and REST end point, HTTPS |
✔ |
✔ |
✔ |
|||
Anvil |
9093 |
TCP |
Services monitoring, Kafka |
✔ |
|||||
DSX |
9094 |
TCP |
Data Mover Engine |
✔ |
|||||
Anvil |
9095 - 9096 |
TCP |
Data Mover Engine |
✔ |
✔ |
||||
Anvil |
9097 |
TCP |
Metadata replication |
✔ |
|||||
Anvil |
9098 |
TCP |
Cloud mobility |
✔ |
✔ |
||||
Anvil |
9099 |
TCP |
Cloud mobility, HMDB |
✔ |
✔ |
||||
Prometheus server |
9100 - 9103 |
TCP |
Prometheus exporters (Anvil) |
✔ |
✔ |
✔ |
|||
Anvil |
9298 |
TCP |
HMDB |
✔ |
✔ |
||||
Anvil |
9299 |
TCP |
Data Manager |
✔ |
✔ |
||||
Anvil |
9399 |
TCP |
KMS proxy |
✔ |
✔ |
||||
Anvil |
9929 |
TCP |
High Availability |
✔ |
|||||
NFS |
20048 |
TCP/UDP |
NFS - Mount |
✔ |
✔ |
✔ |
|||
NFS |
20490 - 20492 |
TCP |
NFS |
✔ |
✔ |
✔ |
|||
Anvil |
21064 |
TCP/UDP |
High Availability |
✔ |
|||||
Anvil |
30048 |
TCP |
HS Store |
✔ |
|||||
NFS |
32803 |
TCP/UDP |
NFS File Locking |
✔ |
✔ |
✔ |
DSX Firewall Port Settings
| Source | Port | Protocol | Service description | Mgmt | Data | Portal | Anvil | Object / Cloud |
|---|---|---|---|---|---|---|---|---|
Any |
22 |
TCP |
Secure Shell for Management Console |
✔ |
✔ |
|||
Any |
80 |
TCP |
S3 (HTTP), Object Storage |
✔ |
✔ |
✔ |
✔ |
|
Any |
111 |
TCP/UDP |
Storage, RPC (rpcbind) |
✔ |
✔ |
✔ |
||
NTP |
123 |
UDP |
NTP, Network Time Protocol |
✔ |
✔ |
|||
Clients |
137 - 139 |
TCP |
SMB data access (NetBIOS) |
✔ |
✔ |
|||
Any |
161 |
TCP/UDP |
SNMP |
✔ |
✔ |
✔ |
||
Any |
389, 636 |
TCP |
LDAP |
✔ |
||||
Any |
443 |
TCP |
S3 (HTTPS), Object Storage |
✔ |
✔ |
✔ |
||
Clients |
445 |
TCP |
SMB data access |
✔ |
✔ |
|||
NFS client |
662 |
TCP/UDP |
NFS - statd |
✔ |
✔ |
|||
NFS |
2049 |
TCP |
NFS |
✔ |
✔ |
✔ |
||
Anvil |
3049 |
TCP/UDP |
HS Store |
✔ |
||||
DSX |
4379 |
TCP/UDP |
SMB High Availability, CTDB |
✔ |
✔ |
✔ |
||
Anvil |
4505 - 4506 |
TCP |
Node management (salt) |
✔ |
✔ |
|||
Anvil |
8443 |
TCP |
HTTPS |
✔ |
✔ |
✔ |
||
Anvil |
9093 |
TCP |
Services monitoring, Kafka |
✔ |
✔ |
|||
DSX |
9094 |
TCP |
Data Mover Engine |
✔ |
✔ |
|||
Anvil |
9095 - 9096 |
TCP |
Data Mover Engine |
✔ |
||||
Anvil |
9098 |
TCP |
Cloud mobility |
✔ |
||||
Anvil |
9099 |
TCP/UDP |
Cloud mobility, HMDB |
✔ |
✔ |
|||
Prometheus server |
9100, 9105 |
TCP |
Prometheus exporters (DSX) |
✔ |
✔ |
✔ |
||
Anvil |
9298 |
TCP |
HMDB |
✔ |
✔ |
|||
Anvil |
9299 |
TCP |
Data Manager |
✔ |
||||
Anvil |
9399 |
TCP |
KMS proxy |
✔ |
||||
NFS |
20048 |
TCP/UDP |
NFS - Mount |
✔ |
✔ |
✔ |
||
NFS |
20490 - 20492 |
TCP |
NFS |
✔ |
✔ |
✔ |
||
Anvil |
30048 |
TCP |
HS Store |
✔ |
||||
NFS |
32803 |
TCP/UDP |
NFS File Locking |
✔ |
✔ |
✔ |
Remote Support Services
To simplify the support experience, the product can phone home and send support bundles with product logs. This functionality requires secure connectivity (HTTPS) to v1proto.sc.hammerspace.com . It currently resolves to:
-
138.68.228.165
-
67.205.142.28
| The IP addresses may change in the future. If this happens, customers will be notified with a support advisory. |
Prometheus (and Grafana)
Remote monitoring using Prometheus is supported with integrated collectors. The collectors are turned off by default.
The two things needed during installation are the firewall ports and the command that turns the collectors on. Both are covered in the sections below.
For what the exporters collect, and for storing and visualizing the metrics afterward, see Monitoring Cluster Health in the Administration Guide.
Prometheus Exporter Ports
Remote monitoring with Prometheus requires network connectivity between the Prometheus server and the Hammerspace Anvil and DSX nodes. The exporters listen on the following TCP ports:
| Node | Protocol | Ports |
|---|---|---|
Anvil |
TCP |
9100 – 9103 |
DSX |
TCP |
9100 and 9105 |
| Port 9104 is not used by the Hammerspace exporters. |
Enabling or Disabling Prometheus Exporters
Use the following command and options to either enable or disable Prometheus exporters in Hammerspace.
-
Log in to the Admin CLI.
-
Run the following command to enable Prometheus exporters:
Command:
cluster-config --prometheus-exporters-enableExpected output (the first lines of the cluster configuration; the Prometheus exporters field shows the new state):
ID:                                 f976411d-c581-4d56-a48a-2d8c70b13b60
Name:                               AEEPQ7Z5Z3487K
State:                              Standalone
Management IPs:                     [192.0.2.10/20]
Data IPs:                           [192.0.2.10/20]
Cluster floating IPs:               [192.0.2.10/20]
Since:                              2026-09-23 21:17:03 UTC
Created:                            2026-09-23 21:16:42 UTC
Timezone:                           UTC
GFS participant max suspected time: 30 minutes
Metered billing:                    Disabled
Prometheus exporters:               Enabled
Evaluation expiration:              2026-10-23 21:16:42 UTC
<Additional output removed for brevity>
Alternatively, to disable the exporters, use the same command but with the prometheus-exporters-disable option:
cluster-config --prometheus-exporters-disableEither command prints the cluster configuration, and the Prometheus exporters field in that output shows the new state. To confirm the current state later, run cluster-config with no options and check the same field.
Pre-Installation Worksheet
Gather the following values and complete the following preparation steps before starting the installation. Having everything ready avoids stopping partway through the installer to go find an IP address or generate a compliant password.
VM or Host Preparation
-
Confirm CPU, RAM, and disk meet the Anvil or DSX minimum requirements described earlier in this chapter.
-
For virtualized deployments, set CPU and memory reservations to 100%. See the VMware Settings section earlier in this chapter.
-
Download the installation ISO and verify its checksum matches the filename.
-
Attach the ISO and confirm it will be the boot target. This is especially important when reinstalling onto a system that already has an operating system on disk, since an existing installation can take priority over the ISO during boot without warning.
| The Administrator Password set during installation must contain a mix of letters, numbers, and symbols, and must meet a minimum length requirement. Prepare a password that meets this policy in advance to avoid repeated rejected attempts during installation. |
Anvil: Per-Node Values
| Value | First Node | Second Node |
|---|---|---|
Host Name |
||
Peer Host Name |
(second node’s hostname) |
(first node’s hostname) |
Local Domain Name |
||
DNS Server(s) |
||
NTP Server(s) |
||
Timezone |
| The installer actively tests each configured DNS server for reachability during setup. If a server cannot be reached, you can select CONTINUE to proceed anyway or BACK to correct the value. |
Anvil: Cluster-Wide Values
| Value | |
|---|---|
Cluster Name |
The installer supplies a default; override it if you want something more descriptive. |
Administrator Password |
|
Default Gateway |
Anvil: Per Network Interface Values
| Value | Data/Management Interface | HA Interface |
|---|---|---|
IP Address |
(not required) |
|
Peer IP Address |
(not required) |
|
Data Cluster IP Address (floating, client-facing) |
(not required) |
|
Subnet Mask |
(not required) |
|
VLAN ID (optional) |
||
MTU |
1500 (or 9000 for jumbo frames) |
1500 |
| The Peer IP Address for the second Anvil node is automatically discovered over the private HA interconnect during Part 3 of the installation and does not need to be gathered in advance. |
DSX: Per-Node Values
| Value | |
|---|---|
Host Name |
|
Local Domain Name |
|
IP Address (per interface; each on a different subnet) |
|
Subnet Mask or CIDR |
|
VLAN ID (optional) |
|
MTU |
|
Default Gateway |
|
Anvil Data Cluster IP (from the Anvil installation) |
|
Anvil Administrator Password (for auto-join) |