Snapshots
Hammerspace supports share-level snapshots to protect data in a share. Share snapshots are nondisruptive to client reads and writes. Snapshots can be manually triggered from the GUI, CLI, or REST API, or scheduled to happen automatically. Snapshot schedules also have retention rules. Each share is limited to 4,095 snapshots.
A snapshot consumes no extra data space until existing data in the share is modified. Then only the modified files use additional space. Each snapshot will use a small amount of metadata space for the snapshot itself and for every file modified after the snapshot was taken.
| Offloading older snapshot data from primary storage into cloud/object storage is recommended to reduce the capacity impact of retaining many snapshots. When data is offloaded to cloud/object storage, it is globally deduplicated and compressed, creating a highly space-efficient backup. See the section titled "Move snapshots to cloud/object storage” for an example. |
Accessing Snapshots from Clients
Hammerspace enables users with permission to view snapshot files directly in their client and perform self-service recovery by copying data from a snapshot.
Linux or macOS NFS Client
The following example shows how to access a recovery snapshot from a Linux or macOS NFS client:
-
From a Linux client that has mounted a Hammerspace share, a user accidentally modifies their latest software project called my_code.py.
Linux client user errorCommand:
echo "my bad" > my_code.py -
Access file snapshots in the
.snapshotdirectory.Listing the snapshot directoryCommand:
ls .snapshot/Expected output:
2026-09-21T23-46-49-0 2026-09-21T23-46-56-0 2026-09-21T23-47-02-0 current -
Copy the file from the snapshot back to the live tree under a new name, then move it into place:
Restore a file from a snapshotCommand:
cp .snapshot/<snapshot>/my_code.py my_code.py.restored
mv my_code.py.restored my_code.py
where
<snapshot>is one of the directories listed in the previous step.The client sees the live file and its snapshot copy as the same file, so copying the snapshot copy directly over the live file fails with "are the same file", and redirecting catoutput into the live file empties it. Always copy to a new name first.
Windows Client
Windows users can browse and recover files directly by right clicking on the file in Windows Explorer and selecting Previous Versions.
Creating an Instant Snapshot
Snapshots capture a point-in-time view of your data, allowing you to protect against accidental deletions or modifications. By scheduling and setting retention policies, you can ensure long-term data availability and easy recovery when needed. This procedure provides steps for creating snapshots using the GUI.
-
Open the GUI and select Data from the left side panel. By default you will see information in the Shares tab.
-
Identify the share you want to snapshot and click on the Snapshot icon
 in the Actions column to the right of that share. In the Snapshot Now popup, click Snapshot.
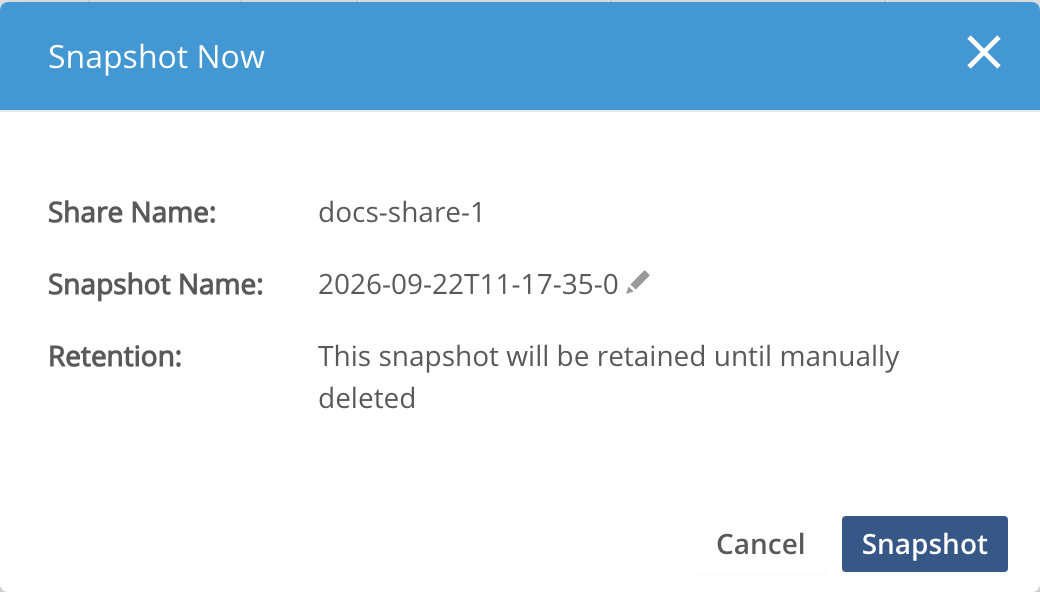 Figure 1. On-demand snapshot popup
You will see a message verifying that the snapshot was created successfully.
 Figure 2. Snapshot successfully created
When no longer needed, the snapshot must be manually deleted.
Custom Schedules and Retention Policies
You can define custom schedules and retention policies to use when creating a share snapshot. Schedules can be very flexible and be defined to run a certain Dates, Days of the Week, Hours, Minutes, etc. The following examples show how to define schedules and retention policies and then create a share snapshot with a schedule and retention policy.
| Schedules can also be applied to tasks other than snapshots. |
Snapshots are quick and space efficient, but they can consume large amounts of storage over time because blocks are not released when files are deleted if the files are in a snapshot.
Retention policies applied to a snapshot task cause the snapshot to be automatically deleted either at a certain age, or after a certain number of newer snapshots are created.
| Snapshots can also be offloaded into cloud/object storage to remove any space pressure from primary storage. |
Creating a Custom Snapshot Schedule
schedule-create --day-of-week MON-FRI --hour 12 --minute 30 --name my-scheduleCreating a Snapshot Retention-Time Policy
snapshot-retention-create --retention-time 14:00:00 --name fortnightCreating a Policy for Number of Snapshot Copies to Retain
snapshot-retention-create --number-of-copies 5 --name my-retainCreating a Share-Snapshot Schedule and Retention Policy
share-snapshot-create --share-name test --schedule-name my-schedule --retention-name my-retainDeleting Snapshots Using the Management GUI
Over time, saved snapshots take up a lot of storage space so it is recommended that you remove them from your snapshot stores regularly. Use the following steps to delete a snapshot from storage using the GUI.
-
Open the GUI and select Data from the left side panel. By default, you will see information in the Shares tab.
-
Click the name of share that contains the snapshot(s) to be deleted.
-
Click the Files tab and then click the
.snapshotdirectory. -
Locate the snapshot(s) you want to delete from the saved snapshot files.
Do not delete the current file. 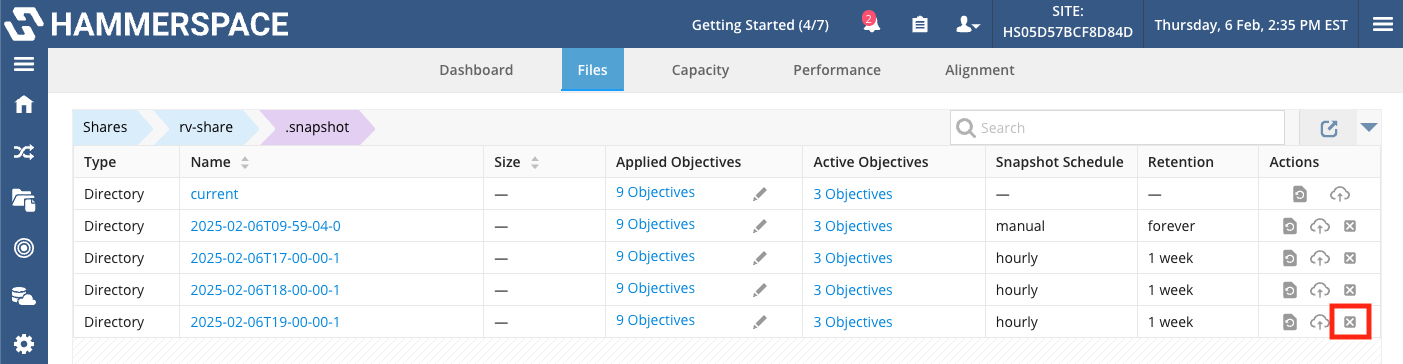 Figure 3. Location of the Delete icon
 -
Click on the delete icon to the far right of the row for the snapshot to be deleted.
-
Confirm you want to delete the snapshot file by clicking Delete. The file is immediately deleted.
Listing Snapshots Using the Admin CLI
You can list the snapshots of a share:
share-snapshot-list --share-name testRestoring a Snapshot
You can restore a snapshot using the GUI:
-
Open the GUI and select Data from the left side panel. By default you will see information in the Shares tab.
-
Click on the share name and select the Files tab.
-
Click on the .snapshot directory and find the snapshot you want to restore, then click the restore icon
 to the far right of the row for that snapshot.
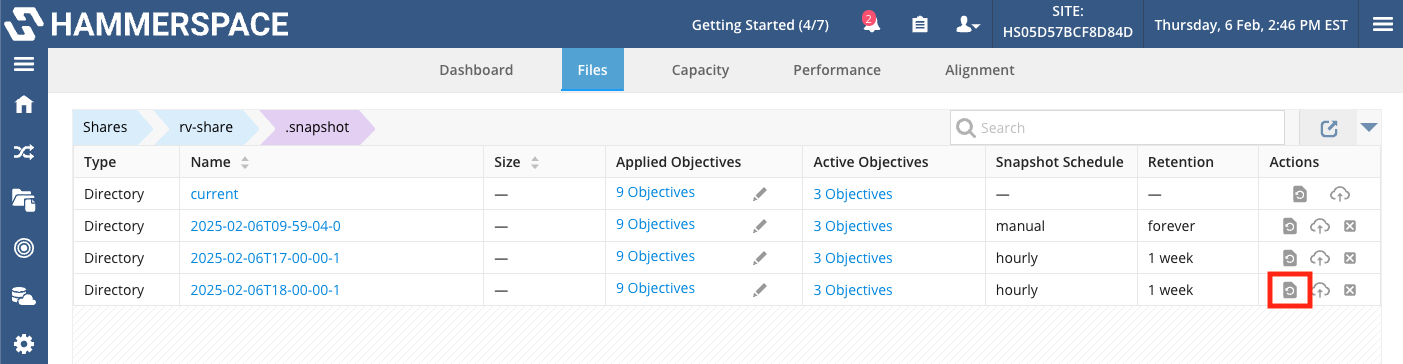 Figure 4. Location of the Restore icon
 -
In the Restore Snapshot popup, select to restore files to their original location, or specify a different location within the share. You can also select to overwrite the contents of the restoration target directory or to create a new target directory for the restored data.
-
Click Restore and you will see a notification in the GUI that the restore operation is in progress. You can click the Tasks icon to confirm that the restore operation is successful.
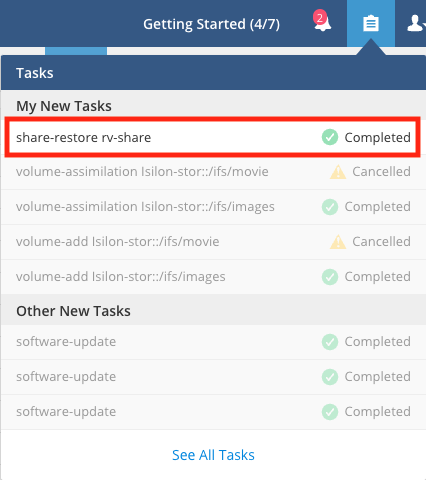 Figure 5. Viewing completed task status
Restoring Individual Files Using the CLI
You can restore files from a snapshot of a share.
share-snapshot-restore --share-name test --filename /VM2/.vmdk* --snapshot-name test-2025-01-25T16-59-27.371Z-0Saved-Snapshot Location
Share snapshots are available in a virtual .snapshot folder, and by using Windows Previous Versions. The .snapshot folder is not visible over SMB data access. The .snapshot folder is available in every directory in the share, representing the data from that directory and its contents.
Snapshot Schedule
The Product provides pre-created schedules for hourly, daily, and weekly snapshots. In addition, administrators can define custom schedules to fit their precise needs.
Example Snapshot Schedules
-
An hourly snapshot schedule with a retention of seven days.
-
A daily snapshot schedule with a retention of seven years (to meet compliance rules).
-
A weekly snapshot schedule with a retention of 12 weeks.
Creating Snapshot Schedule in the GUI
You can set a snapshot schedule for a share, folder, or file. When the snapshot is created for a share or folder, the snapshot captures everything in the share or folder. This procedure shows how to set a snapshot schedule.
-
Open the GUI and select Data from the left side panel. By default you will see information in the Shares tab.
 Figure 6. Editing a share
 -
Identify the share to snapshot and click the Edit icon.
-
In the Edit Share popup, select the Snapshot Schedules tab.
-
Click New Schedule.
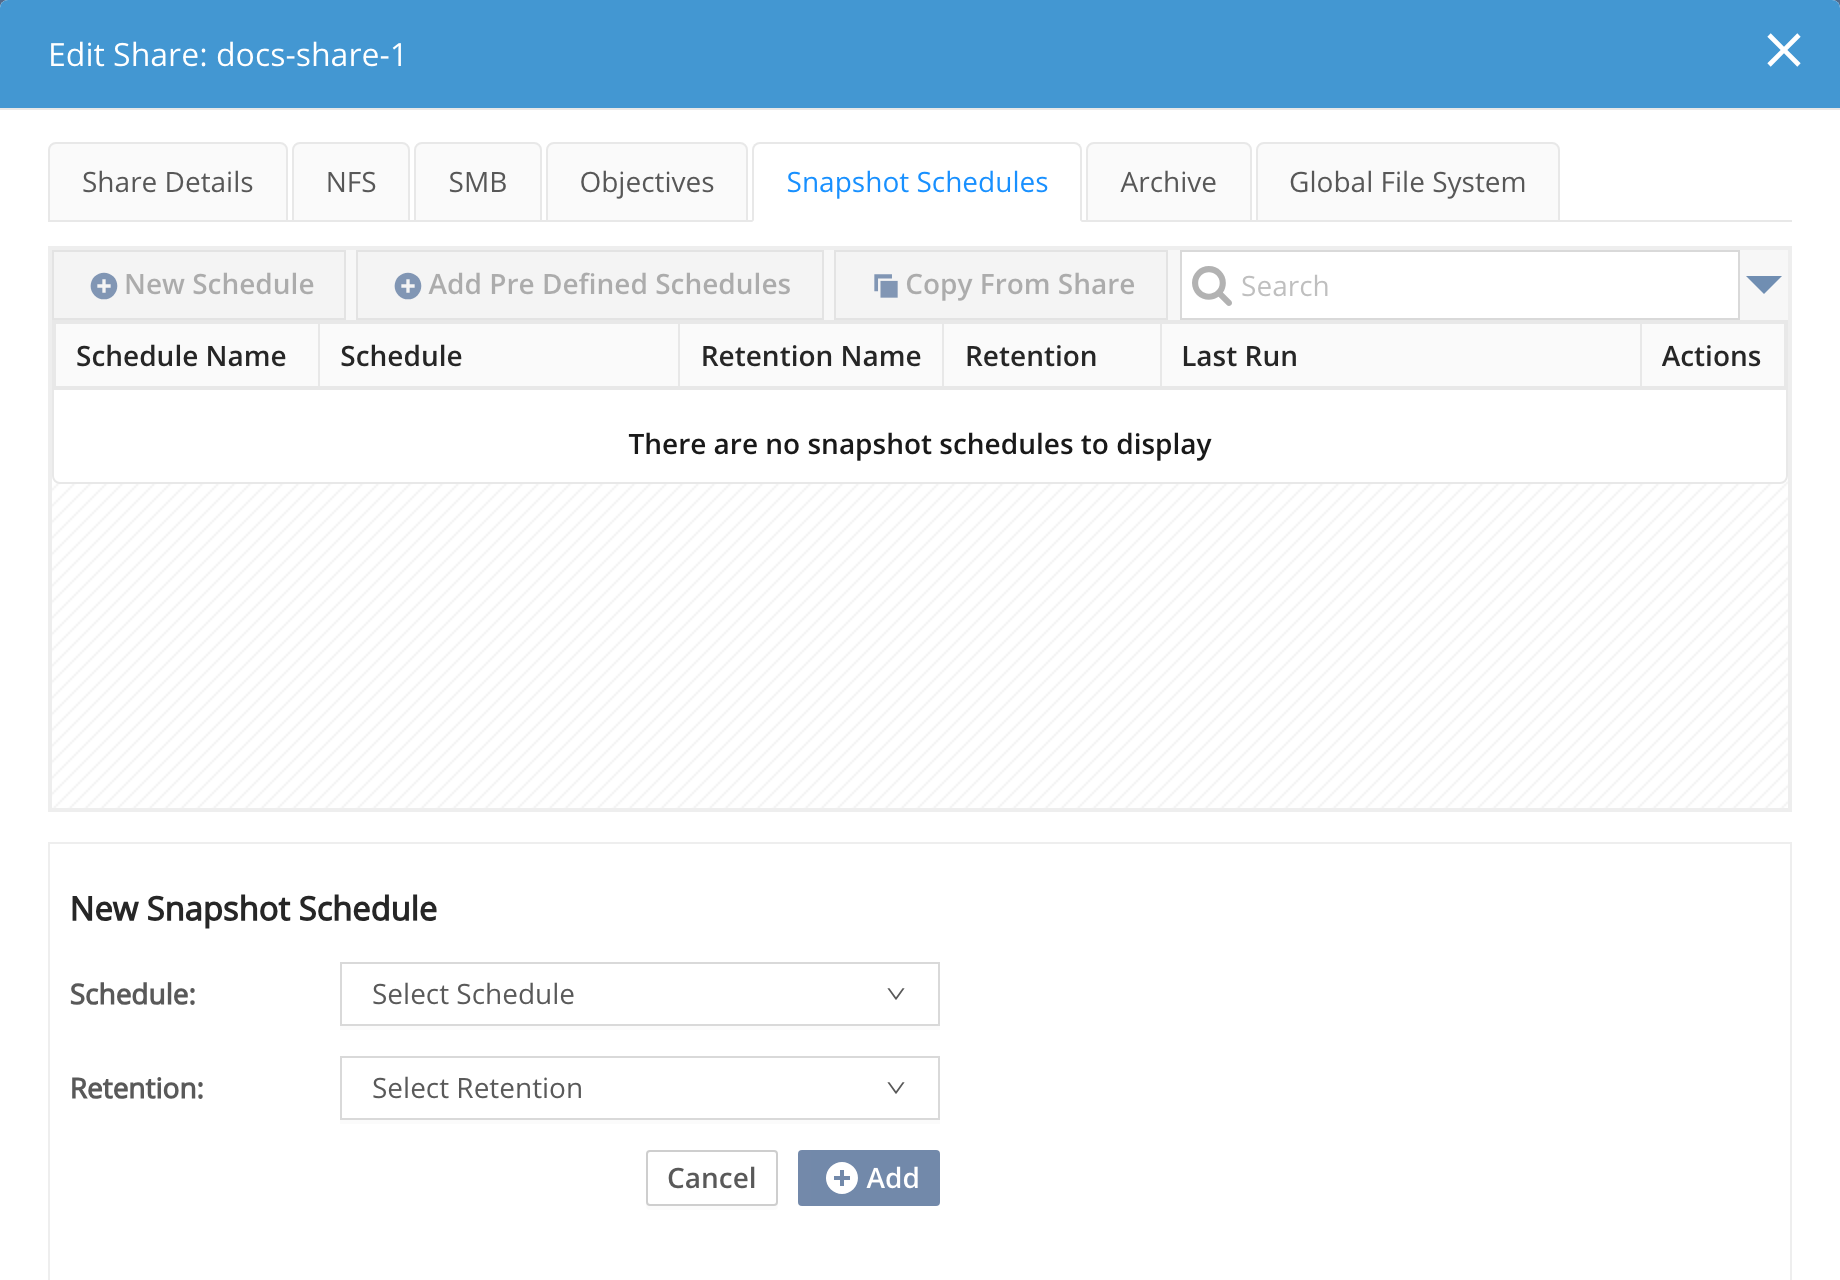 Figure 7. Adding a new snapshot schedule
 -
In the New Snapshot Schedule section of the popup, select a frequency schedule and a retention length for the snapshots, then click Add. You will see the new snapshot schedule in the Snapshot Schedules tab of the popup.
-
Click Close to finish.
Creating Snapshots Using the CLI
You can create a snapshot of a share instantly:
share-snapshot-create --share-name test --now