SMB
SMB clients connect to any of the DSX nodes in the cluster. All SMB shares are available from all DSX nodes. This should ideally be through the floating IP/name registered in DNS.
Active Directory Integration
Hammerspace integrates with Active Directory (AD) to enable authentication and User ID mapping.
| Ports 88, 135, 389, and 445 must be open. |
Joining an Active Directory Domain
Complete the following steps to join an Active Directory domain:
|
In Hammerspace 5.3, joining Active Directory for Kerberos requires two DNS names — an Anvil DNS name and a Portal DNS name — each backed by a DNS record that resolves to the correct address. The Anvil DNS name is used by NFS v4.2 clients that mount with Kerberos security ( |
The two names exist because Kerberos identifies a service by name. A client connecting to a data portal and a client connecting to the Anvil are talking to different services, so each needs its own DNS entry and its own service principal name.
| Name | Resolves to | Used by |
|---|---|---|
Anvil DNS name |
The cluster floating IP address on the active Anvil node |
NFS v4.2, and other Kerberos-sensitive operations. This name is new in 5.3. |
Portal DNS name |
Portal floating IP addresses, or static DSX data IP addresses, depending on how the deployment is designed |
NFSv3, NFSv4.1, and SMB. This is the cluster’s original name, which earlier releases called the SMB server name or cluster NetBIOS name, and it is the name of the cluster’s computer account in Active Directory. |
By default, the Anvil DNS name is the Portal DNS name with -anvil appended. On a cluster named filesrv01 in domain example.com, the defaults are filesrv01.example.com for the portal and filesrv01-anvil.example.com for the Anvil.
Where more than one address backs the Portal DNS name, clients are distributed across those addresses by round-robin DNS. Create PTR records for the relevant addresses as well, so that reverse lookups resolve.
| In Hammerspace 5.3, a cluster cannot join Active Directory while an LDAP name service is configured, and Add Active Directory is unavailable while any directory service is listed. Remove all LDAP name services first. See Configuring an LDAP Name Service. |
-
Go to and click Add Active Directory.
-
On the Details tab:
-
Enter the Domain Name as a fully qualified domain name (an IP address can also be used).
-
Enter the Portal DNS Name (SMB | NFS 3 | NFS 4.1). This name is used to register the cluster’s computer account in Active Directory, and SMB clients use it to reach the cluster at \\<portal DNS name.domain name>. To change it, leave and rejoin Active Directory with the new name.
-
Check the Anvil DNS Name (NFS 4.2). It is filled in as the Portal DNS name with
-anvilappended; change it if your DNS design requires a different name. The two names must be different. -
Enter the Login Name and Password of an Active Directory account with the privilege to add workstations to the domain. Ongoing DNS registration is then handled by the computer account rather than by these credentials; for the exact permissions involved, see Active Directory Permissions.
-
Optionally, enter an Organizational Unit. The account entered above must have permission to write into the Organizational Unit location.
-
For AD Servers, select Auto to use discovered servers, or Manual to enter them yourself. Auto works well when AD Sites and Services are set up correctly.
-
Under SMB ↔ NFS User Mapping, select the schema used to map Active Directory Security Identifiers (SIDs) to User IDs (UID) and Group IDs (GID): Disabled (no cross-protocol mapping), RFC2307, or RFC2307BIS. Refer to the User Mapping section for more details.
-
-
On the DNS Registration tab, choose the IP addresses to register in DNS for the two names:
-
Select Register and continually manage Floating IPs (recommended) to have Hammerspace register the floating IPs and keep the DNS host records up to date as floating IPs are added, removed, or go offline.
-
Optionally, select static IP addresses. Registering static IPs is not recommended.
-
-
Review the Kerberos tab. Hammerspace registers the NFS service principal names (SPNs) automatically when it joins the domain; see Registering NFS Principal Names.
-
Click Add.
Leaving an Active Directory Domain
Complete the following steps to leave a domain:
| After leaving an Active Directory domain, SMB clients cannot connect to the SMB shares. This operation will interrupt data access and must be executed carefully. Also, if S3 servers are configured to use AD, users will no longer be able to connect to those S3 servers. |
-
Go to .
-
In the row for the Active Directory domain, click the Delete action. The Leave Active Directory dialog opens.
-
Optionally, select Remove computer accounts to remove the Anvil and Portal computer accounts from Active Directory. To remove them, enter the Login Name and Password of an Active Directory account with the privilege to remove computers from the domain. The password is required only for removing computer accounts.
-
Click Leave.
| If you leave without entering the password used to join the domain, the NFS service principal names (SPNs) registered for the Anvil DNS name remain in Active Directory. Ask your Active Directory administrator to remove them. |
User Mapping Between Windows and Linux
Anvil stores a unified permission structure in its file system, enabling tight integration between Windows access control lists (ACLs) and NFS permissions. There is no option to choose what is stored, or to prioritize one over the other. The ACLs are mapped to NFS permissions whenever needed.
Anvil uses Active Directory as the source for mapping between the two environments. Anvil will read Windows credentials from Active Directory and fields such as uidNumber and gidNumber for the purpose of mapping between Windows identities and Linux. For Group Membership, when files are created, Anvil maps to the Primary Group assigned to the user in Active Directory.
A common UID/GID is required for user mapping to work; in other words, if your user has UID 5555 on the Linux client, 5555 must be entered in the uidNumber field in Active Directory to enable successful mapping.
The client computer should be connected to the same directory service, Active Directory being the most common. For Windows, this is standard; however, for Linux, this may not always be the case. Please follow the instructions for the respective Linux platform to join it to Active Directory. It is recommended (but not required) that the Linux environment is connected to Active Directory; Linux environments can be configured with other sources that provide identity to the user.
Default Behavior
The default behavior, without having user mapping configured, will make the environments look disconnected. For example, when saving a file from Windows, the default user, UID/GID 65534/65534, is used. This typically maps to nfsnobody on most Linux systems and is the owner of files and directories. This happens because the file was not saved with a UID/GID that is recognizable by Linux.
Mapping the UID and GID Within the Same Active Directory Domain
In Active Directory, each user and group object can also be configured with a UID (User ID) and GID (Group ID) mapping. This allows Linux users with their own UIDs/GIDs to work on files they own and, perhaps most importantly, be part of groups in Active Directory.
They are called uidNumber and gidNumber in the Active Directory object, as shown in the following screenshots:
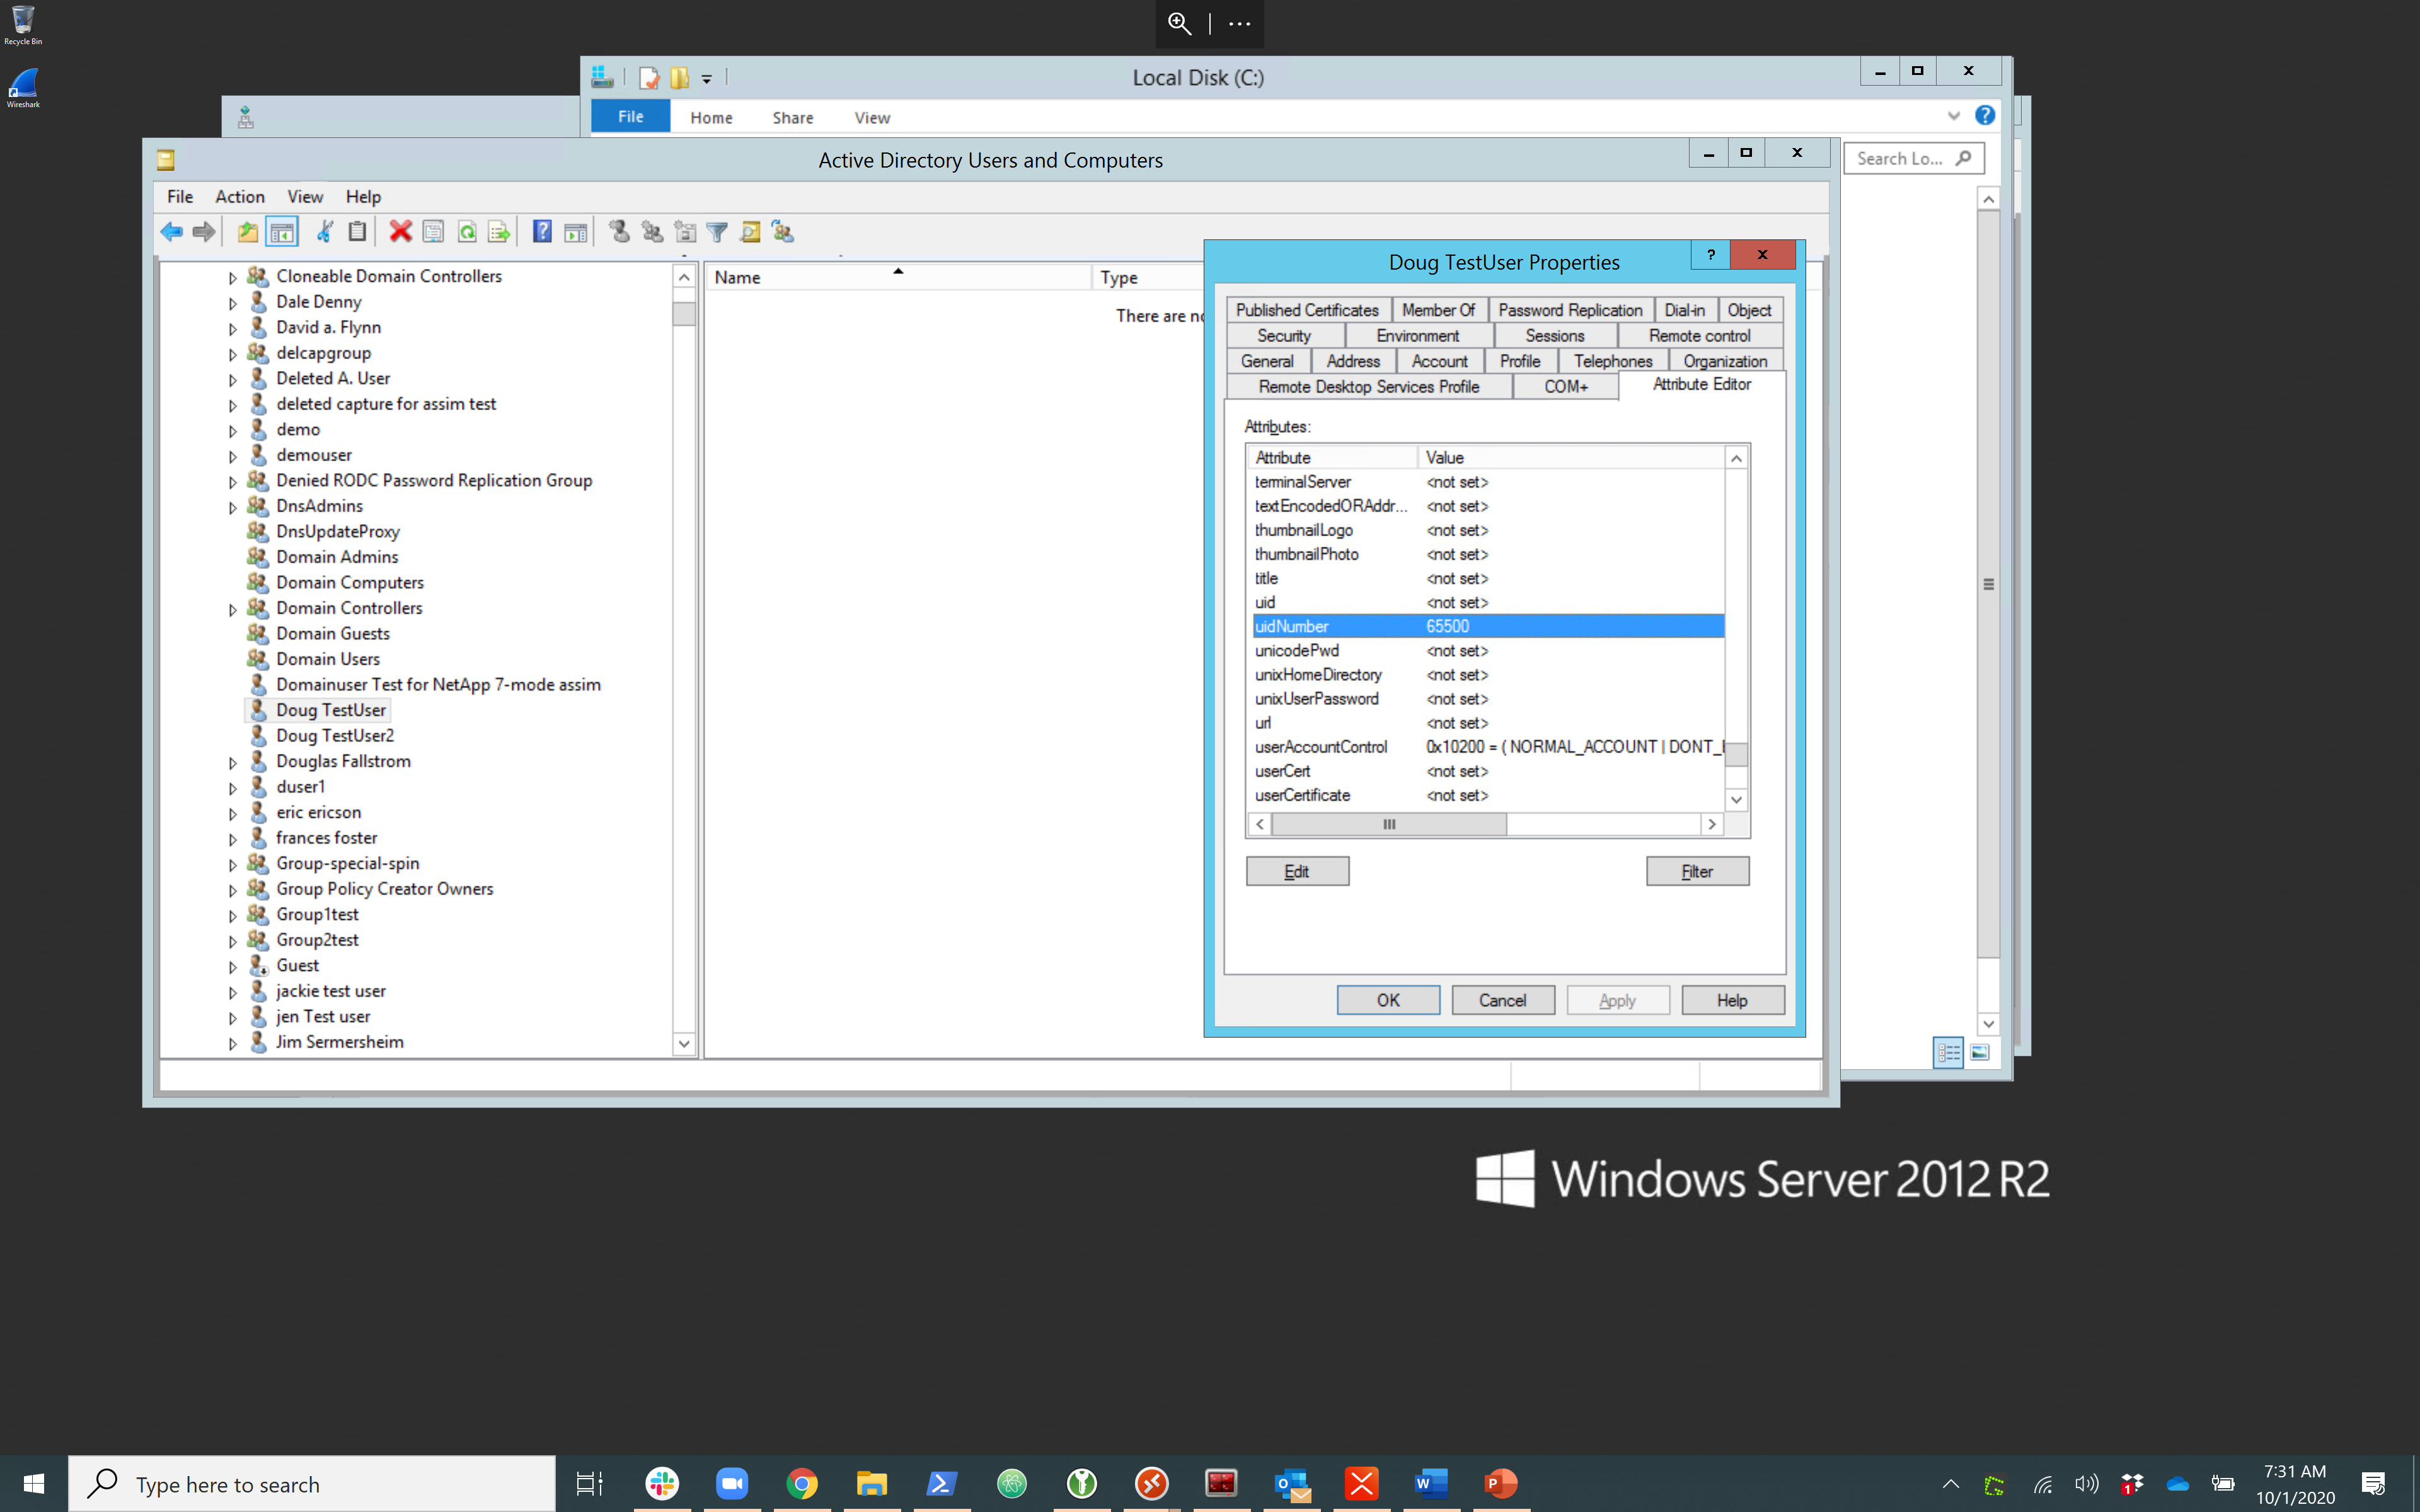
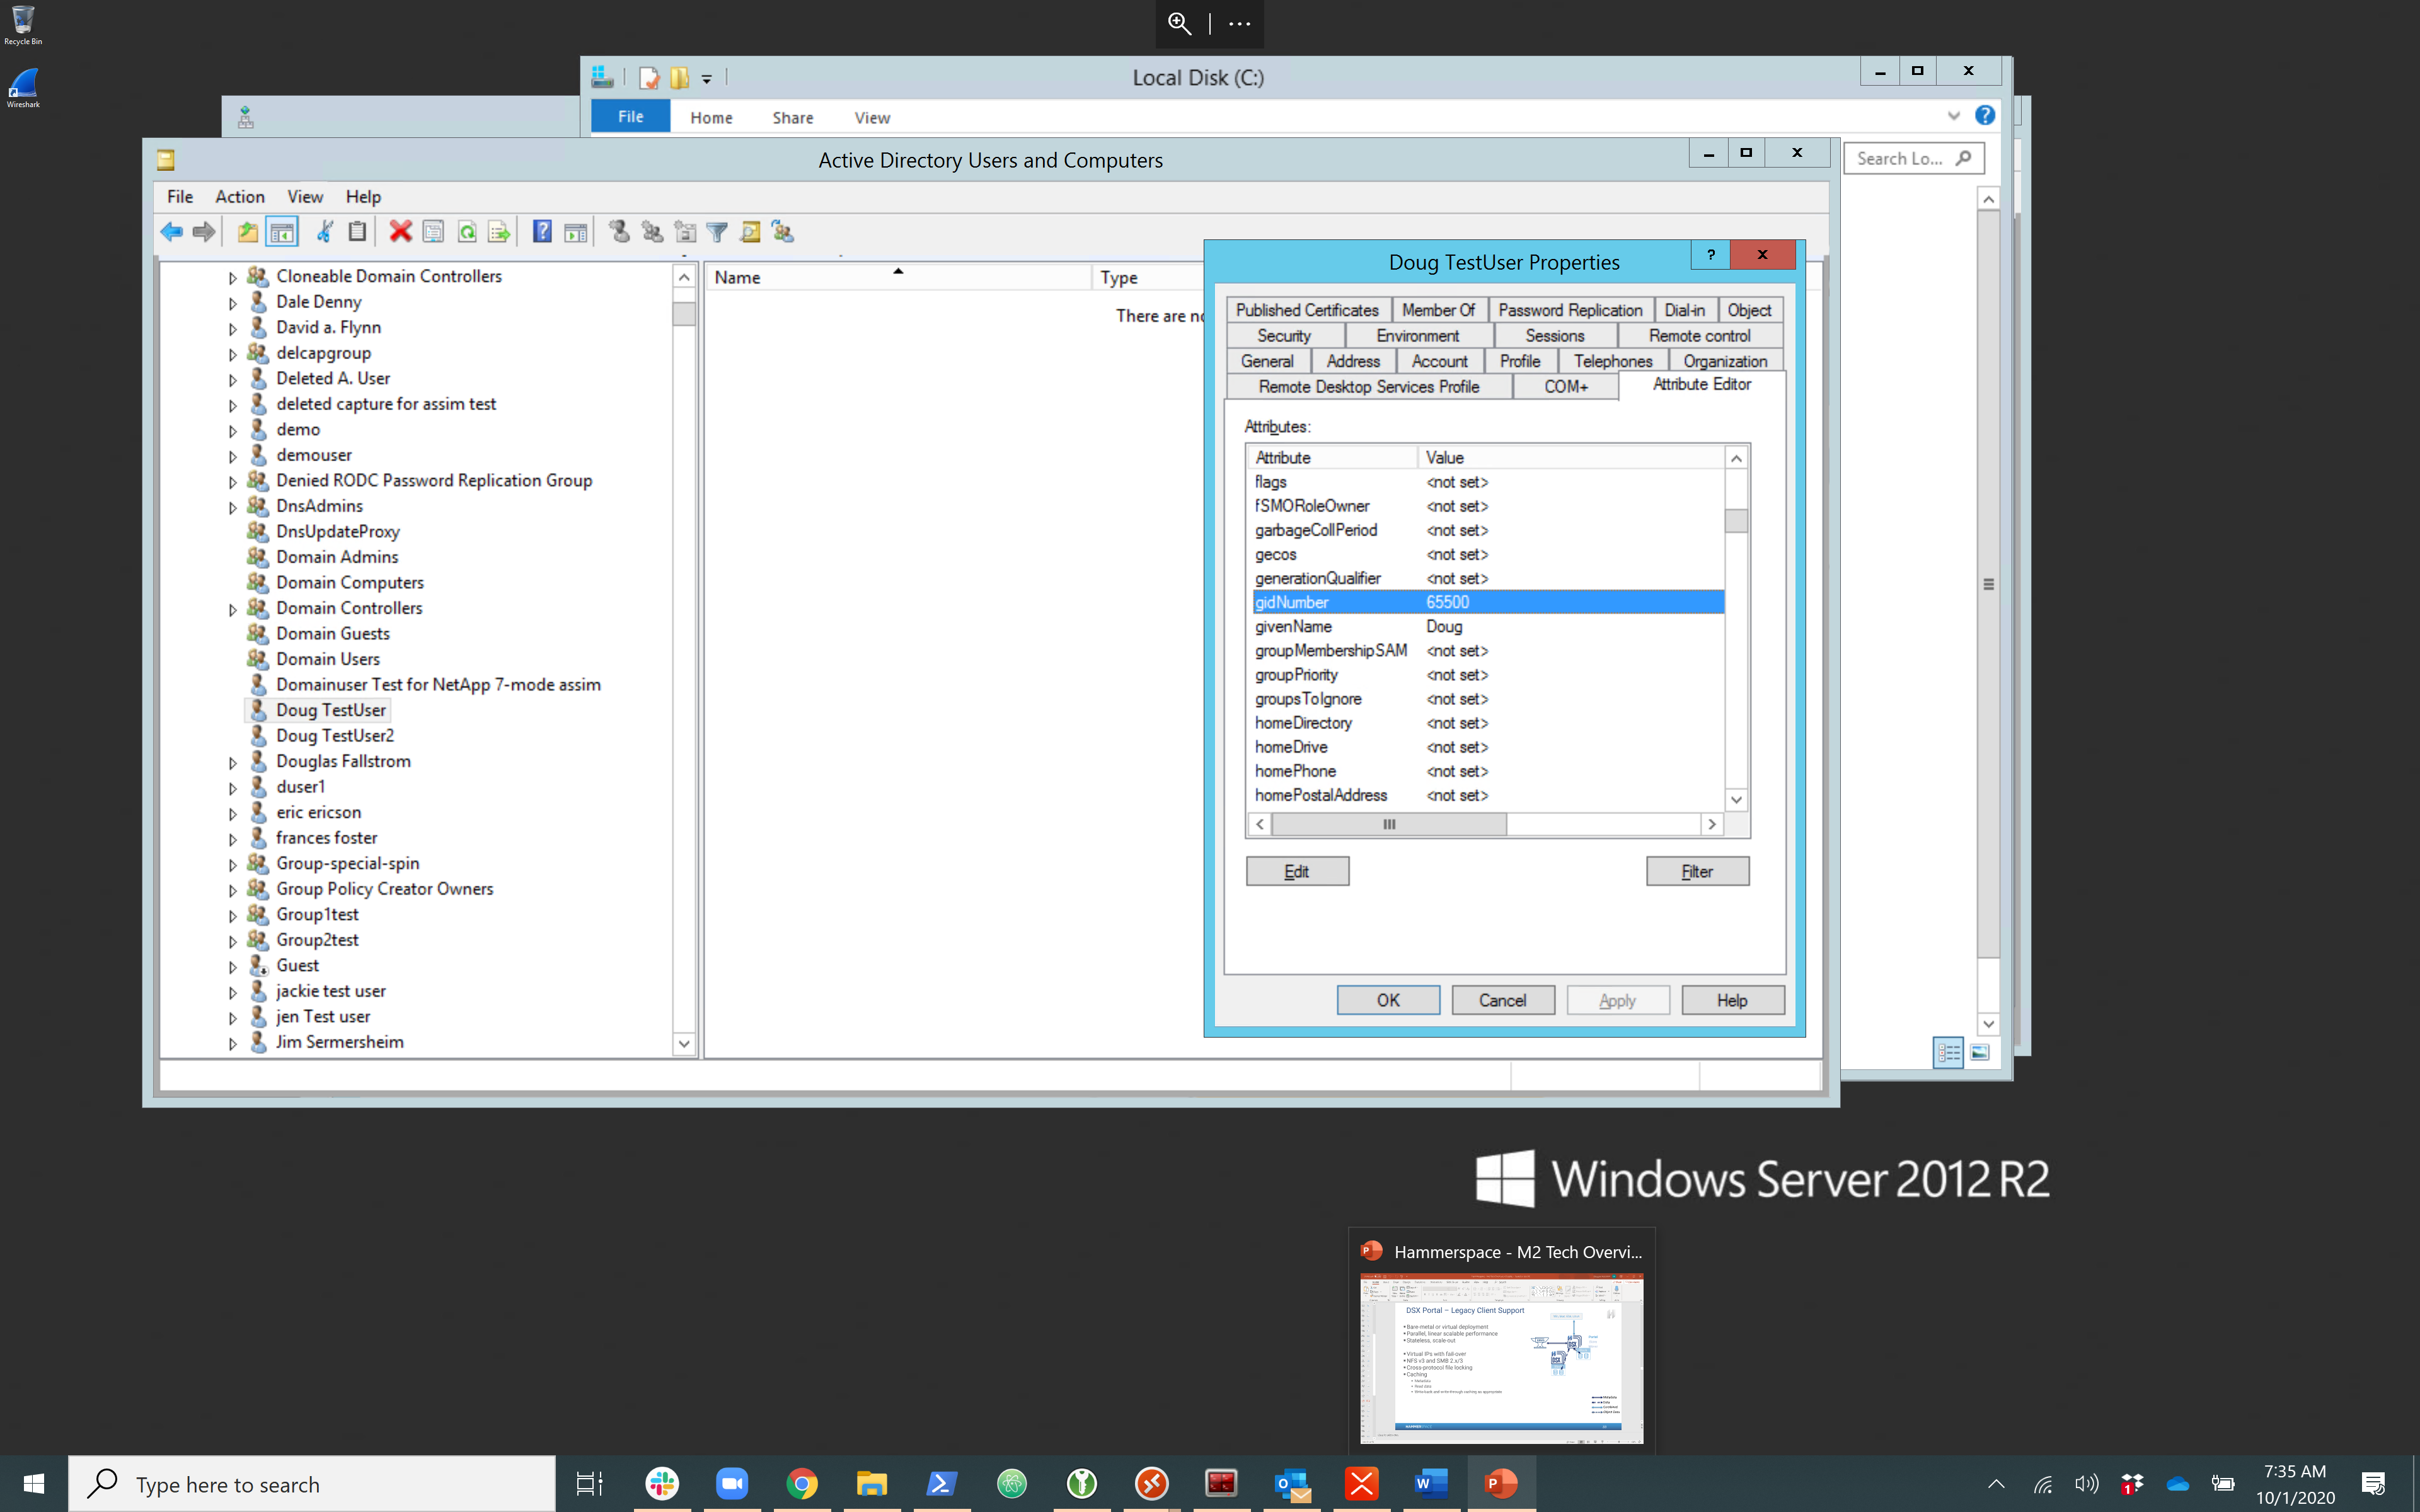
If these parameters do not exist, consult with your Active Directory administrators regarding how to create them.
Cross-Domain Mapping
Hammerspace provides a mapping service that bridges separate Windows and Linux domains, enabling users with accounts in both domains to securely access their files. This is typically only used when the domains are separate. For user mapping within the same domain, please see the User Mapping section.
The following examples demonstrate how to set up cross-domain mapping.
| Cross-domain mapping is not supported without joining Active Directory. Join Active Directory by following the steps in the Joining an Active Directory section. |
Creating Mappings Between Domains
This example creates a bidirectional map between the lin.ad.test and win.ad.test domains. Repeat this action as needed to create additional cross-domain mapping.
domain-idmap-add --from lin.ad.test --to win.ad.test --attribute TestLNXWindowsAccountName --bidirectionalSelecting a Preferred Domain
When creating shares that will be accessed by users from different domains use the
--preferred-domain option to select the preferred domain for the share:
share-create --export-option *,rw,no-root-squash --preferred-domain win.ad.test --path /win1 --create-path --name win1Removing a Preferred Domain
Use the following command to remove a preferred domain from an existing share:
share-update --name win1 --preferred-domain-clearApplying a Preferred Domain to a Share
Use the following command to apply a preferred domain to an existing share:
share-update --name win1 --preferred-domain lin.ad.testReloading Updated Domain-Mapping Rules
Although the domain mapping rules are updated periodically, you can use the following command to immediately reload the rules:
domain-idmap-reloadReviewing Cross-Domain Mappings
Use the following command to review the cross-domain mappings:
Command:
domain-idmap-listExpected output:
total 1
ID:                      cf0890b0-8c9b-492f-8d7b-58e043e05e19
From:                    lin.ad.test
Inherit from:            false
To:                      win.ad.test
Inherit to:              false
Attribute:               TestLNXWindowsAccountName
Bidirectional:           true
Order:                   1
Client Access to Data Using SMB
macOS Client Access
You can mount a share over SMB from macOS using the following steps:
-
Open Finder, click Go, and then click Connect to Server.
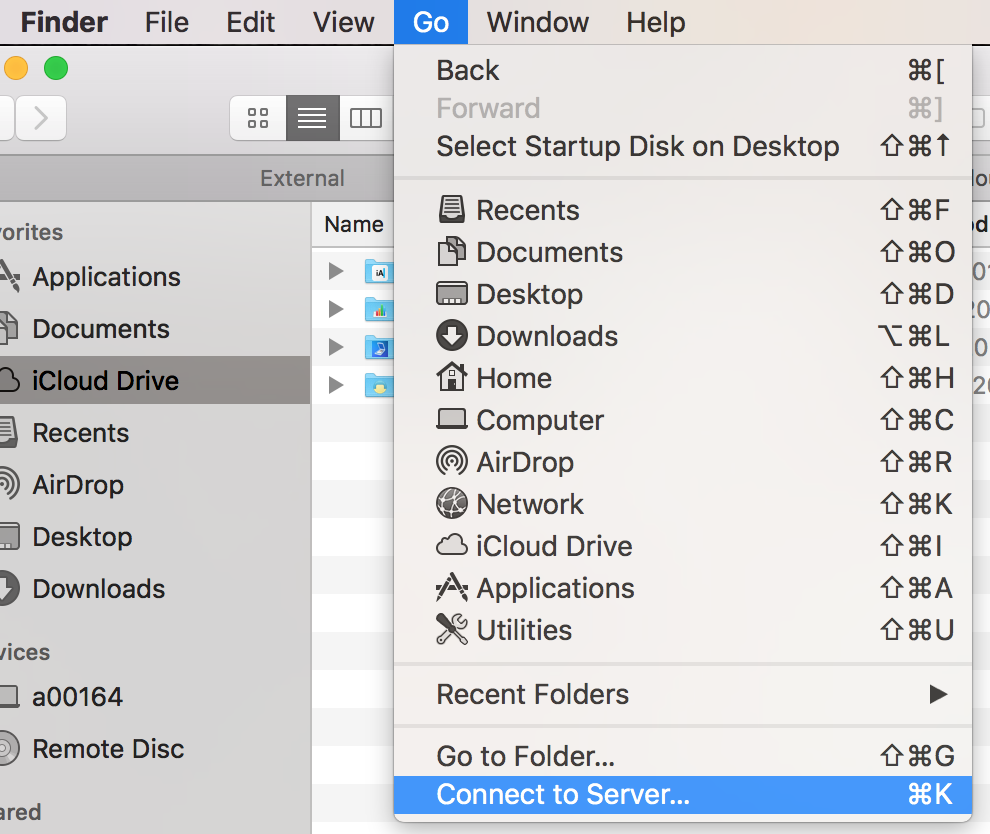 Figure 3. Location of Connect to Server control
 -
Enter smb://DSX DATA IP or DNS name /sharename.
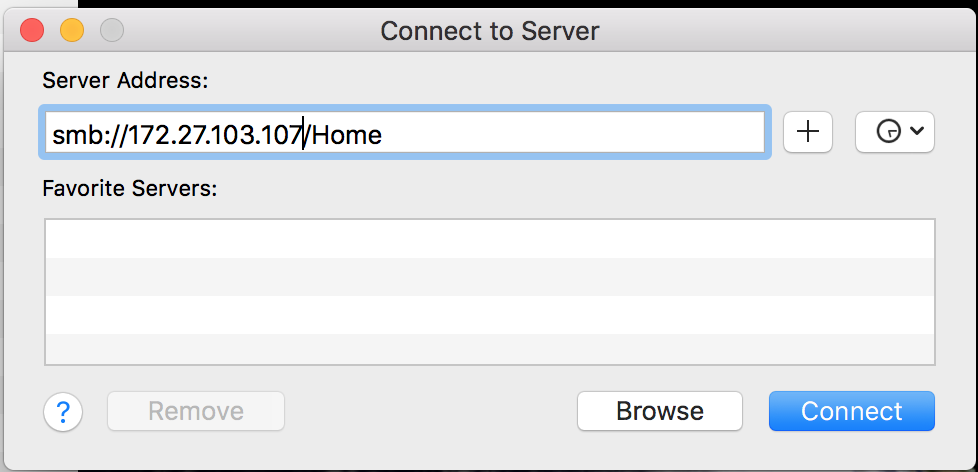 Figure 4. Enter server address to connect to server
 -
Enter the credentials. The credentials are from Active Directory; users are not managed locally on the Anvil.
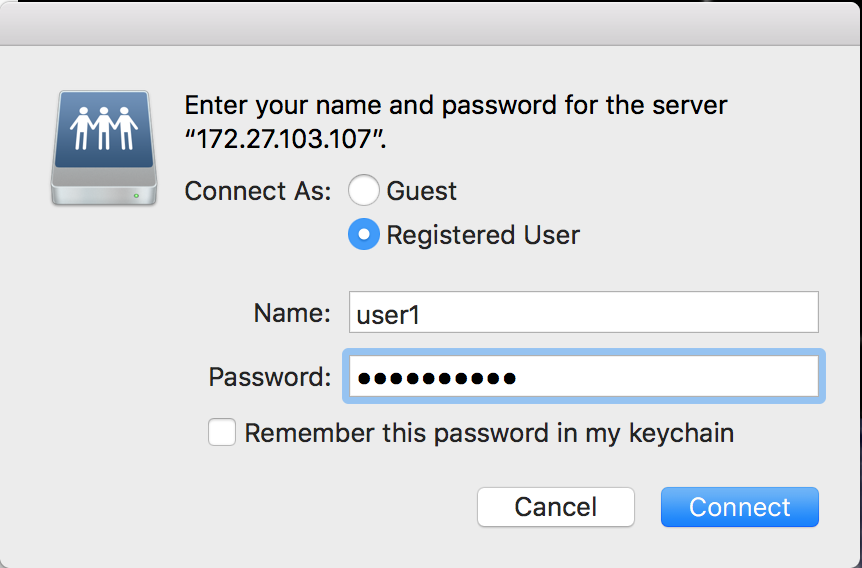 Figure 5. Enter Active Directory credentials
Windows Client Access
A share can be mounted over SMB from a Windows client by mapping a “Network Drive”. It is recommended to use the Fully Qualified Domain Name (FQDN) of the SMB Server when mapping or navigating the namespace.
| When using the IP address of a DSX, SMB does not use Kerberos authentication. To use Kerberos authentication, you must access the share using the SMB Server Name that you entered when Anvil was installed. To do this, you must register the SMB Server Name in Active Directory and point it to the DSX data IP(s)/Floating IPs. |
Load Balancing
When using multiple DSX nodes, it is recommended to include all the floating IPs in DNS. DNS servers typically rotate IP addresses in response to client requests. This will provide connections to be load-balanced across DSX nodes when clients connect to the SMB server name.
Mapping a Share
You can map shares using the Microsoft Management Console.
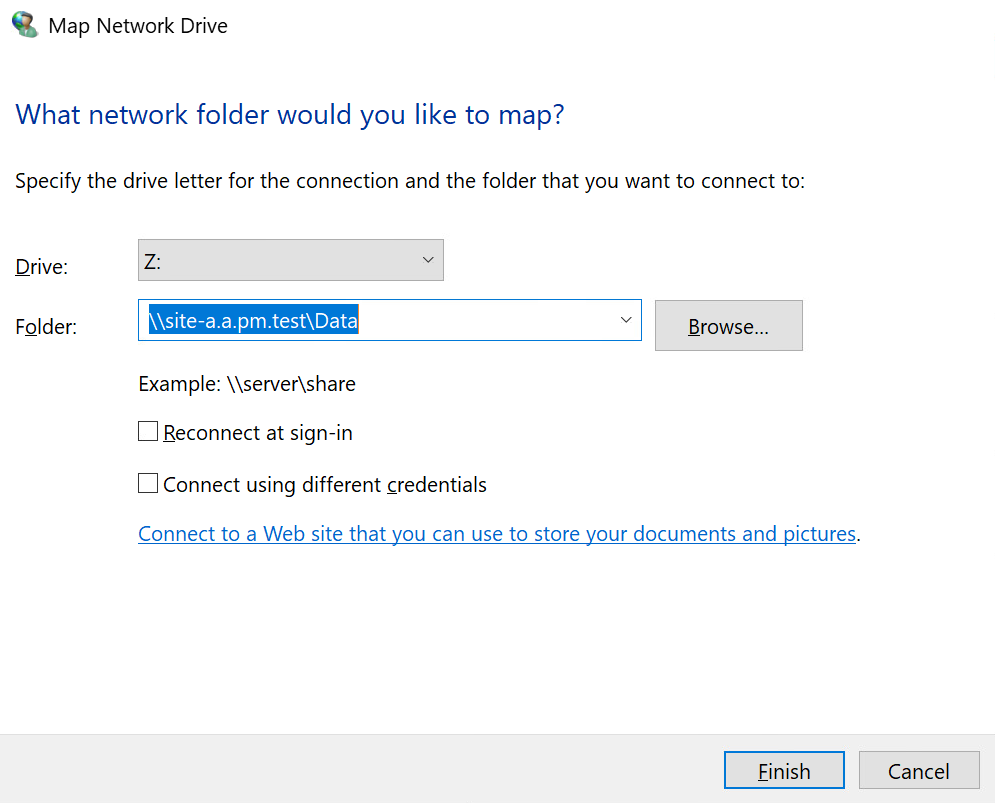
The share is now mapped as a drive letter.
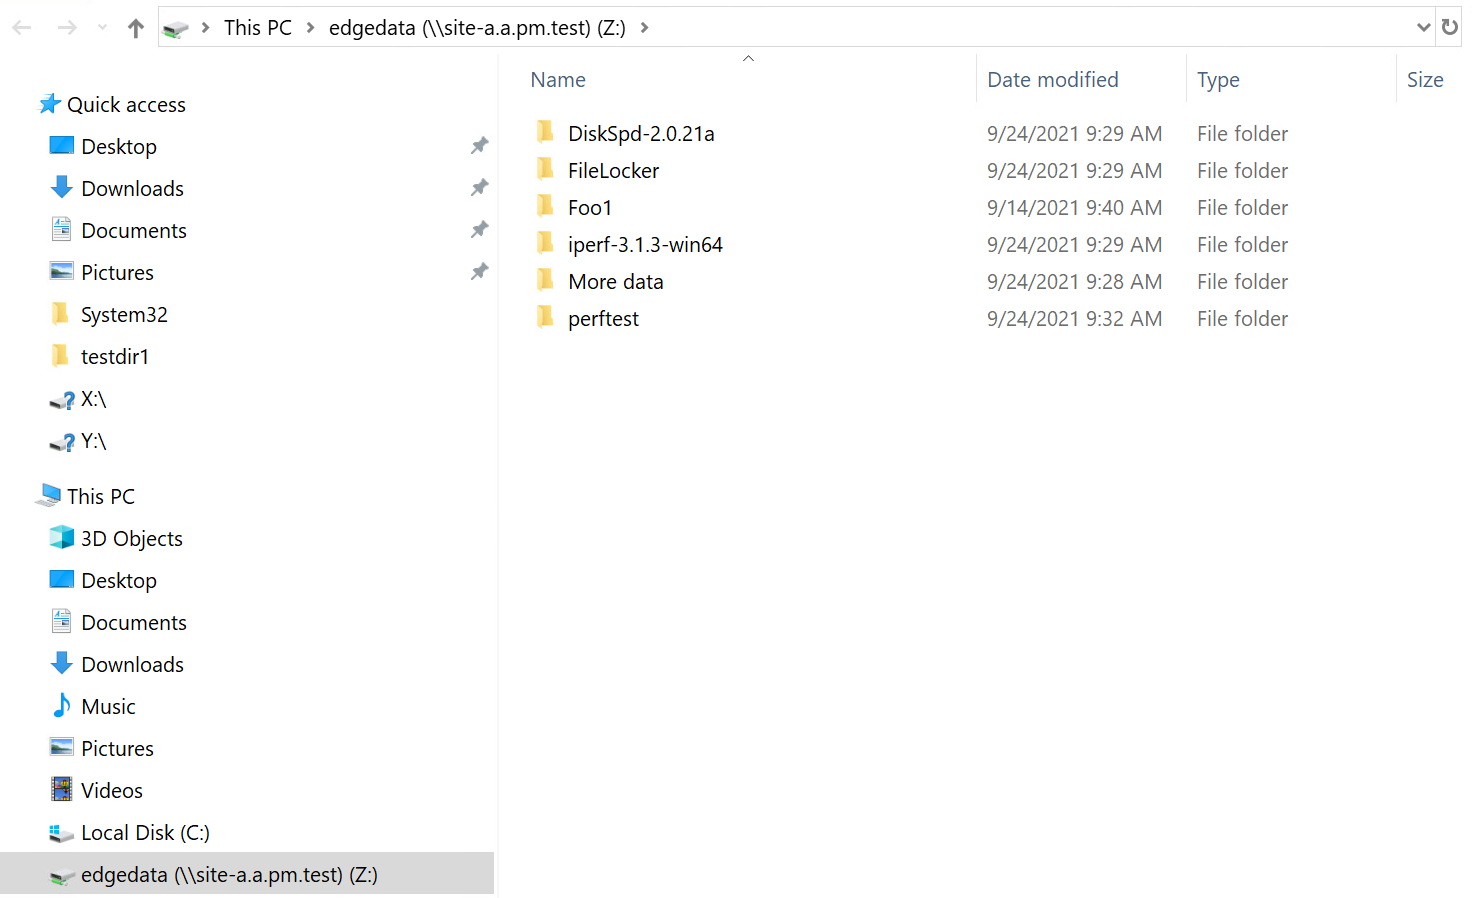
Mapping a Drive Letter Using the Windows CMD
The following example shows the command and output:
Command:
C:\Users> net use Z:\\site-a.a.pm.test\edgedataExpected outcome
The command completed successfully.SMB Multi-channel
SMB Multichannel, a feature included with Windows Server 2012 R2 and Windows Server 2012 and part of the Server Message Block (SMB) 3.0 protocol, improves the network performance and availability of file servers.
SMB Multichannel enables file servers to use multiple network connections simultaneously. It facilitates aggregation of network bandwidth and network fault tolerance when multiple paths are available between the SMB 3.0 client and the SMB 3.0 server.
This capability enables server applications to utilize the full bandwidth of the available network and makes them more resilient to network failures.
Requirements
-
All the IP addresses for a multi-channel session must be on the same DSX node.
-
The number of DSX nodes does not matter.
|
SMB Multichannel is a technology preview in Hammerspace 5.2. Enabling it requires assistance from Hammerspace Support. |
SMB Multichannel lets an SMB 3.x client use multiple TCP connections — across multiple NICs, or multiple CPU cores on a single high-bandwidth NIC — for one SMB session, improving throughput and resiliency.
-
Hammerspace advertises the Multichannel capability; the client decides whether and how to open additional connections. Client support and behavior are defined by Microsoft: SMB Multichannel is supported on Windows 8 and later and Windows Server 2012 and later. See Microsoft’s documentation for the full client list and behavior: Microsoft SMB Multichannel.
-
Multiple NICs are not required — a single high-bandwidth NIC benefits because the client opens multiple connections across CPU cores (RSS).
-
For multi-NIC configurations, the DSX must present independent interfaces. SMB Multichannel over bonded interfaces is not supported.
-
Enabling the feature alone does not guarantee higher performance; results depend on the client, NIC count/speed, and workload.
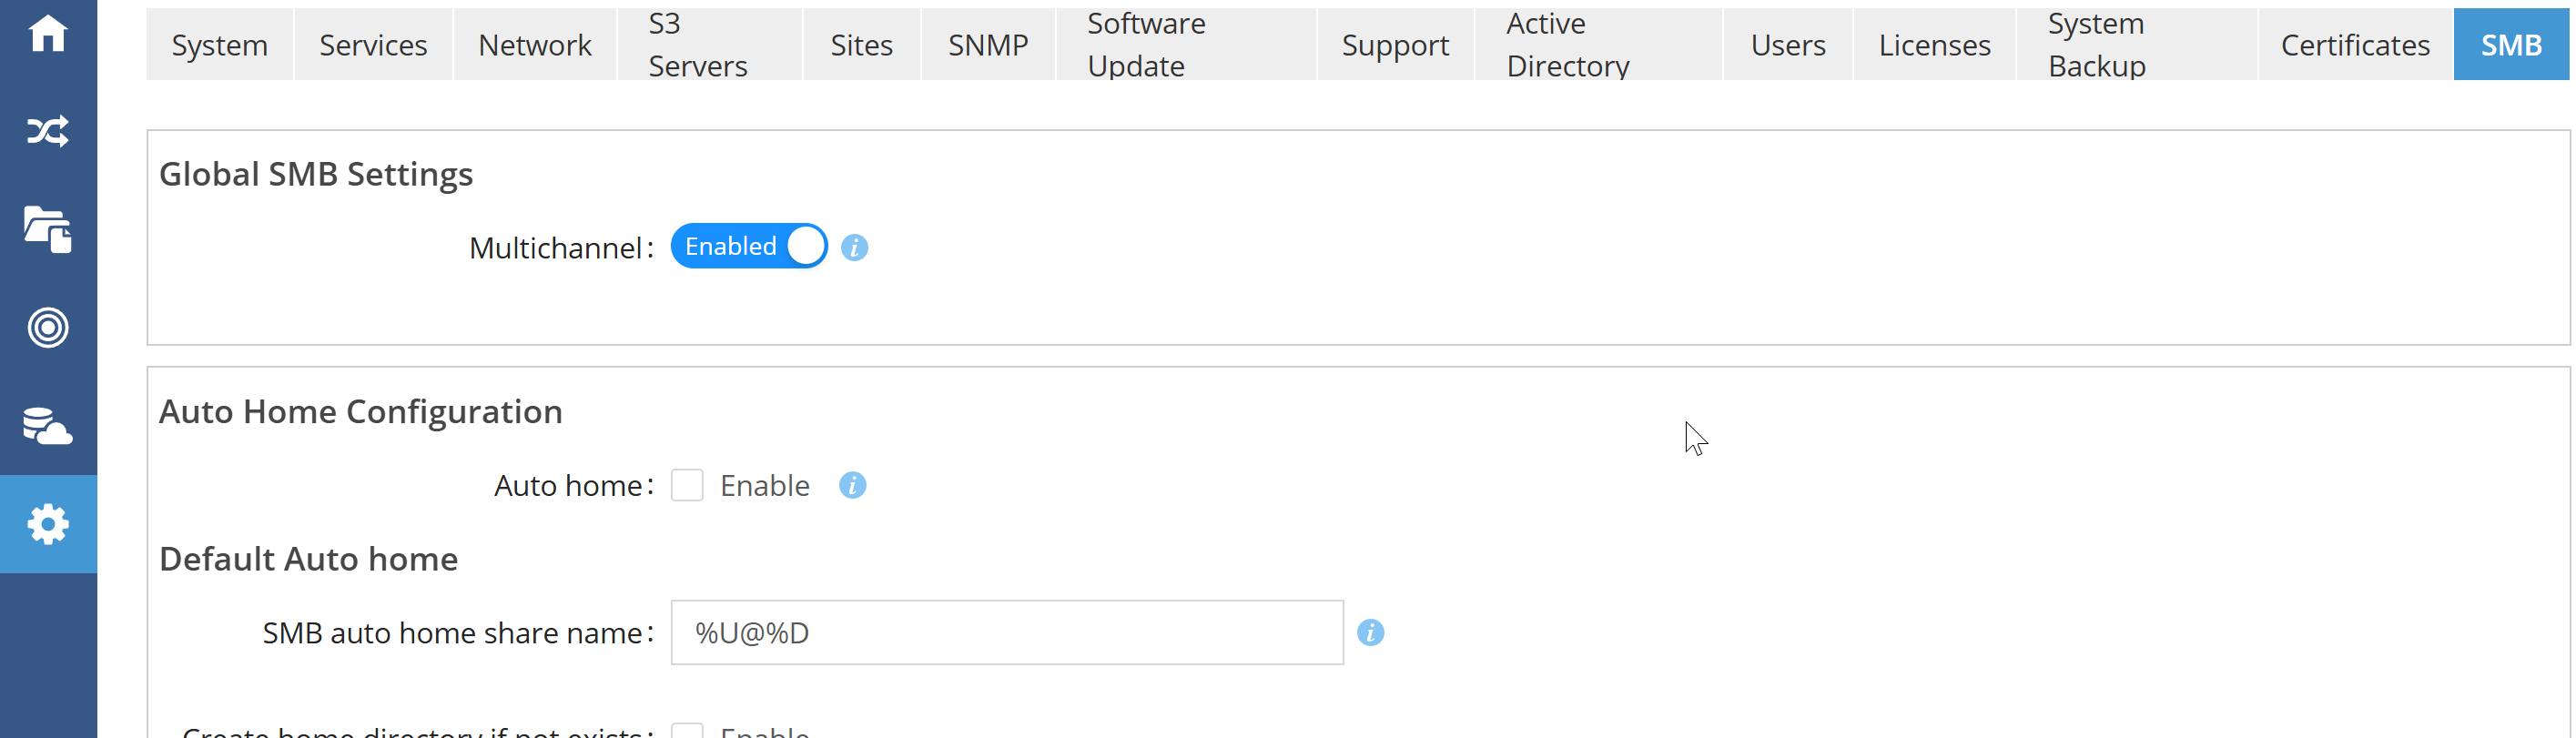
Enabling SMB Multi-channel with the GUI
Multichannel is enabled by default. This setting can be verified or changed in the Management GUI.
Viewing Mapped Shares Using the Windows CMD or PowerShell
C:\Users> net use z: \\site-a.a.pm.test\edgedata

The command completed successfully.

PS C:\Users> net use

New connections will not be remembered.

Status Local Remote Network

-------------------------------------------------------------------------------

z: \\site-a.a.pm.test\edgedata

NFS Network

The command completed successfully.
Unmounting a Share Using the Windows CMD
Command:
C:\Users> net use z: /deleteExpected outcome:
Z: was deleted successfully.Supported SMB Versions
The SMB client automatically negotiates the SMB protocol version and typically requires no management. The SMB server will automatically use the highest version offered by the client, but it will not negotiate below the minimum defined version. The table below represents the product defaults.
| SMB version | Status |
|---|---|
SMB version 1 |
Supported but disabled by default |
SMB version 2 |
Supported |
SMB version 3 |
Supported |
SMB version 3.1 and later |
Supported |
|
Do not use |
| Hammerspace strongly recommends using SMB version 2 and later for Microsoft Windows SMB and Apple macOS. |
Creating Hidden SMB Shares
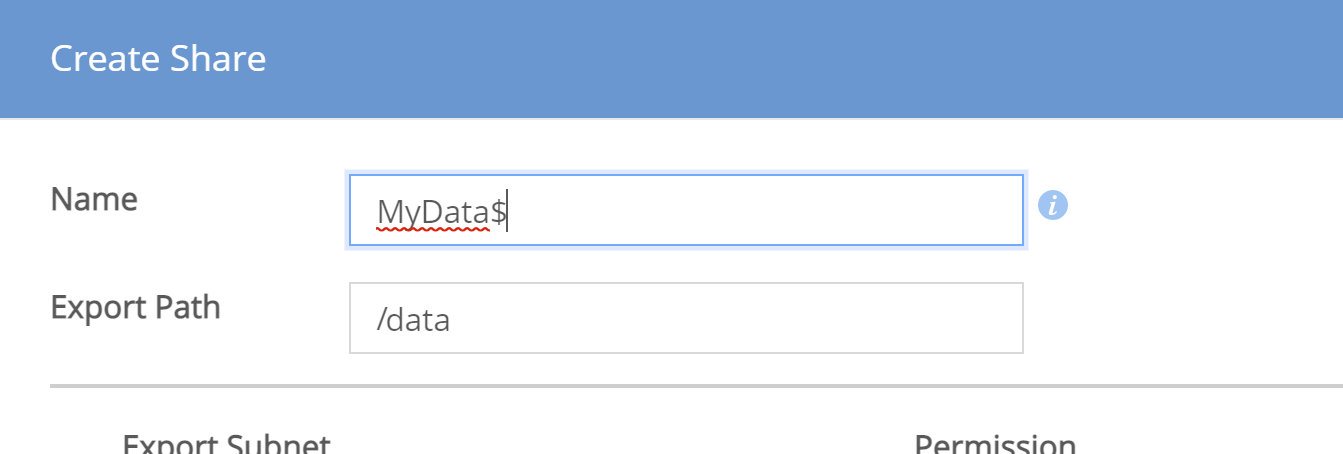
To create hidden SMB shares and aliases, simply add a dollar sign $ at the end of the share name when creating the share. This will hide the share when browsing the network.
| Hidden shares are sometimes referred to as administrative shares. |
Setting the Browsable Option
An alternative to naming hidden shares with a dollar sign ($) is to enable the browsable option. You can allow the browsable option on a share and SMB alias on a granular level.
Using the GUI
-
Navigate to Data and locate the share you want to hide.
-
Click the Edit icon on the same row as the share.
-
Select the SMB tab and click on the Edit icon for the share.
-
Click the Browsable check box so that it displays a check mark, and then click Update.
 Figure 10. Making the SMB alias browsable or not browsable
| The browsable checkbox has three states: Inherited, checked, and unchecked. If the browsable checkbox is solid blue, the share is already browsable; however, you can still make this SMB alias not browsable within the otherwise browsable share. |
Using the Admin CLI
The browsable option can also be configured using the share-update command.
share-update --name <share-name> --smb-browsable-<on|off>Setting Aliases for SMB
SMB aliases can be used to configure additional SMB shares on the system. Typically, the SMB alias is a sub-folder of an existing share, but it can also represent the entire share with a different SMB name. An SMB Alias does not have its own ACL or permissions; it will have the same ACL as either the directory it is pointing to or of the root of the share if it is pointing to /.
To add an SMB alias, open the Edit Share workflow and navigate to the SMB tab. Click on Add Alias and fill in the required details.
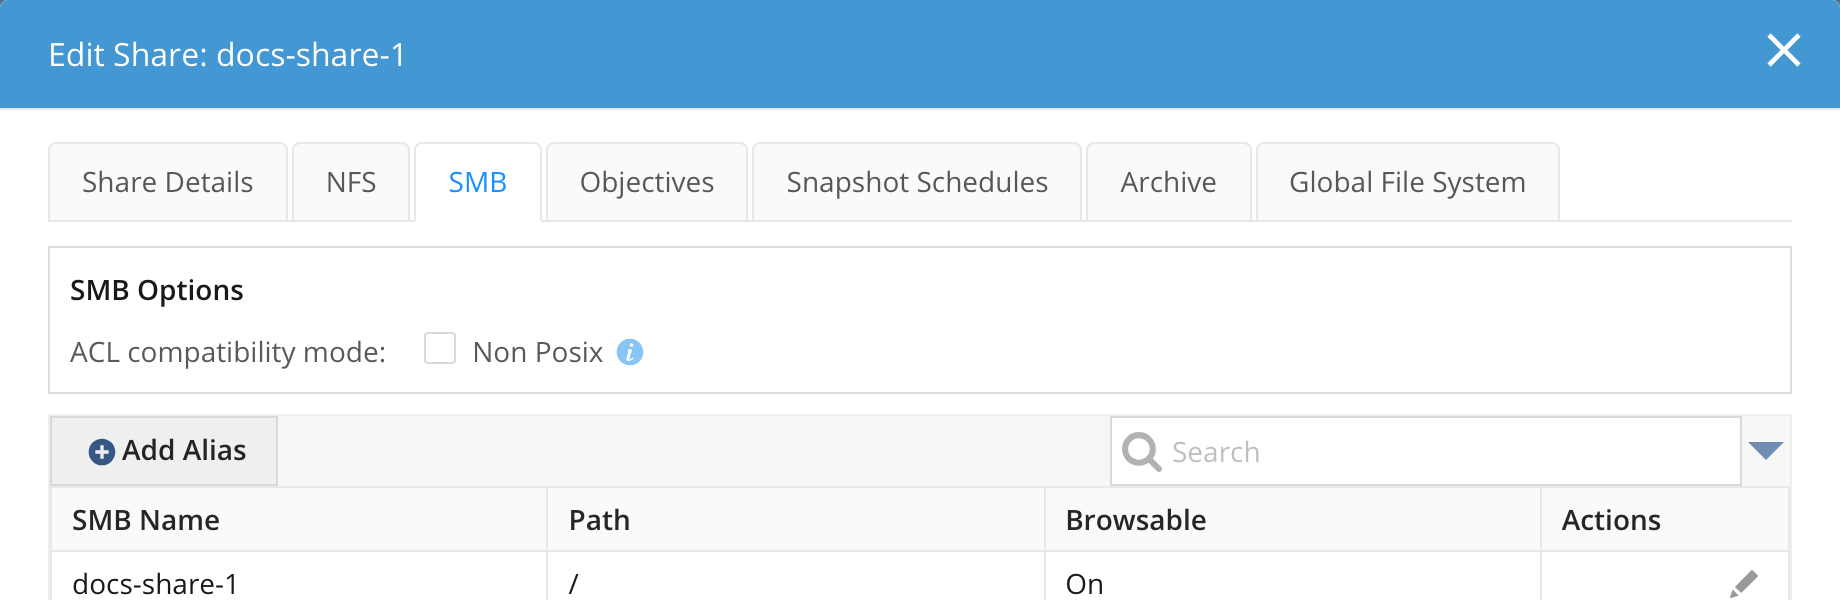
You can manage SMB aliases using the Admin CLI. After a share is created, share-update can be used to add, update, remove, and clear aliases.
share-update --smb-alias <SMB name>,<PATH within the share>share-update --smb-alias-clearAdding Aliases to an Existing Share
You can use the share-update command to add or remove aliases on an existing share using the
--smb-alias, --smb-alias-add, --smb-alias-delete, and --smb-alias-clear options.
-
Start by creating a share:
share-create --name Prod --path /prodWhen browsing the SMB endpoint, the single share is displayed:
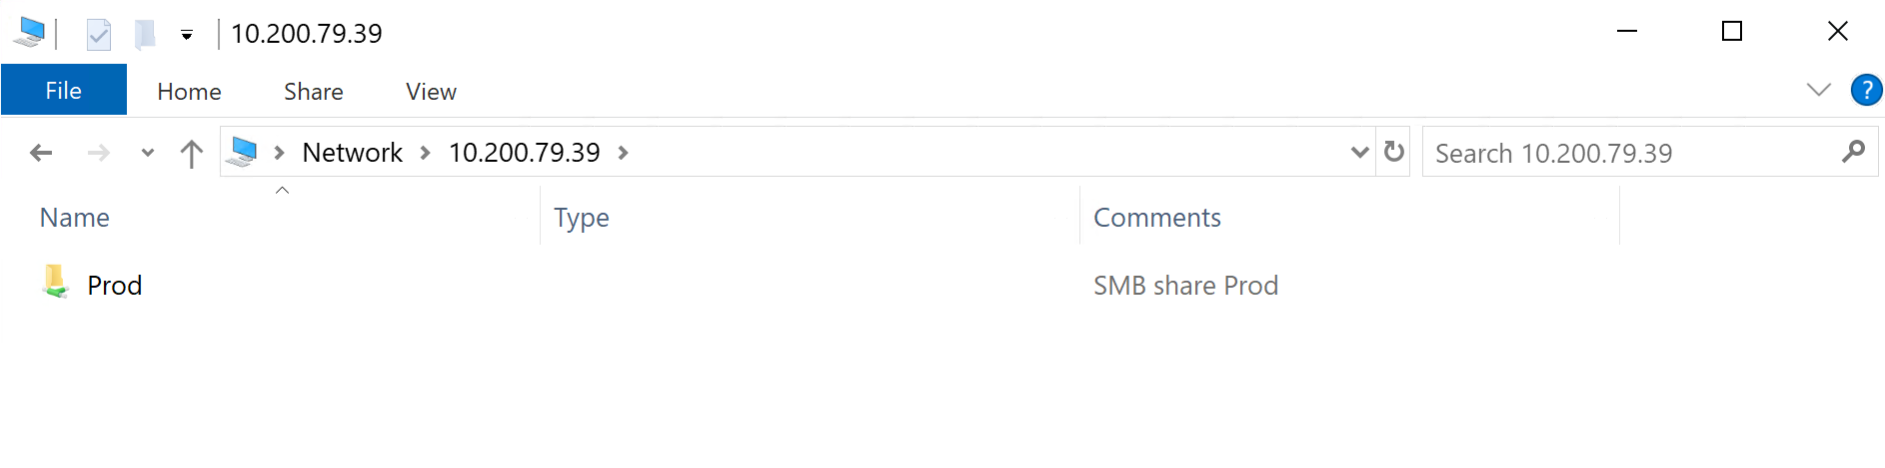 Figure 12. SMB endpoint displaying a single share
 -
Now create additional SMB aliases using the
share-update --smb-aliasoption. SMB clients can mount these aliases directly. The following examples point back to the root of the share:-
Create two additional SMB shares by specifying the option twice:
share-update --name Prod --path /prod --smb-alias Production,/ --smb-alias ProdStuff,/When browsing the SMB endpoint, you can see that the two additional shares have been created:
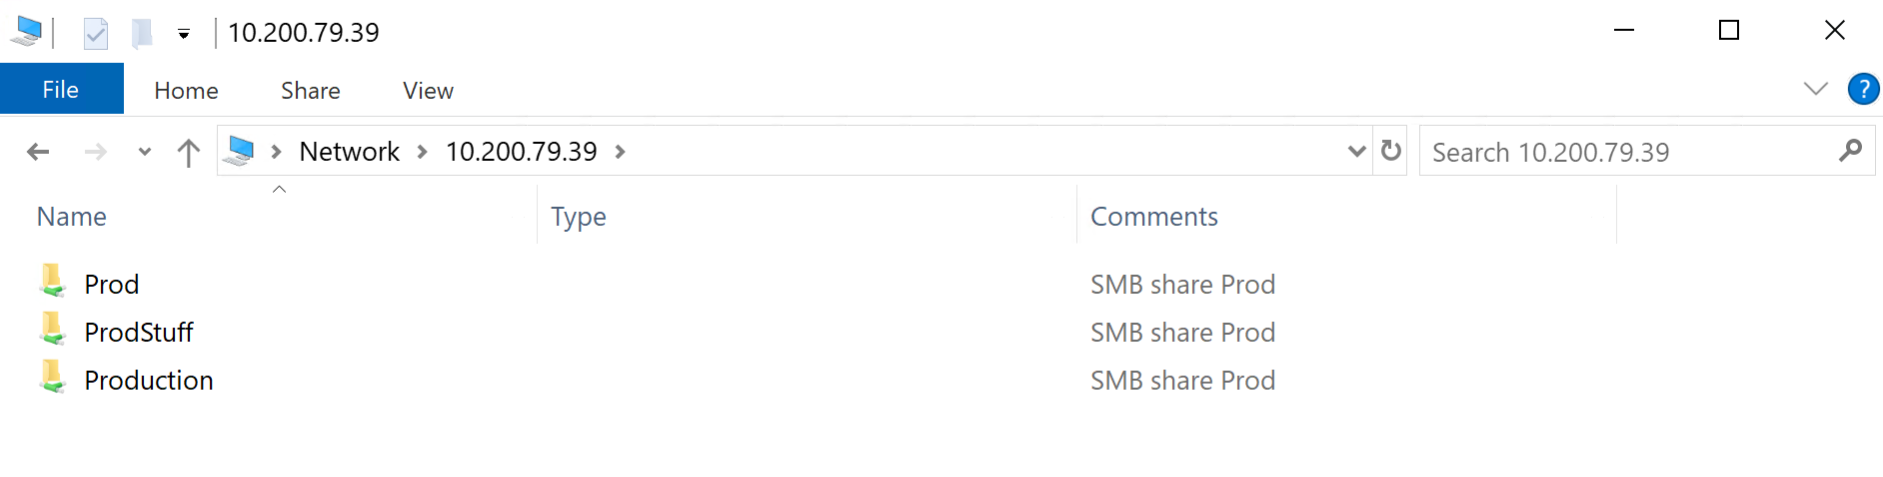 Figure 13. Shares visible in an SMB endpoint
 -
Optionally, to add an SMB endpoint with spaces, enclose the information using quotation marks,
" ". The same applies when using spaces in the path:share-update --name Prod --path /prod --smb-alias "My Prod Data,/"When browsing the SMB endpoint, you can see that the SMB endpoint with spaces has been created:
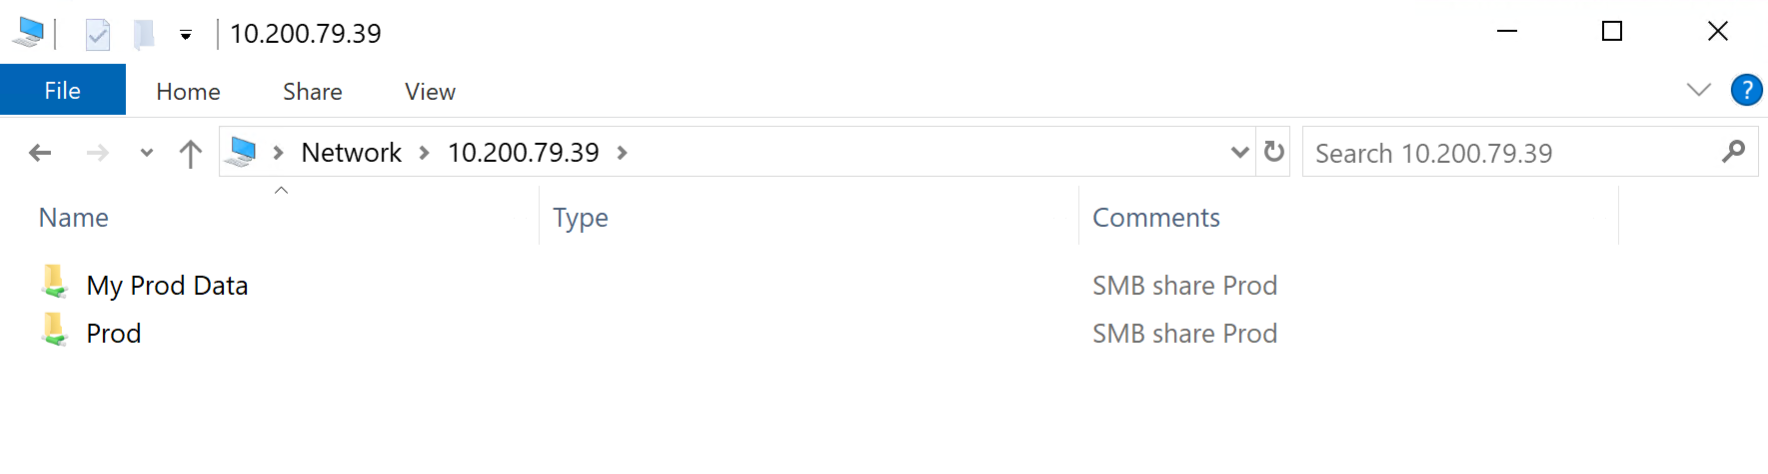 Figure 14. Share names with spaces
-
-
You can also specify a path within the share. Note that all paths used must be created in advance; otherwise, the
share-updatecommand will fail.The following command adds three SMB endpoints to an existing share, each pointing to a different subdirectory within the share.
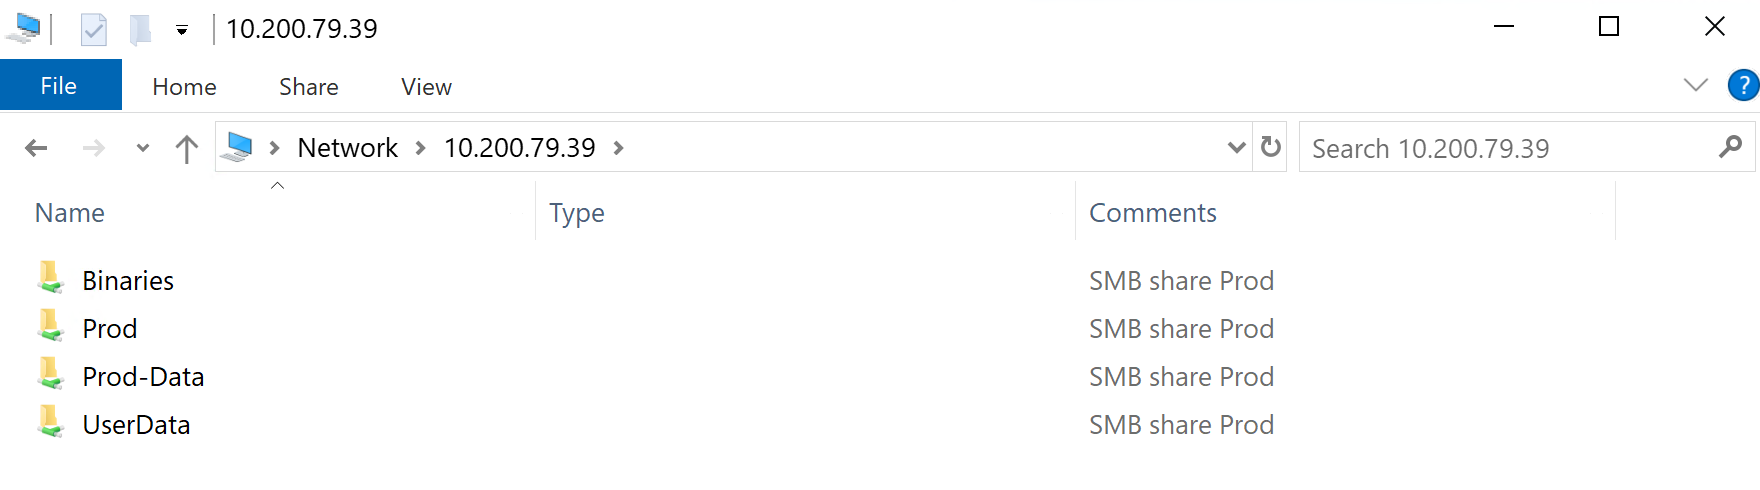
share-update --name Prod --smb-alias Prod-Data,/data --smb-alias Binaries,/bin --smb-alias UserData,/space/userdataAll paths start with a forward slash ( /). This is a relative reference within the share, since/is the root of the share itself.
When browsing the SMB endpoint, you can see that all the endpoints have been created:
Listing SMB Aliases
Use share-list to list SMB aliases for a share.
share-list --name <share name>If a share has an alias configured, there will be a new field called SMB Aliases with all the entries specified for that share. Each entry is separated by a space.
Removing Aliases
All SMB aliases can be removed by using the share-update command with the --smb-alias-delete option. Note that this will disconnect users who are using the SMB endpoint being deleted.
Deleting an SMB alias will not delete the share itself, nor will it delete any data or folders associated with it.
share-update --share-name Prod --smb-alias-delete Prod-DataTo remove all aliases for a share, execute smb-alias-clear without any options.
| This will disconnect users who are using those SMB endpoints and should be used with caution. |
share-update --share-name Prod --smb-alias-clearAdditional Details
-
SMB alias names must be unique in the system; the same SMB alias cannot be used for other shares within the same cluster.
-
SMB aliases do not support share ACLs as they are not shares themselves. If the alias is pointing to the root of the share, then it will have the same share ACL as the share itself.
-
SMB aliases are not replicated or created on remote sites when configuring a global file system. If your goal is to have the same SMB aliases on other sites, they must be added manually using the
share-updatecommand. -
A maximum of 100 SMB aliases can be created per share.
-
The maximum SMB alias length is the same as the maximum length of an SMB share name.
-
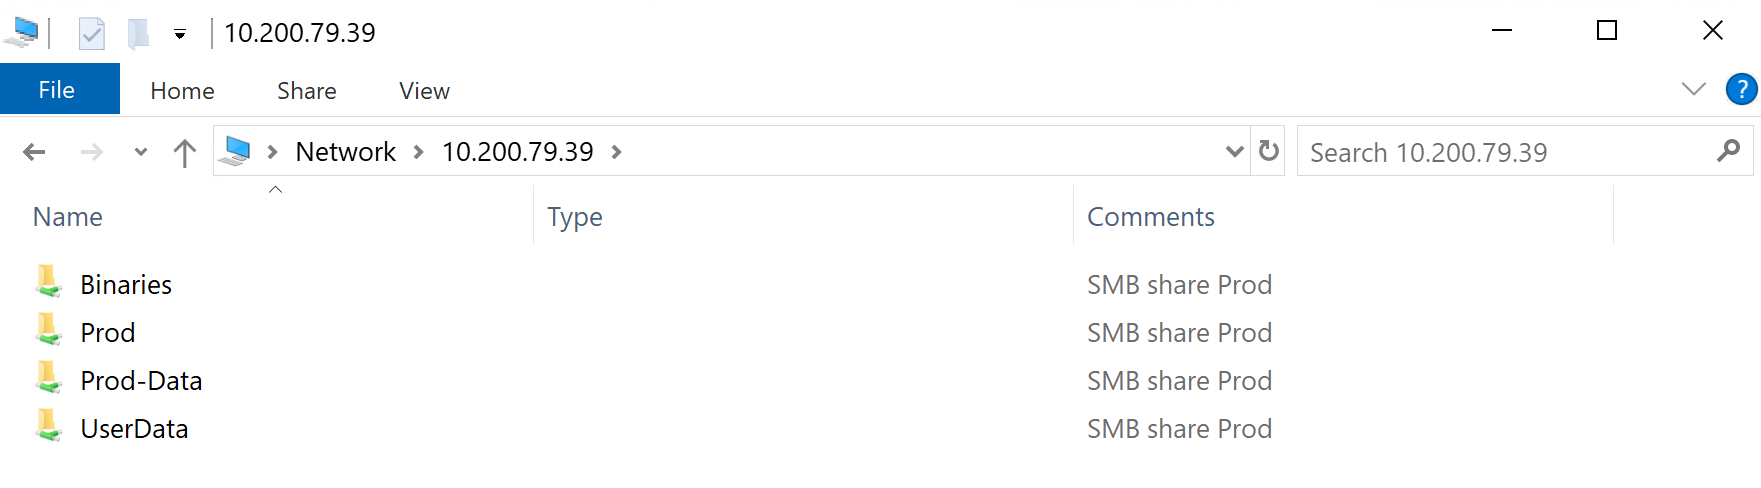
$indicates it is a hidden share. When creating an alias ending with a$sign, the share will not be visible when browsing the SMB endpoint. The following example adds a hidden SMB share to the existing list:share-update --name Prod --smb-alias --smb-alias-add HiddenProd$,/
When viewing the share from the SMB endpoint, the hidden SMB share is not visible:
However, it can be mounted by specifying the name directly:

Allowing Access-Based Enumeration
Access-based Enumeration (ABE) allows for files and folders to be hidden when users do not have list or read permissions to access the objects. Proper management and care must be taken to ensure that inheritance does not unintentionally open or lock down directories deep within the share.
ABE can be enabled at the share/directory and file-granular levels using objectives. The access-based-enumeration objective is pre-created and can be applied easily through the GUI.
The objective can be applied at the share level, with applicability, meaning it cannot be removed further down in the share.
| If the goal is to enforce ABE for all folders and files in an entire share, it is always recommended to use a share-level objective and applicability. |
ABE can also be applied using regular objective expressions at any level within the share. It can be applied at the file level or a sub-directory level, using either the management interface (UI/CLI) or the hstk toolkit.
ABE is also applicable across protocols. When user mapping is properly configured, an NFS mount is also subject to the same ABE behavior. Users without read permission on NFS will not be able to see the folders or files.
When applying the ABE objective, it is also necessary to use the do-not-cache objective. Otherwise, caching on the DSX node may occasionally defeat the ABE functionality.
|
Enabling ABE for an Entire Share Using the GUI
-
In the Management GUI, navigate to the share listing and press the edit icon for the share.
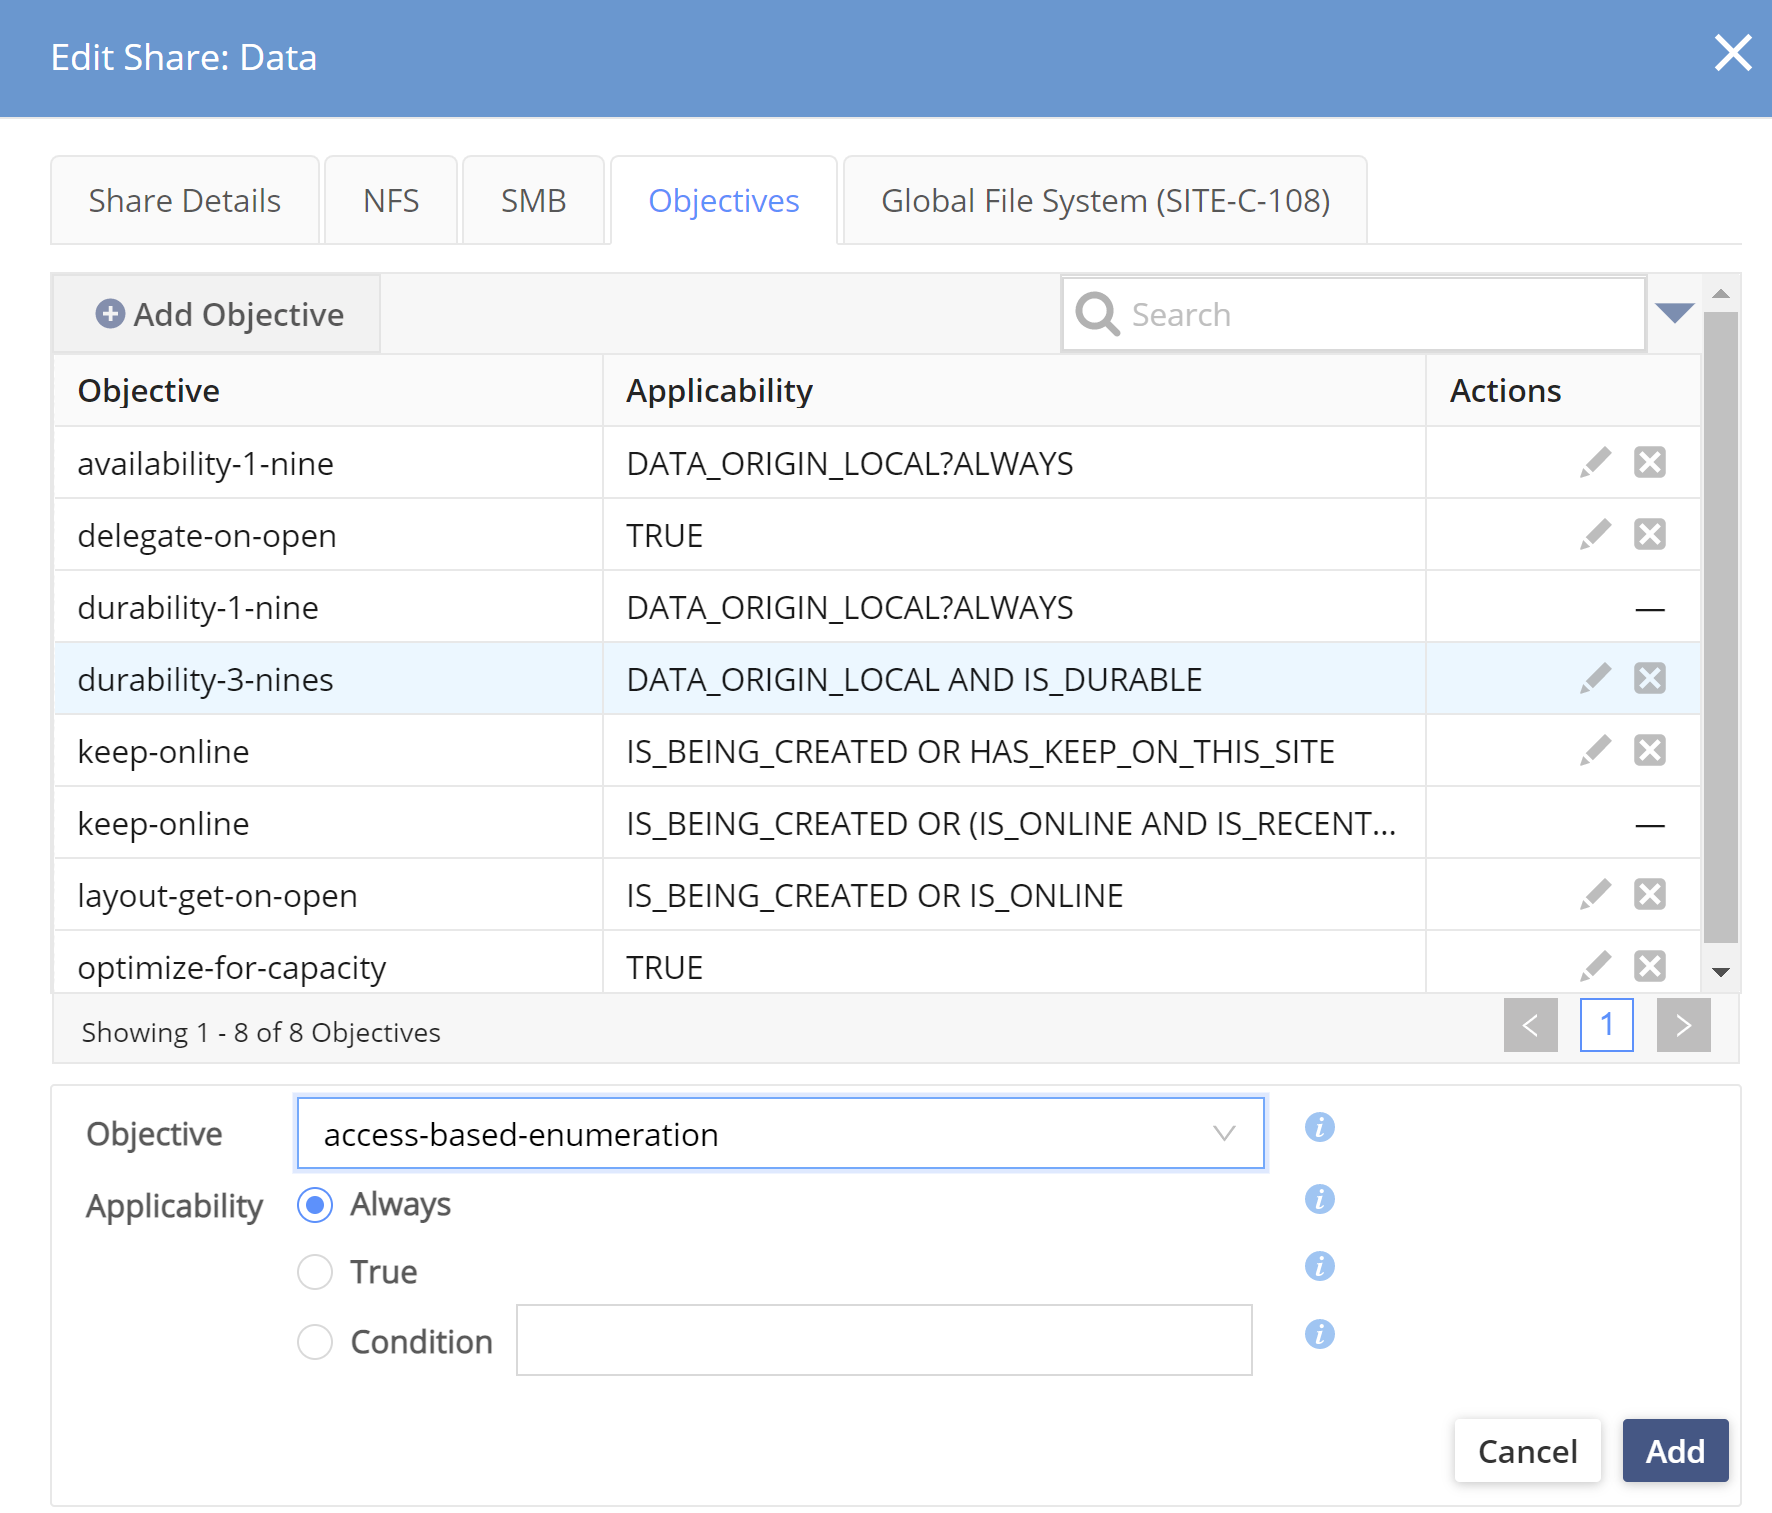 Figure 18. Share-level objective for access-based enumeration (ABE)
Click Add Objective under the Objectives tab. Just like any objective in the system, it can be added using a selection mechanism or to all the data. Always ensures that it cannot be disabled farther down in the share while True could be over-ruled by other objectives within the share.
Enabling ABE for a Sub-folder Using the GUI
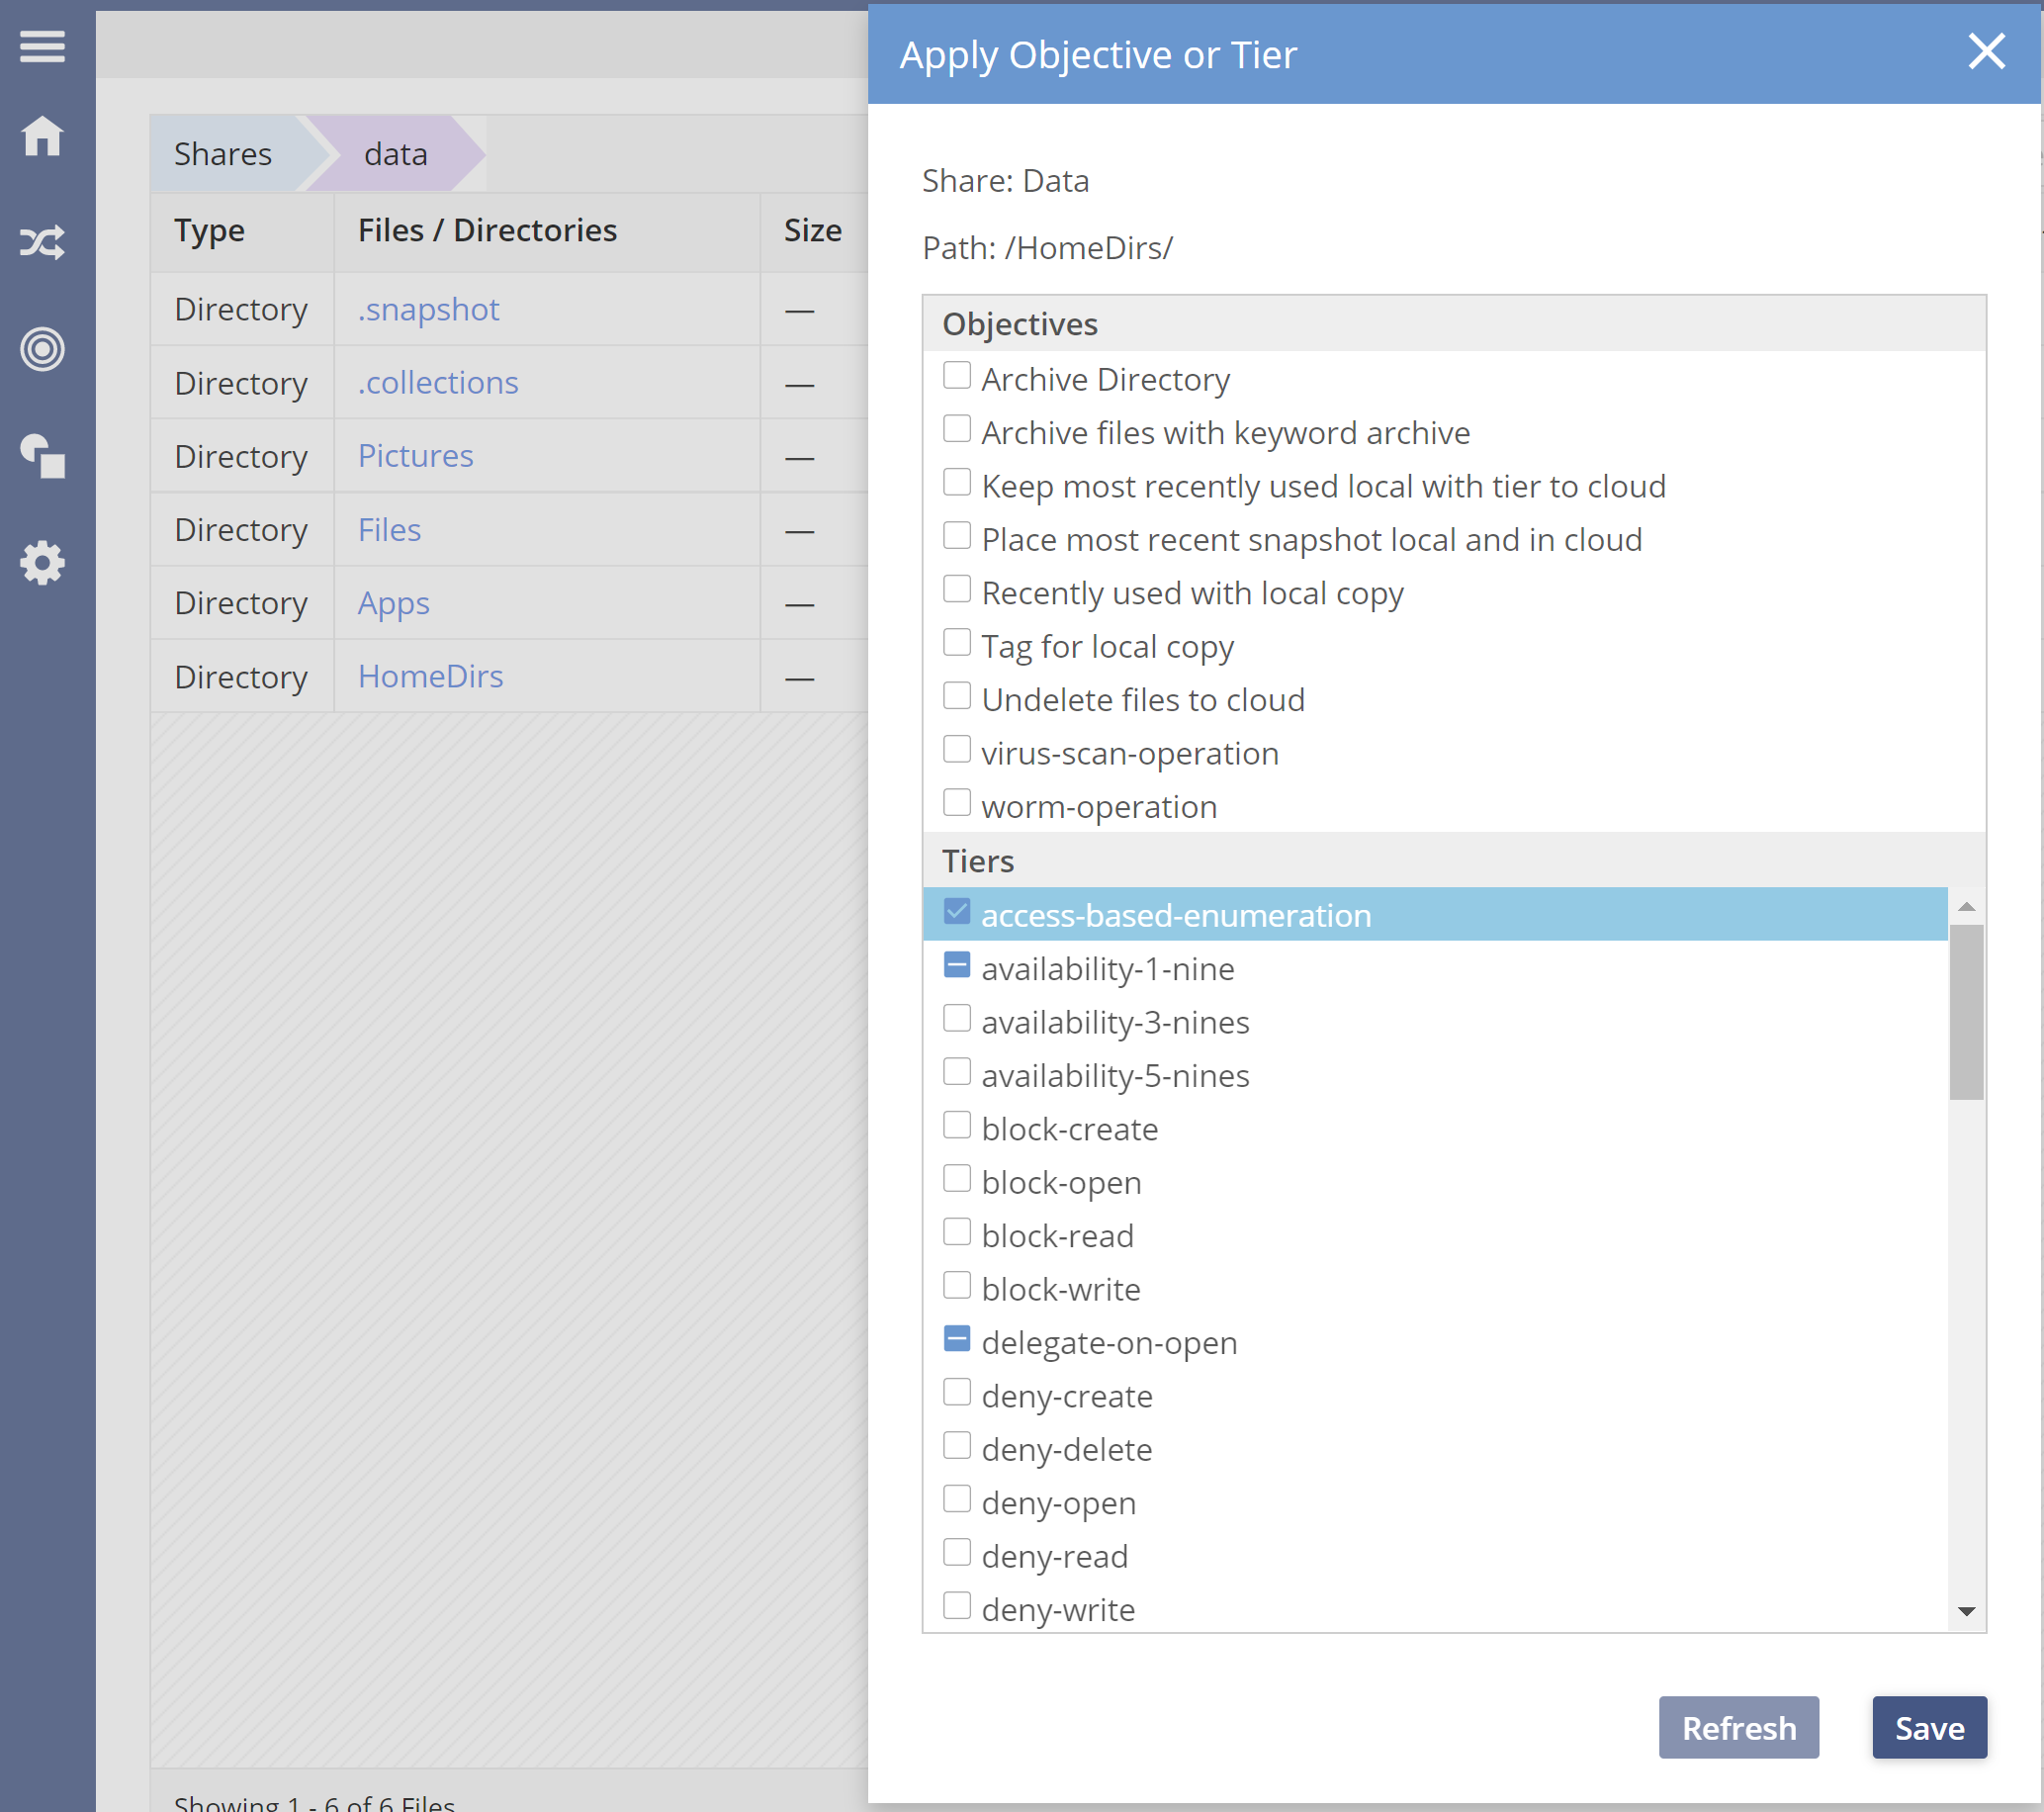
Navigate to the file browser in the GUI and select the folder to apply the access-based-enumeration objective. Note that if this is configured on existing data, it may take some time to be effective. The time depends on how many files are pre-existing in the sub-directory where the objective is applied.
Enabling ABE Using Objective Expressions
It is also possible to enable ABE using an expression as part of the objective. You can do this with the Hammerspace toolkit (hstk) in the Admin CLI.
This example uses the hstk utility (from a Linux or Windows client) to enable ABE when a file or folder has the label “hidemyfile” within the sub-directory HomeDirs. This enables users to enable ABE without requesting that an administrator enable it for the entire share.
# hs objective add -e 'HAS_LABEL(\"hidemyfile\")' access-based-enumeration HomeDirs/Using the Administrators Group
The purpose of the built-in Administrators group is to give a set of administrators elevated privileges to configure or fix issues with permissions.
When joined to Active Directory, the group Domain Admins is automatically added to the built-in group.
Individual users or other groups can be added to the Administrators group and receive the same privileges as Domain Admins. This should be done with caution.
Viewing Existing Members of the Administrators Group
builtin-group-user-list --group Administrators

Domain Admins
Adding a New Group to the Administrators Group
Command:
builtin-group-user-add --group Administrators --username PMHSADMINS@a.pm.testExpected output:
successAdding an Individual User to the Administrators Group
Command:
builtin-group-user-add --group Administrators --username pmuser10@a.pm.testExpected output:
successRemoving Members of the Administrators Group
Note that @<domain> must be added to the group or username; otherwise, it will not be found.
Command:
builtin-group-user-remove --group Administrators --username pmuser10@a.pm.testExpected output:
successWindows Previous Versions
The following capabilities are enabled when using Windows Previous Versions:
-
Users can self-service data recovery using Windows Previous Versions functionality. Hammerspace will display snapshots, versioning, undelete, and log-xfer files as versions in a file.
-
Users can right-click on a file or folder and restore or navigate to a previous point in time.
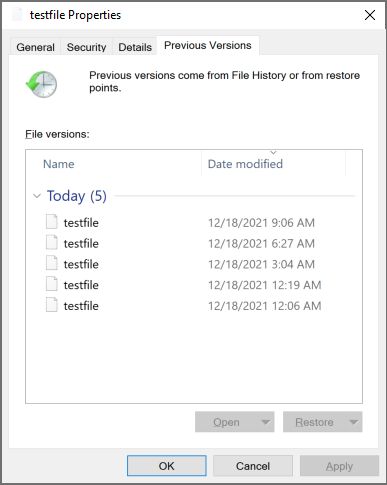 Figure 20. Windows file properties: Previous Versions tab
| It is not recommended to restore the entire share using Windows Previous Versions as it will take longer than using the built-in Product functionality of share-restore. For very large restore operations, it is recommended to use the Product interface for faster recovery. |
Using Microsoft Management Console
Microsoft Management Console (MMC) can be used to manage functionality using native Windows tools. It allows customers to manage common operations directly from their Windows workstations.
The following operations are supported with MMC:
-
Manage (change and view) share level permissions
-
View open files
-
Close open files
-
View sessions
-
Close sessions
Managing Share-Level Permissions
Hammerspace recommends using Microsoft management tools to view or change the share-level permissions on shares.
The default permissions of a share are set to allow everyone to read and write to the share. It is recommended that this be configured to meet the customer’s best practices.
Using the Microsoft Management Console to Set Share Permissions
-
Open up MMC on a Windows client and Add or Remove .
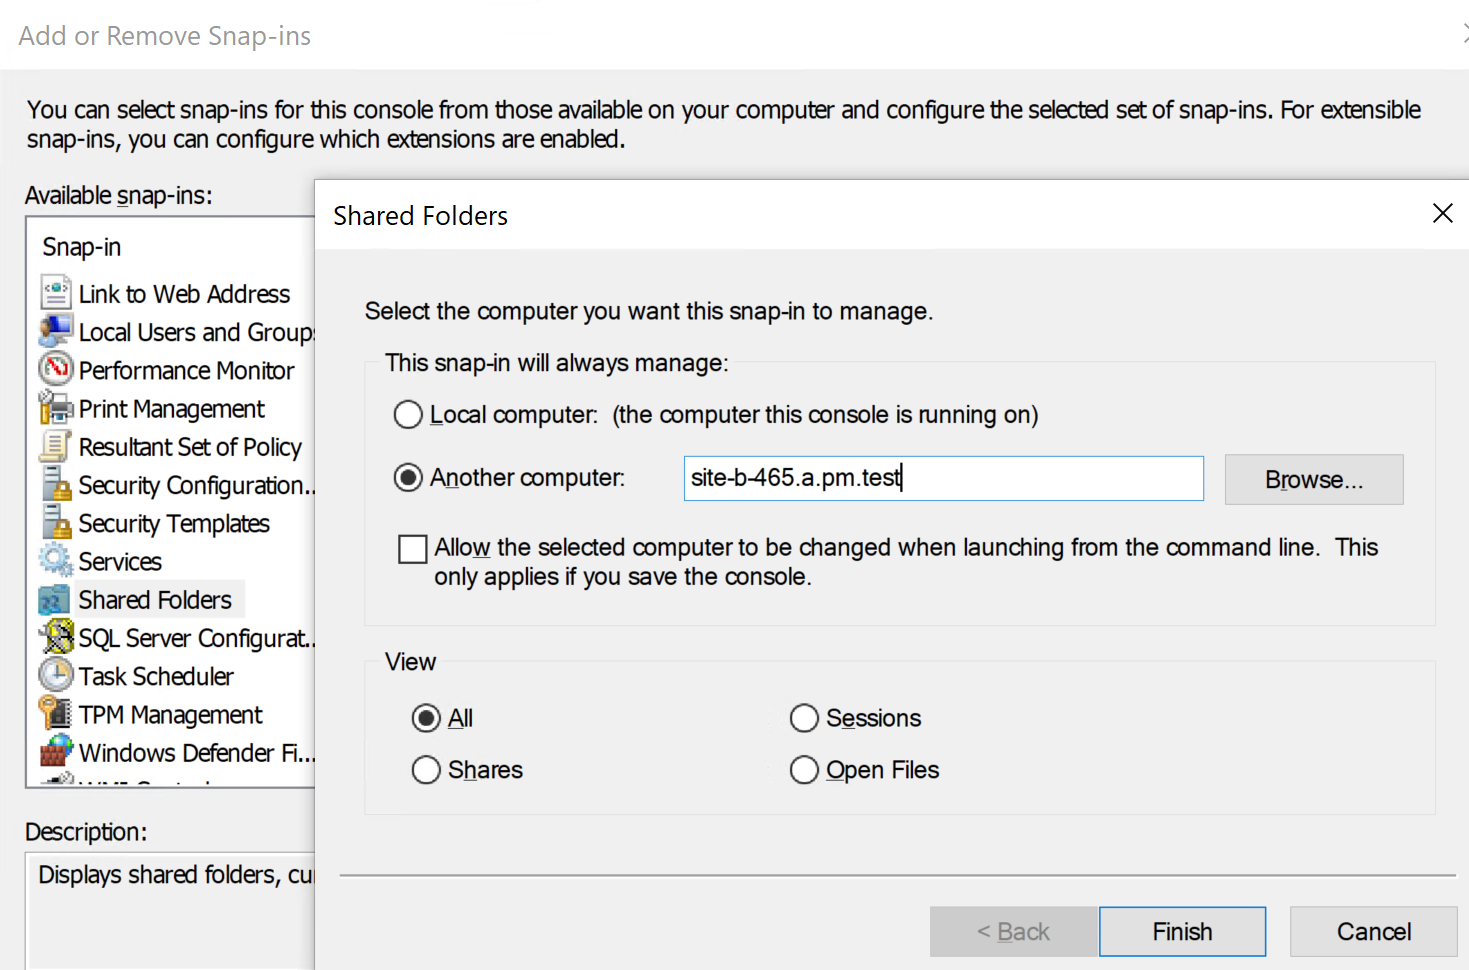 Figure 21. Connect to SMB server name (FQDN)
 -
Type in the FQDN of the DNS-registered endpoint for the SMB server name.
-
Once connected, expand to see the shares.
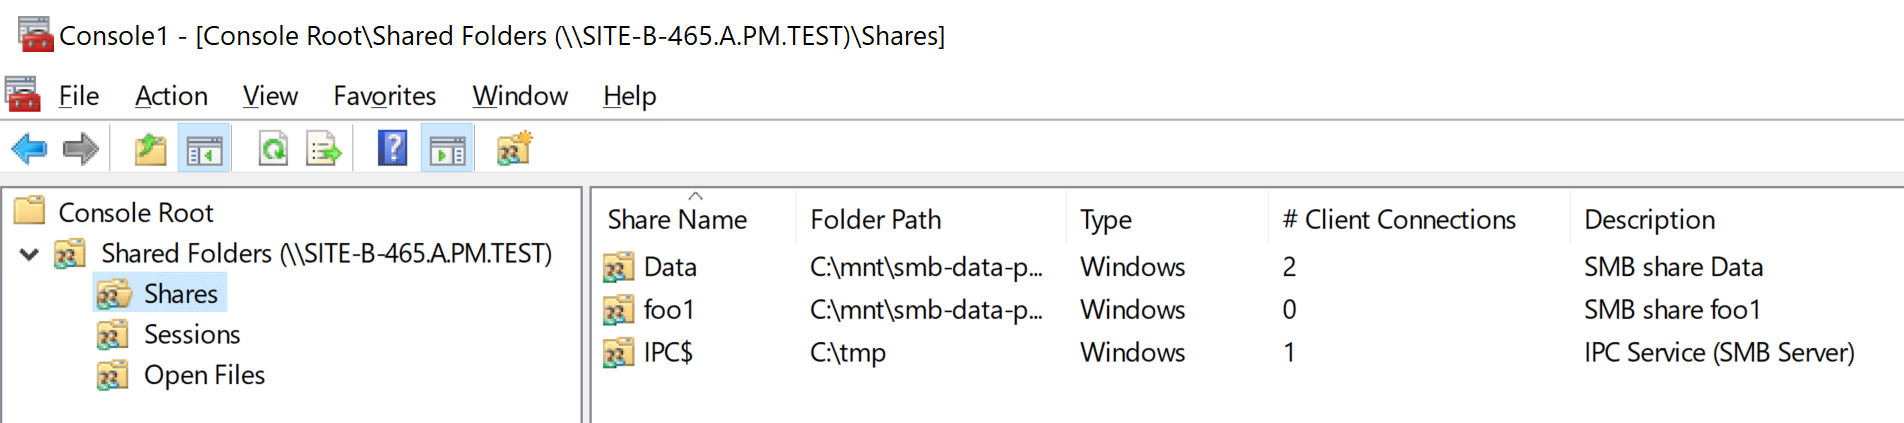 Figure 22. Share listing in Microsoft Management Console (MMC)
 -
Right-click on the share and select tab.
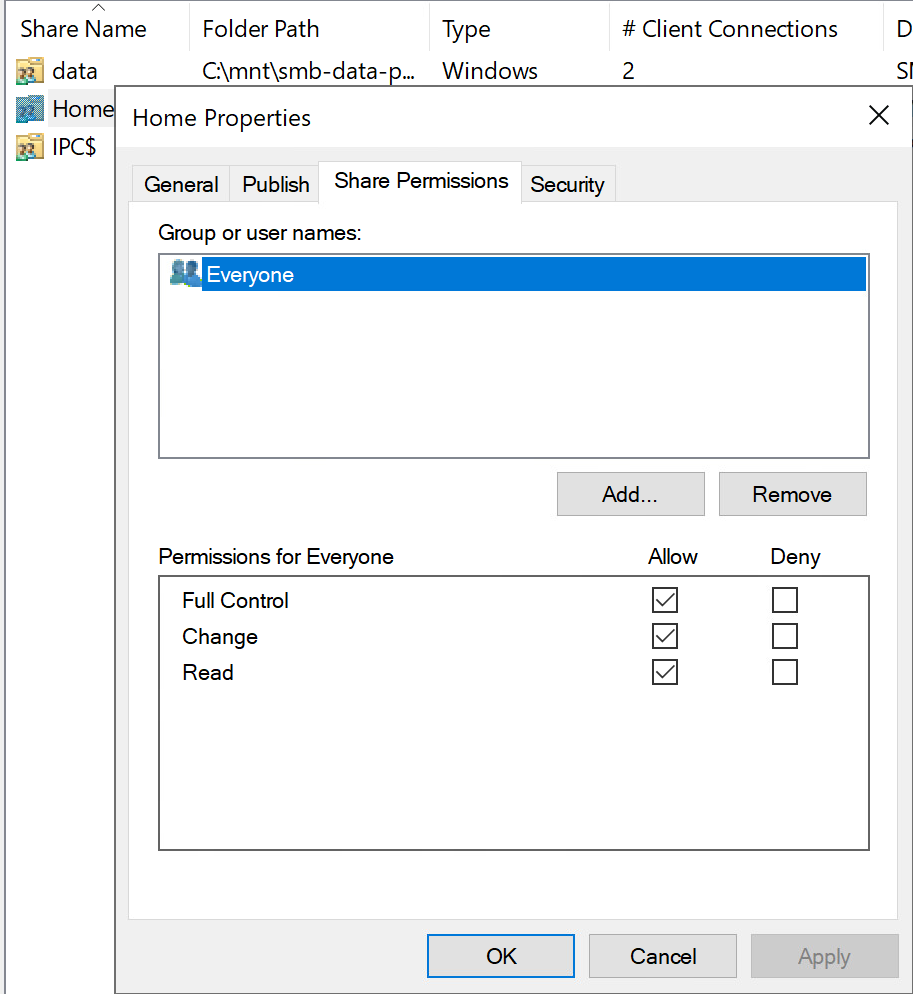 Figure 23. Share permissions
 -
The default permissions are open for everyone. Configure the settings according to desired best practices.
Viewing and Closing Files
At times, it may be required to help resolve client issues by closing open files. This can be done directly from the MMC.
-
Open the MMC on a Windows client and under File, select Add/Remove Snap-in.
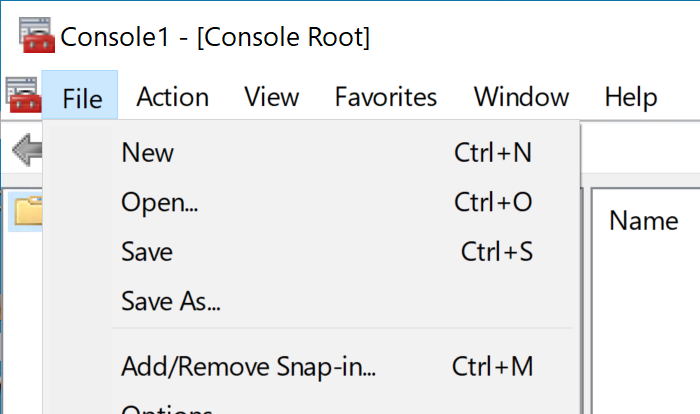 Figure 24. Location of Add/Remove Snap-in control
 -
Type in the hostname of the DNS-registered DSX endpoint or the IP address of one of the DSX nodes.
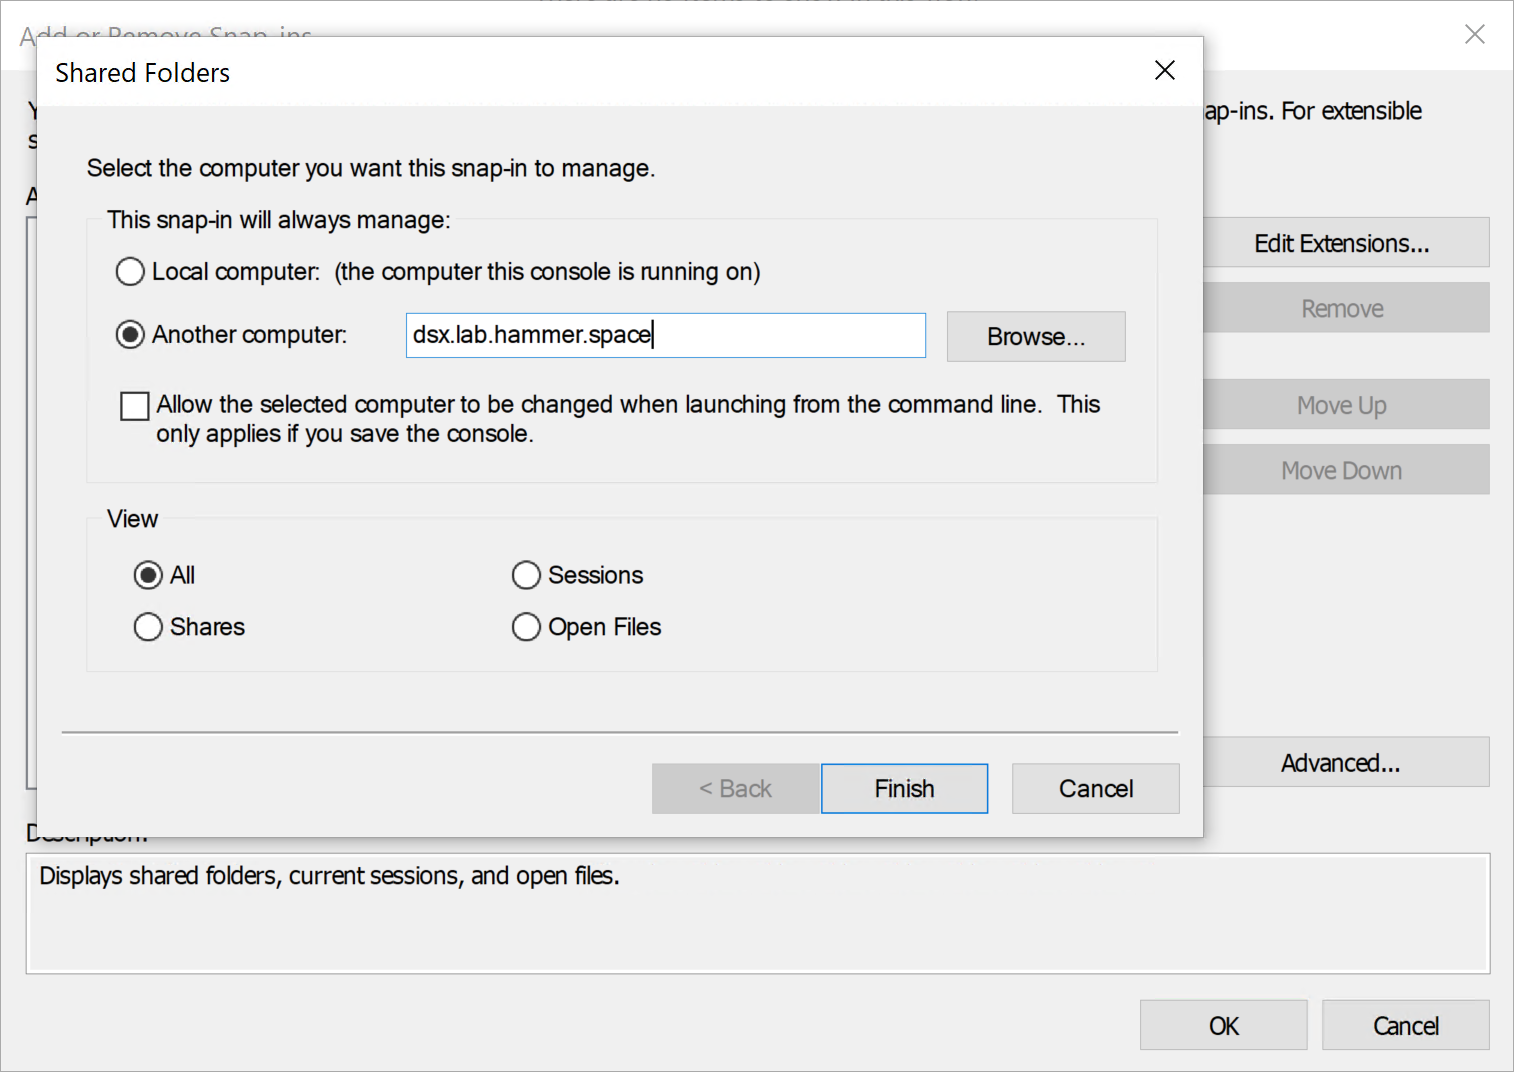 Figure 25. Associating Snap-in with the DSX node
 -
Once connected, expand to view which files are currently open. The example below highlights a file currently open.
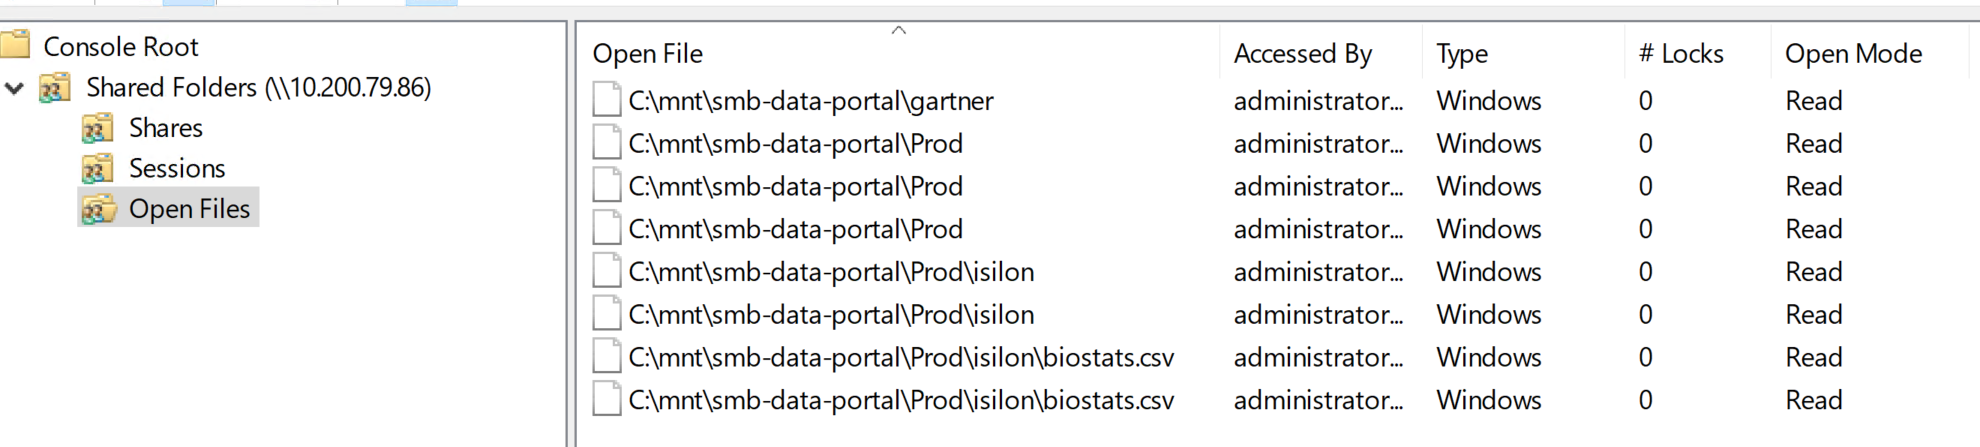 Figure 26. Viewing open files
 -
Right-click on the file and select Close Open File to close the file.
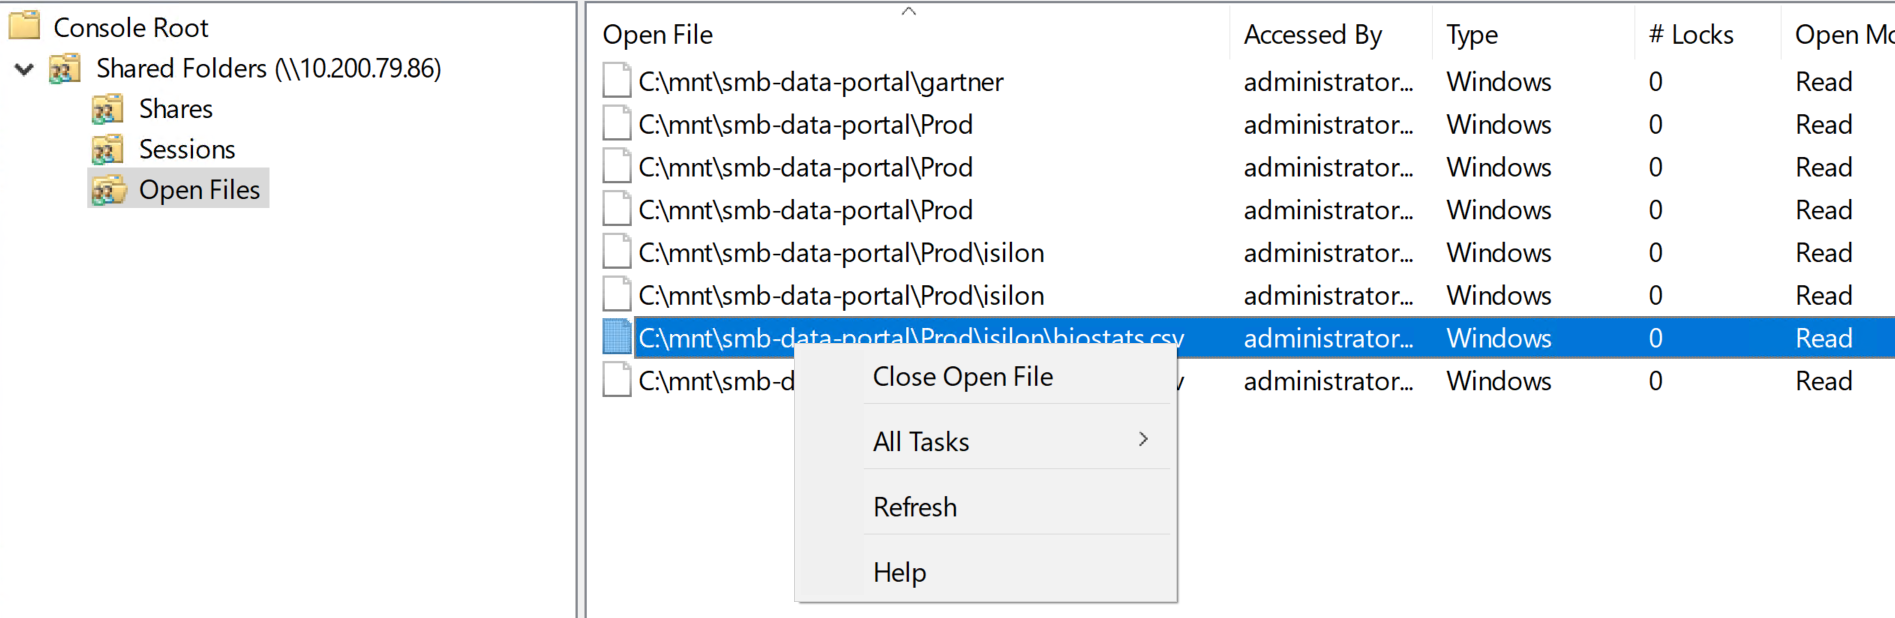 Figure 27. Closing an open file
Viewing and Closing Sessions
At times, it may be necessary to assist in resolving client issues by closing their sessions. This can be done directly from the MMC.
-
Follow the instructions in Viewing Open Files to connect to Hammerspace.
-
Once connected, expand to see the clients that are currently connected.
 Figure 28. Viewing open sessions
 -
Right-click on a session and select Close Session to close the session.
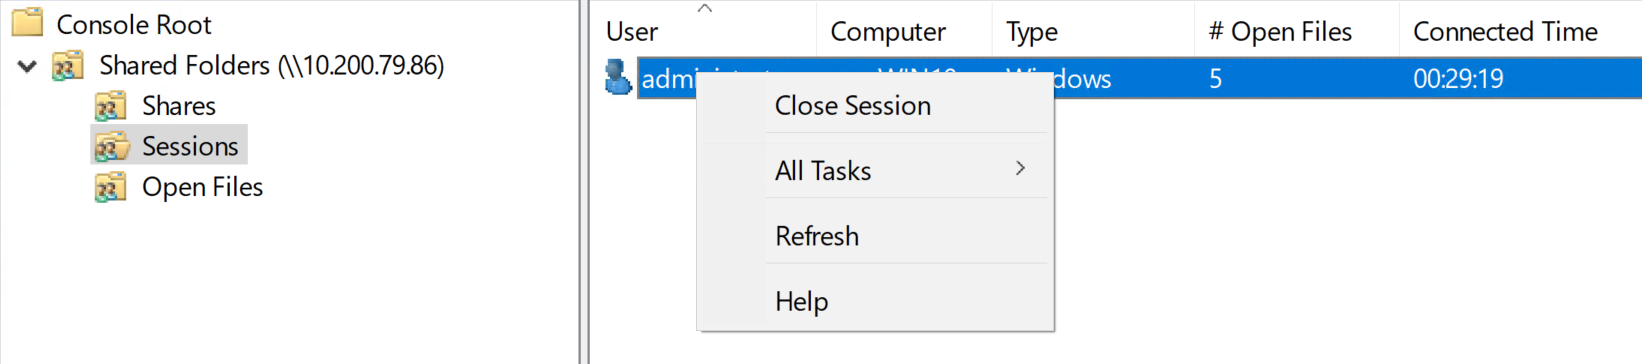 Figure 29. Closing an open session